Have you ever stepped into your storage shed and immediately felt a sense of overwhelm? Maybe you were looking for that specific trowel or a box of seasonal decorations, only to find yourself maneuvering around piles of clutter and half-empty bags of potting soil. It is a common problem, but one with a surprisingly achievable solution. The image you see here is not just a picture of a well-organized shed; it is a blueprint for a more efficient, stress-free life. Organization is not just about making things look pretty; it is about creating a system that works for you, and your storage shed is the perfect place to start. Let us dive deep into the visual elements of this inspiring space and extract the practical strategies you can implement in your own shed to finally reclaim that valuable space.
Deconstructing the Organized Shed: The Key Elements
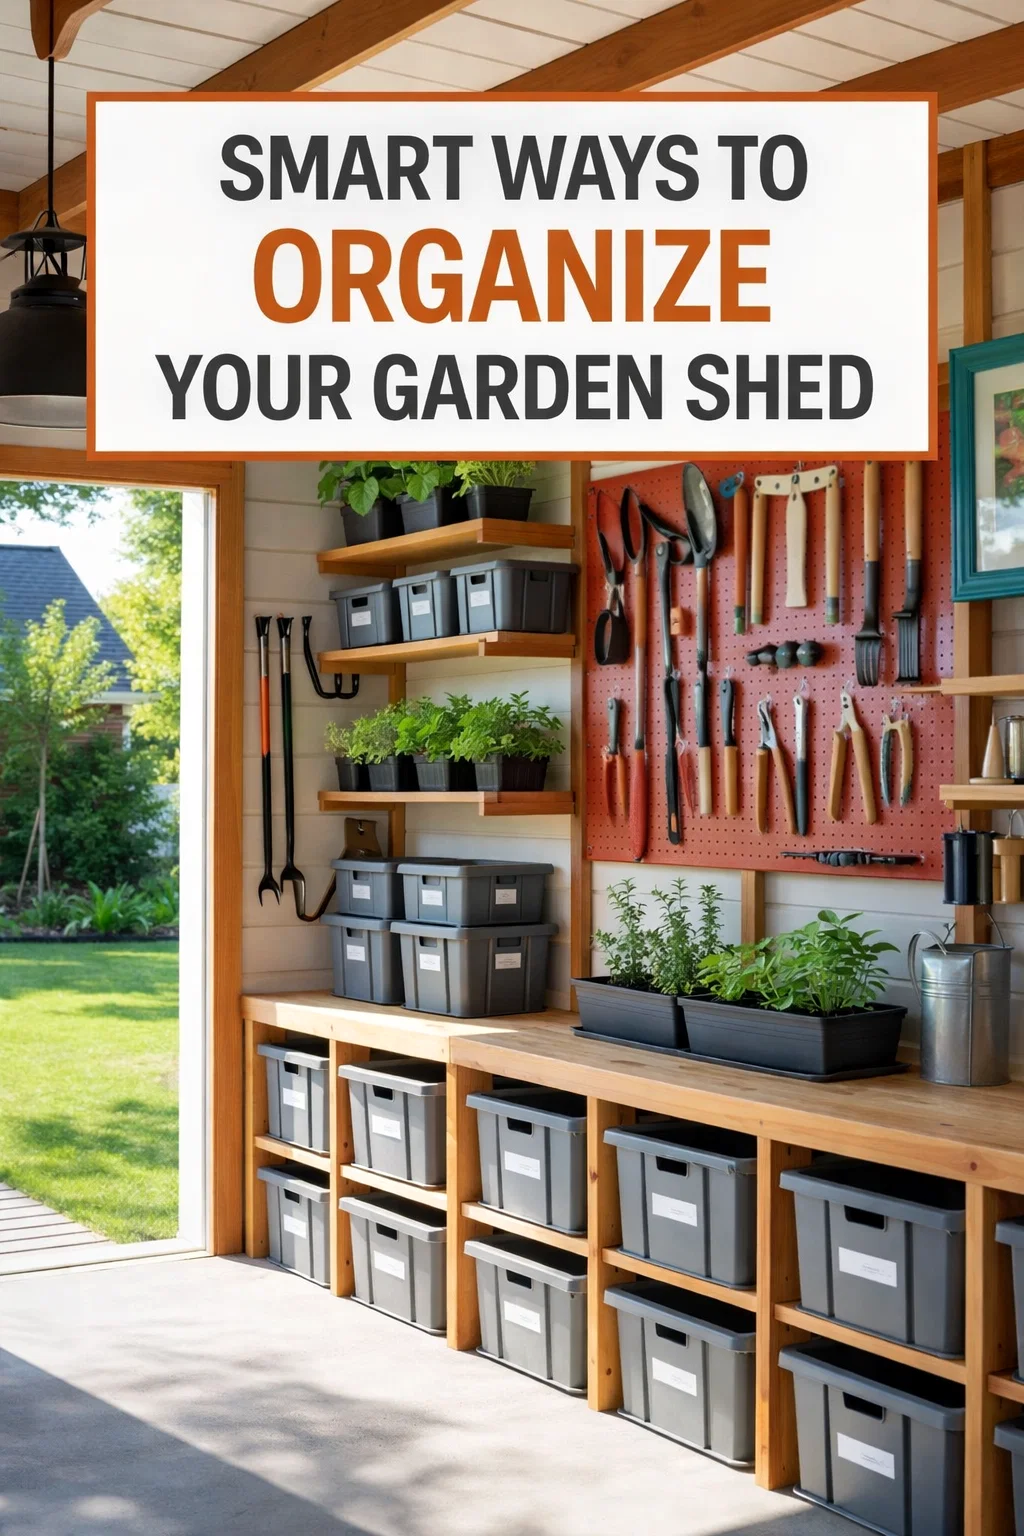
When you first look at this image, you might notice the overall sense of clean lines and purposeful design. But if you look closer, you will see a deliberate layering of organization systems. The foundation of this successful space is built upon three main principles: effective shelving, clever wall storage, and clear categorization. These are not complex concepts, yet when applied correctly, they work wonders. The combination of open shelving for easy access to frequently used items, designated storage for smaller tools, and sturdy bins for larger or seasonal items creates a cohesive and functional workspace. This image proves that organization does not have to be expensive or overly engineered; it just needs to be intentional.
The Power of Effective Shelving Systems
One of the most prominent features in this organized shed is the use of tiered wooden shelving. These are not flimsy, pre-fab units; they are sturdy, built-in shelves that maximize vertical space. This is a crucial element for any small storage area. By utilizing the height of the walls, you effectively double or even triple your usable storage space. Notice how the shelves are arranged. Smaller, potted plants and commonly used items sit at eye level, while larger storage containers are neatly stacked below. This vertical stacking of heavy-duty bins is a game-changer. It keeps the floor clear, reducing trip hazards and making the shed feel significantly larger. When you are planning your own shelving, think about what you need to store and build accordingly. Adjustability is key; as your needs change, your shelving should be able to adapt. The wooden construction in the image not only provides strength but also adds a warm, inviting feel to the shed.
Maximizing Utility with Pegboards and Tool Storage
Moving from the shelves to the walls, we see another vital organizational tool: the pegboard. The vibrant orange color chosen for this pegboard is not just an aesthetic decision; it makes the tools stand out, helping you to quickly identify what you need. Pegboards are incredibly versatile and relatively inexpensive. They allow you to turn any flat surface into customizable storage. Instead of having a tangled drawer of tools, each item has a specific spot. Notice the variety of hooks used: long hooks for wrenches, smaller loops for screwdrivers and pliers, and even specialized holders for tape rolls. This level of granular organization prevents the frustration of diggin through a messy toolbox. Additionally, there are other clever wall-mounted solutions. For instance, notice the racks for holding long-handled tools. Keeping rakes and shovels off the floor is not only safer but also frees up significant floor space. These simple, wall-mounted racks are often overlooked but are essential for a well-functioning shed.
The Magic of Containerization and Labeling
A central tenet of the organization system shown in the image is the extensive use of sturdy, gray storage bins. These are not random containers from around the house; they are a coordinated set, which significantly contributes to the visually pleasing and orderly look. But beyond aesthetics, using uniform bins offers several practical benefits. They stack neatly, maximize shelf space, and can be easily moved or reorganized as needed. Crucially, each of these bins is clearly labeled. While the specific labels in the image might be simple, like “Wrenches” or “Pliers,” the act of labeling is what truly brings the system together. It removes the guesswork. You know exactly what is in each bin without having to open and rummage. This simple step saves precious time and effort. When choosing containers, look for durable, high-quality plastic or even sturdy wood boxes. The goal is long-term organization, so investing in good containers will pay off.
Taking Your Shed Beyond Just Storage
An often-overlooked aspect of shed design is its potential to be more than just a dumping ground for tools and seasonal items. With the right planning, it can become a functional workspace or even a serene hobby haven. The shed in the image does this brilliantly by including a sturdy wooden workbench that spans the length of the main wall. This transforms the space from simple storage into a dedicated creation and repair center.
The Ultimate Practical Addition: The Workbench
This workbench is not just a surface; it is an active zone of productivity. The sturdy wooden top provides an excellent surface for tasks like potting plants, repairing a broken tool, or assembling a small project. The height is perfect for comfortable standing or using a stool. Below the workbench, more storage bins are neatly tucked away, ensuring that the work surface remains clear and uncluttered. If you are building or updating a shed, a solid workbench should be high on your priority list. It provides a focal point for the space and dramatically increases its utility. Make sure to choose a material like the thick wood top seen in the image, as it can withstand wear and tear better than particle board or thinner plywood.
Adding Life and Personality: Plants and Natural Light
What sets this shed apart from others is the clever addition of life and natural elements. The presence of potted plants on the open shelves and in larger planters on the workbench adds a touch of freshness and color that instantly makes the space feel more inviting. They not only look beautiful but also improve air quality and create a calming atmosphere. Furthermore, the inclusion of natural light from a window or skylight, which is evident from the bright, even lighting in the image, is a crucial detail. Natural light makes the space safer, more pleasant to work in, and visually expands the area. If your shed is dark and cramped, consider adding a window, a clear roof panel, or better artificial lighting. These simple changes can make a world of difference in how you feel when you step into your shed.
A Step-by-Step Guide to Achieving Shed Zen
Feeling inspired? Good! You can absolutely achieve this level of organization in your own shed. While you might not be able to transform it overnight, you can make significant progress with a few dedicated weekends. Here is a step-by-step guide to help you transition from chaos to calm.
Phase 1: The Great Empty-Out
The first and perhaps most daunting step is to completely empty the shed. Yes, every single item must come out. This is the only way to truly assess the space and the things you own. Lay everything out on the lawn or driveway where you can see it all clearly. This step is crucial for clearing the slate and mentally preparing for the task ahead.
Phase 2: The Ruthless Purge
Once everything is out, it is time for the hardest part: decluttering. Be ruthless! Create four piles: Keep, Donate, Recycle, and Trash. If you haven’t used an item in over a year and it holds no sentimental value, chances are you will not use it again. Dispose of old chemicals safely, recycle broken plastics, and donate usable items. The fewer things you have, the easier they will be to organize.
Phase 3: Clean and Maintain
With the shed empty, take the opportunity to clean the floors, sweep out the spiderwebs, and check for any pests or structural issues. Consider a fresh coat of paint. In the image, the light-colored walls make the space feel bright and clean. Painting the interior walls or adding durable flooring can make the entire shed more inviting.
Phase 4: Planning and Zoning
Before putting anything back, take some measurements and create a zone plan. Decide where your workbench will go, where you will install shelving, and where long-handled tools will be stored. Create logical “zones” for different activities. For example, have a gardening zone with soil and pots near the workbench, and a tool zone around a pegboard.
Phase 5: The Build and Installation
Now, install your chosen organization systems. Whether you are building heavy-duty shelves, installing a pre-fab workbench, or mounting pegboards, this is the phase where you physically construct the framework for your organized space. Pay attention to structural integrity, especially for heavy items.
Phase 6: The Thoughtful Re-population
This is the fun part! Start bringing your “Keep” pile back inside, placing items into their designated zones. As you do this, group like items together and place them in the appropriate containers. Think about frequency of use; store items you use daily within easy reach, and seasonal or rarely used items on higher shelves.
Phase 7: The Final Touch – Labeling
Once everything is in its place, the final and most critical step is to label everything. A label maker or simple handwritten tags will work, but clear, durable labels are best. This one simple step will ensure your system stays organized for the long haul. Without labels, people are tempted to just put things wherever they fit, and chaos will slowly return.
Reaping the Long-Term Benefits of an Organized Shed
Taking the time to organize your shed is not just about having a neat space; it is an investment that pays off in many different ways. The most immediate benefit is time. No more hours wasted searching for tools or supplies; you will know exactly where everything is. Secondly, it saves you money. How many times have you bought a second hammer or bottle of plant food because you could not find the first one? An organized shed prevents redundant purchases. Perhaps most importantly, it significantly reduces stress. Walking into a clutter-free, orderly space instills a sense of calm and control, making your home and hobby life much more enjoyable.
Ultimately, the beautiful shed in this image is an inspiration to us all. It reminds us that any space, no matter how functional, can also be a source of beauty and calm with a little intentional planning and effort. Reclaiming your shed is an achievable goal, and the reward is a space that truly works for you, giving you back your time, money, and piece of mind. So why not start planning your shed transformation today? Your future, stress-free self will thank you for it.