Welcome to a project that will instantly elevate your garden’s charm and provide a vital resource for your local wildlife: a DIY bird bath! There is something immensely satisfying about watching colorful birds splash and preen in your backyard, knowing you created that inviting space yourself. The best part? You do not need an expensive, heavy concrete pedestal to achieve this. With a little creativity and a quick trip to the local dollar store, you can craft beautiful, functional, and completely unique bird baths on a strict budget. The collage above perfectly captures four distinct approaches to this popular garden project, proving that a stunning result is often just a matter of reimagining everyday items. Let’s dive into how you can make your garden a feathered friend oasis.
Why Your Garden Needs a Bird Bath right now
A bird bath is more than just a decorative accent, although it certainly adds a lot of character to any landscape. It is a fundamental element in creating a wildlife-friendly habitat. Birds need clean water just as much as they need seeds, especially during hot summers or dry spells. For many species, a bird bath serves as a crucial oasis in an urban or suburban environment where natural water sources might be scarce or polluted. By providing this simple amenity, you are offering a safe haven for hydration and hygiene. Birds take dust baths to clean their feathers of parasites, but a good water splash is essential for maintaining feather health and keeping cool.
Beyond the obvious benefits for the birds, you, the gardener, will also see the rewards. A bird bath acts like a natural entertainment hub. Once birds discover your consistent water source, you will be treated to delightful displays of nature. Watching robins, sparrows, finches, and perhaps even rarer local species bathe and socialize can become a peaceful morning ritual, providing a perfect excuse to slow down and connect with the natural world right from your window or patio.
Dollar Store DIY: The Magic of Repurposing
This post is dedicated to making a big impact on a small budget. The world of dollar store DIY is vast, and bird baths are a prime candidate for this approach. The premise is simple: look at inexpensive, mass-produced items through a creative lens. In the dollar store, you are looking for potential, not perfection. A decorative bowl isn’t just a bowl; it’s a potential basin. A stylish vase is more than just home decor; it’s the perfect pedestal waiting to happen.
This approach has numerous advantages. First and foremost, it keeps your costs very low. You can often assemble a full bird bath for less than the cost of a couple of high-end coffees. This low financial barrier means you can afford to experiment. If your first design doesn’t turn out quite how you imagined, or if you decide you want multiple styles for different areas of your yard, it’s not a significant investment. Furthermore, you are giving a second life to items that might otherwise sit on a shelf. Upcycling is a form of environmental stewardship, reducing waste one project at a time.
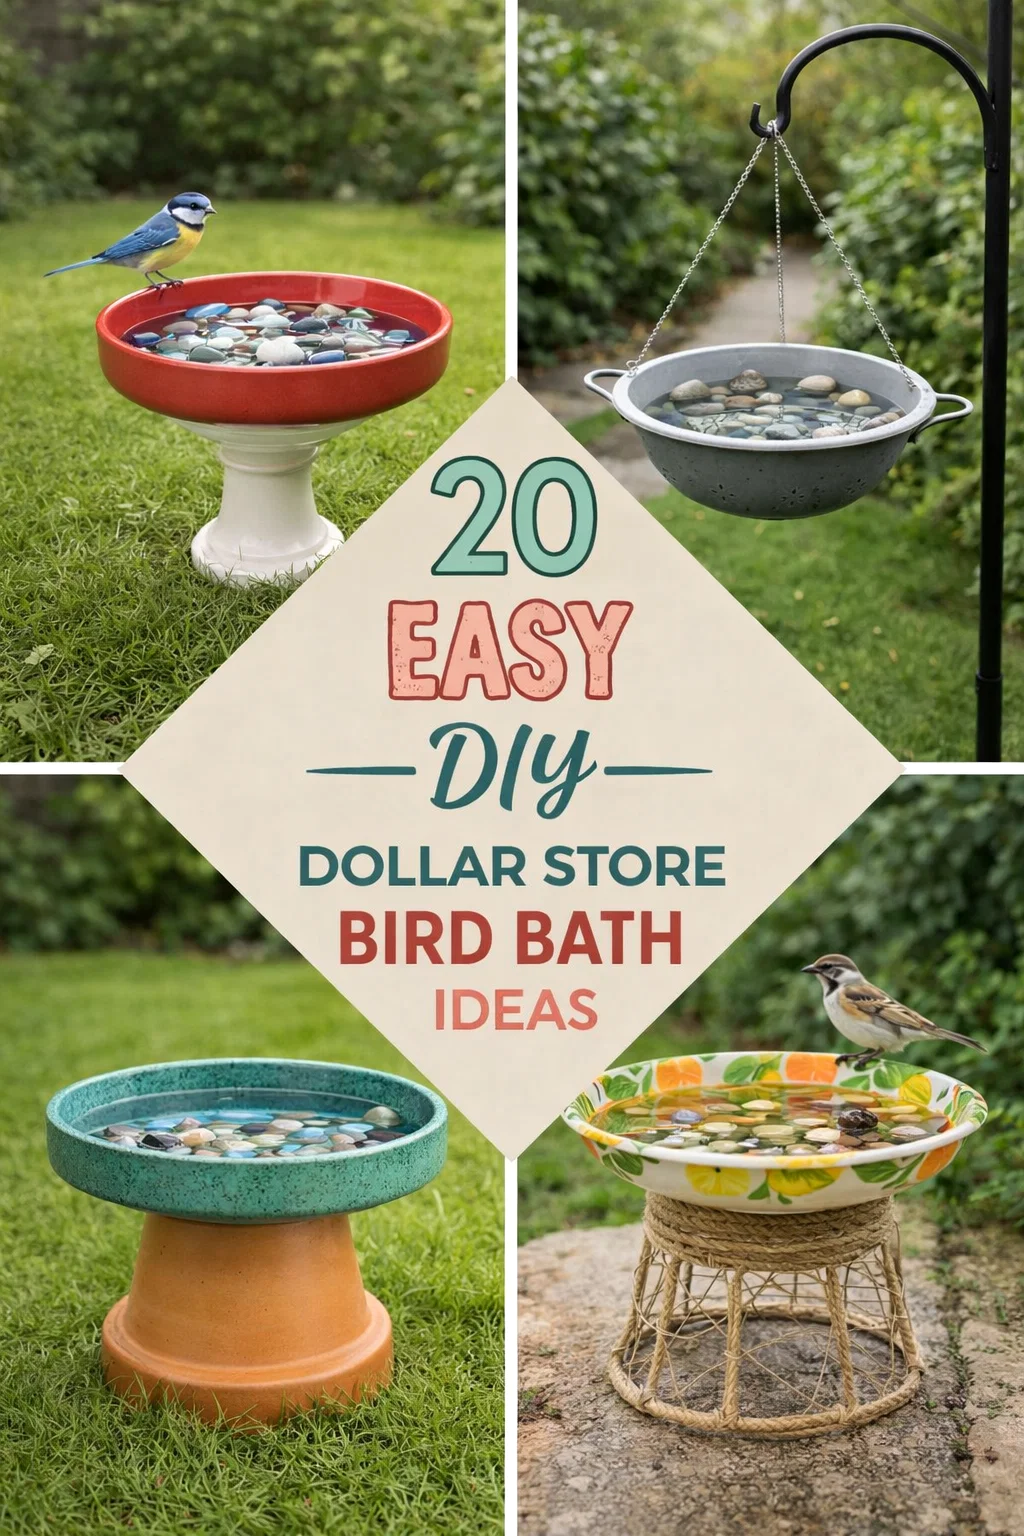
Decoding the Image: Four Inspiration Pieces
The image collage providing our inspiration showcases four distinct and beautiful ways to execute a dollar store bird bath. Let’s break them down to understand the core concept of each. Each quadrant represents a different combination of items and a unique final “feel.” This is your menu of choices, or perhaps a blueprint you can adapt.
Project 1: The Upcycled Hanging Colander (Top Left)
This is arguably the most ingenious and unexpected idea of the group. Who would have thought to turn a common kitchen tool into a bird bath? It uses a standard metal or stainless steel colander (which you can definitely find at many dollar-type stores, even if they aren’t strictly “dollar” price points). A thin liner (the grey material) is placed inside to create a shallow water pool, and simple metal chains are attached to the handles to transform it into a hanging fixture. This design is fantastic because it gets the bird bath up off the ground, safe from cats, and utilizes existing structures like a large tree branch. It’s perfect for smaller spaces or yards where you want to add a vertical interest. It also speaks to a cozy, slightly rustic farmhouse aesthetic.
Project 2: The Textured Shallow Basin on a Post (Top Right)
Here we see a classic pedestal-style bath but made with affordable parts. The basin is a decorative, shallow plate or bowl featuring a vibrant pattern, which is great for visibility. Inside, it’s filled with smooth river stones. This is a critical detail. Birds are hesitant to use water that is too deep; they prefer to wade in. The stones create varied depths and offer secure footholds, ensuring they feel safe. This specific bath is set upon a simple wooden post, showing how you can merge a few crafted pieces with existing garden structures or materials on hand. The overall look is playful and natural.
Project 3: The Elegant Stacking Bath (Bottom Left)
This version looks surprisingly upscale and is a masterclass in combining unrelated items. It uses a base with a beautiful, intricate blue and white pattern (perhaps a ceramic vase or a decorative pillar from a dollar store’s home goods section). Resting securely on top is a simple, wide-rimmed white bowl as the basin. This combination creates a striking and classic visual reminiscent of high-end ceramic work. It’s a perfect example of how choosing complementary dollar store items can result in something far greater than the sum of its parts. This bath is set directly in the grass, making it accessible to ground-feeding birds like sparrows or robins.
Project 4: The Painted & Patterned Centerpiece (Bottom Right)
In the final corner, we have a very colorful and stylized approach. The base is an inverted bowl (perhaps painted to create the specific leaf and berry pattern), and the basin is a matching patterned plate, both with a lovely nature motif. This design shows how you can use inexpensive tableware or serving platters in a creative way. The matching set creates a cohesive and vibrant garden centerpiece. Like with Project 2, river stones are added to the basin, ensuring safety and accessibility. This is a great project for using paint to customize the look, perhaps matching your bath to existing patio furniture or garden colors.
Step-by-Step Guide: Crafting Your Own Dollar Store Bird Bath
Now that you are inspired by the collage, let’s walk through the generalized steps to create your own. The process is remarkably straightforward, but the choices you make along the way will dictate your final, one-of-a-kind result. Get ready for a small project with a huge reward.
Step 1: The Shopping and Salvaging Expedition
This is the fun part! Head to your favorite dollar store or thrift shop with the sole purpose of finding potential pedestals and basins. Remember to keep an open mind. A potential base could be a tall ceramic or sturdy plastic vase, a sturdy lamp base (with the wiring removed), or even a set of large, nesting serving bowls (Project 4). The basin is usually easier: look for large serving plates, shallow pasta bowls, plastic plant saucers, or even a wide-rimmed pizza pan. The key is to find a set that sits well together and is proportional.
Don’t forget the extras. A small bag of smooth decorative river rocks is a must for the birds’ safety. If you plan to stack items that don’t sit perfectly flat, consider getting strong outdoor-rated adhesive. A multi-purpose construction adhesive often works well, just be sure to let it cure fully before adding water.
Step 2: Dry Fitting and Assembly
Once you have your items home, find a flat surface to test your assembly. Experiment with different combinations to see which stack looks best and is most stable. If you are doing a stacking bath, ensure the base is very stable and will not easily tip over in the wind. For some designs, like the blue and white one, the bowl may rest perfectly securely without glue, which makes for easier cleaning. However, if there’s any instability or you have playful pets, a few dabs of heavy-duty adhesive will provide peace of mind. Let any glue dry according to the manufacturer’s instructions. If you chose a hanging colander, attach your chains and determine the hanging height.
Step 3: Finding the Perfect Garden Home
Placement is paramount for a successful bird bath. You want it somewhere you can easily view it from the house, but birds are cautious. The best location is a partially shaded area where birds can see approaching predators, like cats. Ideally, place the bath near a deciduous tree or dense shrub. This provides them with a ready-made escape route and a comfortable perching spot to dry off and groom after their bath. Avoid placing the bath in complete, open sun, as the water can quickly become too hot and will evaporate rapidly. Also, keep the bath away from low-hanging branches where a cat might hide and pounce.
Step 4: Customization with River Rocks and Features
Remember the river rocks? Now is their time to shine. Place a layer of smooth, clean stones or pebbles in the bottom of your basin. Aim for a water depth of no more than one to two inches in the shallowest areas. The stones will not only provide necessary grip and safety but also add to the bath’s visual appeal. You might also add a single, larger, flatter rock for them to land on before stepping into the water. For an extra touch of luxury, consider a solar-powered fountain pump. A small fountain can add movement and the sound of trickling water, which is incredibly enticing to birds and helps keep the water aerated.
Maintenance and Cleaning: Keeping Your Oasis Sparkling
Creating your bird bath is only the first step. To ensure it remains a healthy resource for wildlife, you must commit to a simple but regular maintenance routine. Stagnant, dirty water can quickly become a breeding ground for bacteria, diseases, and mosquitoes, which are harmful to the birds. Clean your bird bath basin thoroughly at least every few days, and even daily during peak summer months. If you notice a film of algae or dirt forming, give it a good scrubbing with a stiff-bristled brush. Avoid using harsh chemical cleaners, as any residue can be toxic to the birds. Instead, a solution of one part vinegar to nine parts water is a safe and effective sanitizer.
Fill the basin with fresh, cool water after each cleaning. If you are leaving for a few days, consider emptying the bath or asking a neighbor to tend to it. This consistent care will ensure your bird bath is a cherished, healthy destination rather than a source of trouble for the creatures you admire.
Enjoy the Rewards: Creating Memories and Connection
As you complete your project and place it in its permanent spot, you are opening a new chapter in your relationship with your backyard. Be patient. It can take a few days or even a couple of weeks for birds to discover and trust your new amenity. Soon enough, you will be rewarded with the first splash and the sound of wings. We encourage you to grab a cup of coffee, sit by your window, and simply observe. Document which species visit, learn their behaviors, and celebrate the small, peaceful moments your handmade bird bath has brought to your life. This simple project is a powerful reminder that with just a little imagination and a minimal budget, we can all create something truly beautiful and positive.