Creating a beautiful first impression for your home starts right at the curb. One of the most effective ways to elevate your home’s exterior is through thoughtful landscaping, specifically by focusing on well-defined flower beds. A crisp, clean edge does more than just look pretty; it acts as a frame for your favorite perennials and shrubs, instantly making your outdoor space look professionally maintained. Whether you are working with a sprawling front lawn or a compact entryway, the right edging technique can transform a messy garden patch into a stunning focal point that adds real value to your property.
The Importance of Defining Your Garden Borders
Garden edging serves both a functional and an aesthetic purpose. From a practical standpoint, a solid border keeps mulch in place and prevents aggressive lawn grass from creeping into your flower beds. This means less time spent weeding and more time enjoying your blooms. Visually, an edge creates a clear transition between different textures, such as the soft green of a lawn and the rich, dark tones of garden soil or mulch. This contrast is what gives high-end landscapes their polished look.
When you choose to install DIY edging, you gain full control over the shape and flow of your yard. Straight lines offer a formal, modern feel, while gentle curves evoke a more natural and relaxed atmosphere. By analyzing your home’s architectural style, you can select materials that complement your siding, stonework, or entryway, ensuring a cohesive look that ties the entire property together.
Popular Materials for DIY Flower Bed Edging
The beauty of a DIY project is the wide variety of materials available to suit any budget or skill level. Depending on the “vibe” you want to create, you might choose something permanent like masonry or something flexible like recycled plastic.
Natural Stone and Cobblestones
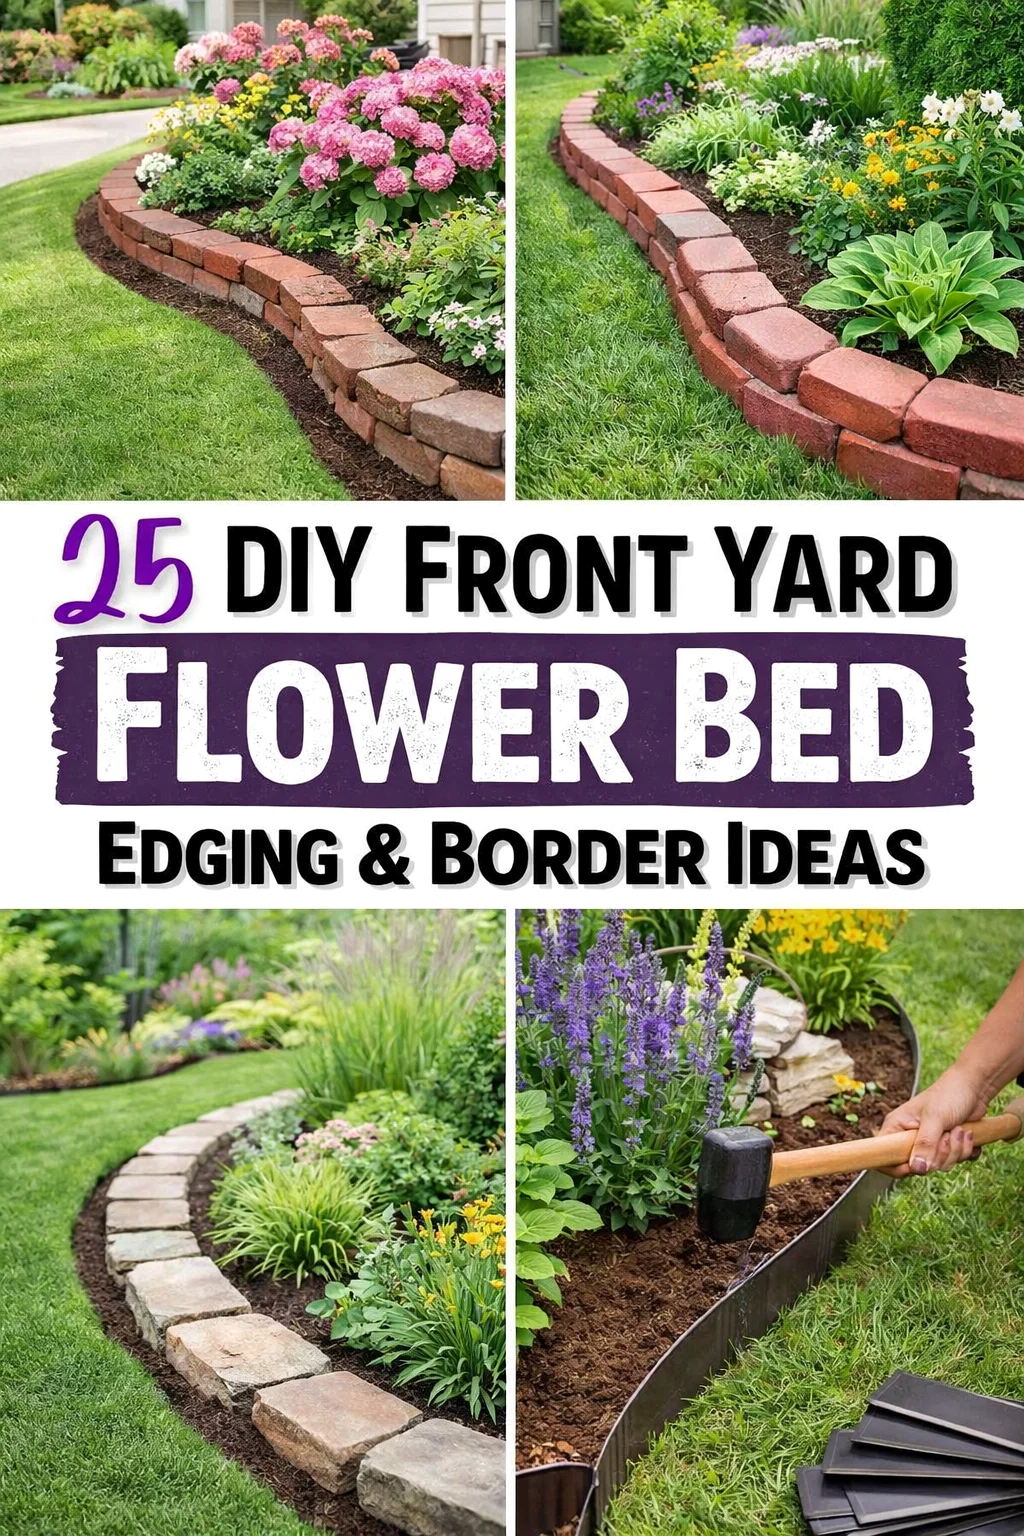
For those who love a rustic or cottage-style garden, natural stone is an unbeatable choice. Flagstones, river rocks, or even stacked fieldstones provide an organic feel that blends seamlessly with the environment. Because no two stones are exactly alike, this type of edging adds unique character to your front yard. It is incredibly durable and weathers beautifully over time, often looking even better after a few seasons of exposure to the elements.
Concrete Pavers and Bricks
If you prefer a clean and orderly appearance, concrete pavers or traditional red bricks are excellent options. These materials are uniform in size, making them very easy to install in straight lines or tight geometric patterns. You can lay them flat for a subtle border or set them on an angle for a decorative “sawtooth” effect. Bricks are especially popular for older homes, as they provide a timeless, classic appeal that never goes out of style.
Plastic and Metal Strip Edging
For a nearly invisible border that creates a sharp “pro-style” look, metal or heavy-duty plastic strips are the way to go. These are often used to create those perfectly manicured curves seen in professional landscape designs. They are thin enough to be buried mostly underground, leaving only a slim, clean line visible at the surface. This is a fantastic choice if you want the plants and the mulch to be the stars of the show without the border itself drawing too much attention.
Recycled and Creative Materials
Gardening on a budget encourages wonderful creativity. Many homeowners use recycled materials like wine bottles, old terracotta tiles, or even short lengths of scrap wood to create unique borders. Not only is this eco-friendly, but it also ensures that your garden reflects your personal style and flair.
Step by Step Guide to Installing Your Own Border
Ready to get your hands dirty? Installing a basic garden edge is a project that can usually be completed in a single weekend. Here is a general breakdown of how to achieve a professional result on your own.
- Plan Your Path: Use a garden hose or a long rope to layout the shape of your new flower bed. Step back and look at it from the street to make sure the curves feel balanced and scale correctly with your house.
- Mark the Line: Once you are happy with the shape, use a can of spray paint or a spade to mark the line directly onto the grass.
- The Trench: Use a sharp-edged shovel or a specialized edging tool to cut a trench along your marked line. For most materials, a depth of 3 to 4 inches is sufficient.
- Prepare the Base: If you are using heavy stones or pavers, add a thin layer of leveling sand or crushed gravel to the bottom of the trench. This prevents the stones from sinking or shifting over time.
- Set the Material: Place your edging material into the trench. Use a rubber mallet to gently tap stones or bricks into place so they are level and snug against one another.
- Backfill and Finish: Fill in any gaps behind the edging with soil and pack it down firmly. Finish the look by adding a fresh layer of mulch to your flower bed.
Maintenance Tips for a Long Lasting Look
Once your edging is installed, a little bit of upkeep will keep it looking fresh for years. For stone or brick borders, you may occasionally need to pull a few stray weeds that find their way into the cracks. Every few years, you might find that some stones have settled unevenly; simply lift them up, add a bit of sand underneath, and tap them back into place.
If you chose a wood-based border, keep an eye out for rot or insect damage, and consider applying a fresh coat of sealant every other spring. For those using metal or plastic edging, check after a hard winter to ensure that “frost heave” hasn’t pushed the strips out of the ground. Usually, a quick tap with a mallet is all it takes to reset them.
Choosing the Right Plants for Your New Borders
The border is the frame, but the plants are the art. To make your front yard truly pop, consider how your plant choices interact with your edging. Low-growing groundcovers like creeping thyme or sedum look beautiful when they “spill” over the top of a stone edge, softening the hard lines. On the other hand, upright flowers like tulips or lavender create a tidy, organized look when planted just behind a straight brick border.
Think about color contrast as well. If you have dark grey stone edging, bright yellow or white flowers will stand out brilliantly. If you have used red brick, purple and blue blooms like salvia or catmint offer a stunning complementary color palette.
Common Landscaping Mistakes to Avoid
While DIY landscaping is rewarding, there are a few pitfalls to watch out for. One common mistake is making the flower beds too small. Small, narrow beds can look cramped and out of proportion with the house. Don’t be afraid to go a bit wider to allow your plants room to grow and breathe.
Another error is failing to consider the “mower’s path.” If your edging is too high or jagged, it can be difficult to trim the grass around it without damaging your lawnmower blades. Try to keep the edging low enough that you can easily run a string trimmer along the side for a crisp finish.
Conclusion: Your Dream Front Yard Awaits
Enhancing your front yard with DIY flower bed edging is one of the most satisfying home improvement projects you can take on. It is an affordable way to boost curb appeal, organize your garden, and express your creative style. By choosing the right materials and taking the time to install them properly, you create a lasting structure that brings beauty and order to your home’s exterior. Whether you choose the timeless elegance of brick or the rugged charm of natural stone, your new garden borders will serve as a testament to your hard work and vision. It is time to grab a shovel and start building the entryway you have always dreamed of!