37 Creative Easter Home Decor Centerpieces Ideas for a Festive and Stylish Home
Introduction to 37 Creative Easter Home Decor Centerpieces Ideas for a Festive and Stylish Home
As the first signs of spring emerge, our homes naturally crave a refresh—a joyful infusion of life, color, and light. Easter, with its themes of renewal and celebration, offers the perfect inspiration for this seasonal transformation. Moving beyond simple baskets of candy, thoughtful Easter home decor can create a warm, inviting, and stylish atmosphere that delights family and guests alike. The heart of this festive styling often lies on the table: the centerpiece. A well-crafted centerpiece is more than just a decoration; it’s a conversation starter, a focal point that sets the tone for your entire gathering, and a beautiful expression of the season’s spirit.
This guide is designed to inspire you with 37 creative ideas that range from elegantly minimalist to charmingly rustic, and from quick DIY projects to sophisticated displays. Whether you’re hosting a formal brunch, a casual family dinner, or simply want to sprinkle seasonal cheer throughout your living spaces, these concepts will help you craft a home that feels both festive and authentically yours. Ultimately, we believe that the best spring home styling blends personal creativity with the timeless symbols of the season, resulting in a space that feels renewed, joyful, and beautifully put-together.
Why Choose Creative Easter Centerpieces for Your Space
You might wonder, why focus so much effort on a table centerpiece? The answer lies in its transformative power. A thoughtfully designed centerpiece is a cornerstone of effective holiday home styling. Firstly, it immediately establishes a festive mood. A beautiful arrangement of spring blooms, delicate eggs, or fresh greenery signals celebration and welcome the moment someone enters the room. This visual cue lifts spirits and makes any meal or gathering feel more special and intentional.
Secondly, a centerpiece is a versatile tool for expressing your personal seasonal decor style. Are you drawn to a modern, monochromatic look? A sleek vase with white tulips and gilded eggs can achieve that. Do you prefer a rustic, garden-inspired feel? A weathered wooden box filled with moss, nests, and speckled eggs will bring that charm to life. This flexibility allows your Easter decorations to seamlessly integrate with your existing interior design, rather than clashing with it. Furthermore, a centerpiece is inherently functional; it organizes the table’s visual space, often providing a natural anchor for place settings and serving dishes, thereby enhancing the overall harmony and flow of your tablescape.
Finally, investing creativity in your Easter table decor fosters connection and tradition. A DIY project can be a fun family activity, and a stunning centerpiece becomes a memorable part of your holiday celebrations year after year. It’s a simple yet profound way to celebrate the season’s themes of new life and joy within the heart of your home.
Key Elements & Design Components
Essential Decor Items for Easter Centerpieces
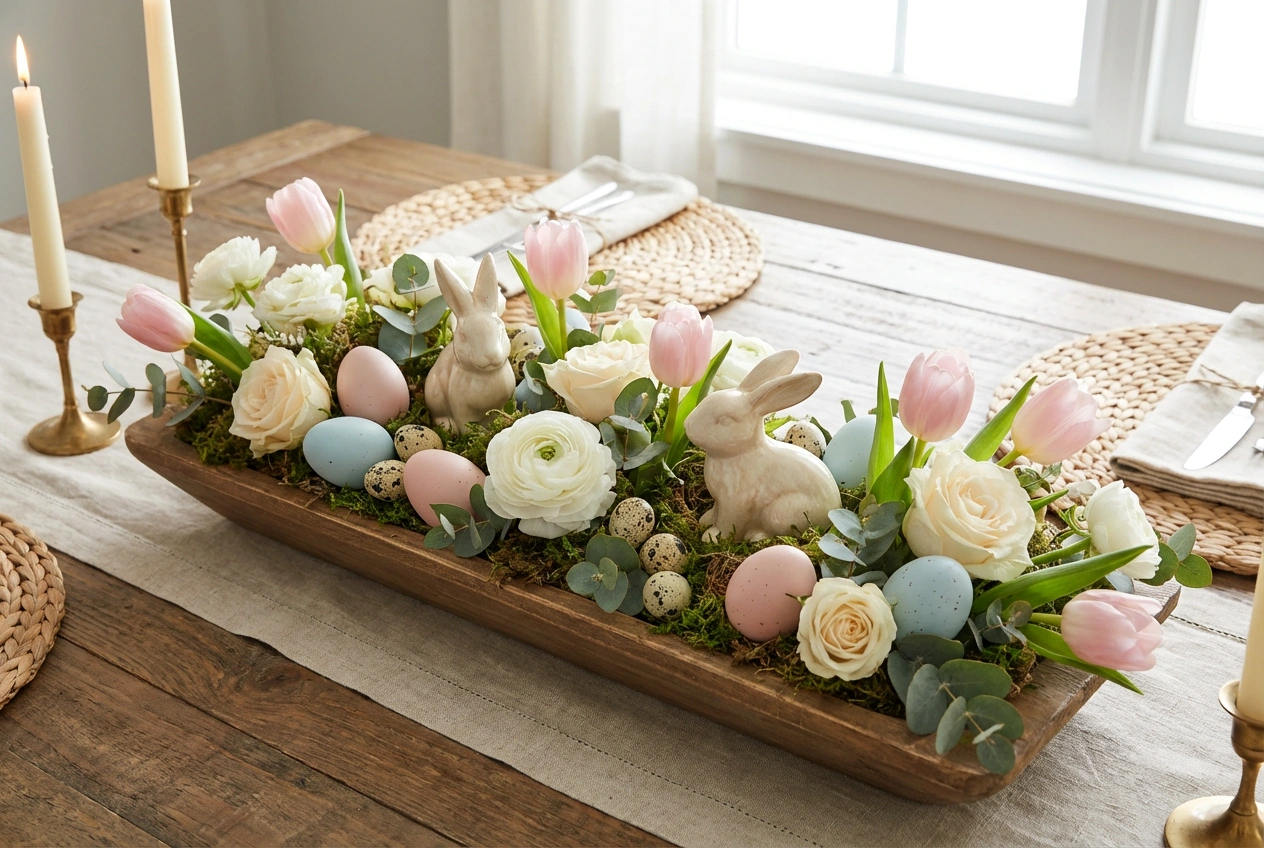
Creating a captivating Easter centerpiece relies on a blend of natural elements, symbolic accents, and a thoughtful vessel. Here are the essential components to consider:
-
The Foundation (Vessels & Bases): This is your canvas. Options include:
- Traditional Vases: For classic floral arrangements.
- Trays, Platters & Bowls: Perfect for creating grouped displays.
- Natural Elements: Baskets, wooden dough bowls, ceramic planters, or even a hollowed-out log.
- Unexpected Finds: Vintage teacups, mason jars, or a collection of glass cloches.
-
The Focal Point (Florals & Greenery): Fresh or faux, flowers are non-negotiable for spring centerpiece ideas. Favorites include tulips, hyacinths, daffodils, ranunculus, and blossoming branches like cherry or forsythia. Greenery such as eucalyptus, ferns, or moss adds texture and fullness.
-
The Symbolic Accents (Easter Elements): These are the festive touches that define the theme.
- Eggs: The quintessential symbol. Use real blown eggs (dyed, painted, or decoupaged), faux ceramic or wooden eggs, or even elegant metallic ones.
- Nests: Representing new life, small bird nests (real or crafted from twigs/moss) are charming for holding eggs or mini treats.
- Bunnies & Lambs: Figurines made of ceramic, wood, or felt add whimsy and tradition.
- Natural Textures: Twigs, pussy willow branches, feathers, and smooth stones add organic interest.
-
The Supporting Cast (Light & Height):
- Candles: Taper candles in candlesticks, pillar candles on stands, or a cluster of tea lights add warmth and glow to evening gatherings.
- Risers: Use cake stands, inverted bowls, or stacks of books to create varying heights for visual dynamism.
Style Variations & Budget-Friendly Alternatives
Not every centerpiece needs to be a grand floral masterpiece. Here’s how to adapt the look to different styles and budgets:
- Modern Minimalist: Focus on a single type of flower in a monochromatic color scheme (all white or soft blush). Use a sleek, geometric vase. Incorporate metallic eggs or a single, sculptural ceramic bunny. Budget Tip: Use a clean, cylindrical glass vase from a discount store and fill it with branches from your yard.
- Rustic Farmhouse: Embrace imperfection. Use a woven basket or wooden dough bowl as a base. Fill with moss, speckled faux eggs, a few sprigs of lavender or rosemary, and a small, burlap-wrapped pot of wheatgrass. Budget Tip: Collect smooth stones and twigs from outside. Use brown paper bags to create rustic-looking “nests” for eggs.
- Garden Whimsy: This style is lush and playful. Mix an abundance of colorful spring flowers in a mismatched collection of vintage pitchers or tin watering cans. Tuck in small bird figurines and use brightly painted eggs. Budget Tip: Purchase a few $5 bunches of seasonal flowers from the grocery store and separate them into several small jam jar vases clustered together.
- Kid-Friendly & DIY: Make the centerpiece an activity! Create a “grass-growing” centerpiece by lining a tray with soil and growing wheatgrass or chia seeds. Let kids decorate paper maché or plastic eggs to scatter around. Use colorful felt to create simple bunny ears to adorn napkin rings or candle bases.
How to Achieve the Look: Step-by-Step Styling Guide
Crafting your perfect Easter centerpiece is a simple, enjoyable process. Follow these steps to build a display that wows.
Step 1: Define Your Vibe and Choose a Color Palette
Before gathering supplies, decide on the atmosphere you want. Do you envision soft pastels for a gentle, romantic feel, or vibrant jewel tones for a dramatic, modern table? Perhaps you prefer a neutral scheme of whites, creams, and greens for a natural look. Your color palette will guide every subsequent choice, from flowers to eggs to your table linens.
Step 2: Select Your Primary Vessel and Arrange the Foundation
Choose your main container based on your chosen style. Place it in the center of your table. If creating a grouped display, arrange your vessels (tray, bowls, vases) in an off-center or linear grouping for visual interest. Remember to consider sightlines—guests should be able to see each other across the table.
Step 3: Build Height and Structure with Florals & Greenery
This is the backbone of your arrangement. Start by adding the tallest elements, like branches or tall-stemmed flowers, to establish height. Then, add your primary blooms, turning the vessel as you work to ensure fullness from all angles. Finally, tuck in greenery and filler flowers to cover mechanics and add lushness. For non-floral centerpieces, this step involves arranging your largest items, like candles on stands or a central figurine.
Step 4: Incorporate Thematic Easter Accents
Now, weave in the festive details. Nestle painted eggs into the greenery, place a ceramic bunny peeking out from behind a vase, or arrange small nests with mini eggs along a tray. Scatter a few loose eggs or feathers around the base of the arrangement to tie everything together. The key is integration—make these elements look like a natural part of the whole scene.
Step 5: Add Dimension with Layers and Lighting
Create depth by placing some items on risers. A nest on a small cake stand, or a group of eggs on an inverted bowl, adds compelling variation. Then, introduce light. The warm flicker of candles is essential for evening ambiance. Mix heights with taper candles and clusters of tea lights in small glass holders.
Step 6: Finalize with Surrounding Tablescape Details
Your centerpiece doesn’t exist in a vacuum. Ensure it complements the rest of your Easter tablescape. Coordinate your napkins, placemats, and charger plates with your color palette. You can extend the theme with individual place settings that feature a sprig of rosemary or a single decorated egg as a favor. Finally, do a “sightline check” from a seated position to ensure the arrangement is beautiful but not obstructive.
Elevating the Look: Advanced Styling Tips
To take your festive home centerpiece from lovely to magazine-worthy, consider these pro tips:
- Play with Asymmetry: Instead of one perfectly round, centered arrangement, create an organic, asymmetrical display down the length of a rectangular table using a series of smaller groupings. This feels more modern and dynamic.
- Incorporate Unexpected Elements: Introduce something unique that reflects your personality. This could be a collection of vintage postcards tucked into the arrangement, a beautiful piece of coral or sea glass for texture, or a snippet of a favorite spring poem written on a tag.
- Think Beyond the Dining Table: Your Easter home decor shouldn’t be confined to one room. Create smaller, complementary centerpieces for your coffee table, console table, or kitchen island. A single hyacinth bulb in a forcing vase, or a bowl of beautiful, undecorated natural eggs, can spread the festive feeling throughout your home.
- Use Lighting Strategically: If possible, position your centerpiece where natural light can highlight it during the day. In the evening, consider using a small, discreet spotlight or a string of fairy lights woven subtly into the arrangement for a magical glow.
- Edit Ruthlessly: Sometimes less is more. Once your arrangement is complete, step back and remove one or two items. This often results in a more polished, intentional, and elegant look.
Maintenance & Care: Keeping Your Space Fresh
A beautiful Easter display is meant to be enjoyed, not stressed over. Here’s how to keep it looking its best:
- For Fresh Flowers: Change the water in your vases every other day and re-cut the stems at an angle. Keep the arrangement away from direct sunlight and heat sources. Using flower food can significantly extend their life.
- For Faux Florals & Elements: Dust is the enemy. Use a hairdryer on a cool, low setting to gently blow dust off silk flowers and greenery. Wipe down ceramic bunnies, eggs, and other hard accents with a slightly damp cloth.
- Daily Touch-Ups: Give your centerpiece a quick once-over before guests arrive. Straighten any tilted candles, fluff flattened greenery, and remove any fallen petals or leaves.
- Post-Holiday Storage: To make Easter decorating easy next year, store items properly. Wrap delicate ceramic and glass items in tissue paper. Store faux florals in plastic bins to prevent crushing. Group like items together (all eggs in one box, all bunnies in another) and label the bins clearly.
FAQs: Frequently Asked Questions About Easter Home Decor Centerpieces
Q: How do I make an Easter centerpiece for a small table?
A: Opt for a low and long arrangement rather than a tall, wide one. A narrow tray running down the center with a line of small potted plants (like hyacinths or herbs), tea lights, and scattered eggs is perfect. Alternatively, a single, stunning statement piece like a short, wide bowl with a few blooms and moss is elegant and space-saving.
Q: Can I create a beautiful centerpiece on a tight budget?
A: Absolutely! Some of the most charming DIY Easter decor uses foraged items. Collect interesting branches, moss, and stones. Use eggs from your kitchen—blow them out, dye them with natural dyes (onion skins, turmeric, beet juice), and display them in a bowl. A bundle of fresh herbs from the grocery store (rosemary, thyme) tied with twine and placed in a simple jar is fragrant and beautiful.
Q: How far in advance can I make my centerpiece?
A: If using fresh flowers, assemble it 1-2 days before your event for peak freshness. For non-perishable centerpieces (using faux florals, nests, etc.), you can create them a week or more in advance and store them in a cool, dry place, covering them lightly with a cloth to prevent dust.
Q: What are some non-traditional color schemes for Easter decor?
A: While pastels are classic, don’t be afraid to break the mold. A scheme of navy blue, white, and brass feels sophisticated. Deep emerald green with touches of copper and white is lush and modern. Even an all-white and green palette, using different textures, is incredibly elegant and timeless.
Q: How can I make my centerpiece child-friendly and safe?
A: Avoid using small, loose items that are choking hazards if you have very young children. Opt for larger wooden or plastic eggs. Use battery-operated candles instead of real flames. Secure any figurines so they can’t be easily pulled down. Involving kids in creating a centerpiece with potted plants or their own artwork is a great safe alternative.