Ultimate Guide to Vanity Organization: How to Organize Your Makeup for a Clutter-Free Vanity
Introduction to Ultimate Guide to Vanity Organization: How to Organize Your Makeup for a Clutter-Free Vanity
Imagine starting your day in a serene, beautiful space where every lipstick, brush, and palette has a designated home. A well-organized vanity isn’t just a practical solution for storing your cosmetics; it’s a personal sanctuary that sets the tone for your entire day. This ultimate guide to vanity organization will show you how to transform a chaotic jumble of products into a curated, functional, and aesthetically pleasing display. A clutter-free vanity reduces morning stress, saves precious time, and elevates your daily routine into a ritual of self-care. Whether you have a dedicated dressing table or a small corner in your bathroom, mastering the art of makeup organization can profoundly impact your space and mindset. Consequently, we’ll explore systems that blend form and function, creating a setup that is both Instagram-worthy and incredibly efficient. Ultimately, this journey is about crafting a corner of your home that feels exclusively yours—a place of calm, creativity, and order.
Why Choose Ultimate Guide to Vanity Organization: How to Organize Your Makeup for a Clutter-Free Vanity for Your Space
Investing time in proper vanity organization offers benefits that extend far beyond a tidy surface. Firstly, it creates immense visual harmony. A clutter-free zone with thoughtfully arranged items is inherently calming and can make even a small bedroom feel more spacious and intentional. This sense of order directly reduces the mental clutter and decision fatigue that often comes with rummaging through piles of products. Moreover, a well-organized makeup station maximizes functionality. You’ll know exactly where everything is, which streamlines your morning and evening routines. This efficiency is a game-changer for busy professionals, parents, or anyone looking to reclaim a few peaceful minutes in their day.
Furthermore, a styled vanity area serves as a beautiful focal point in a bedroom or dressing room. It reflects your personal style, whether that’s minimalist, vintage, or modern glam. This dedicated spot for grooming and self-care also has a positive emotional impact; it encourages you to take a moment for yourself. Additionally, good systems help you keep track of your inventory, preventing duplicate purchases and making it easier to see what you actually use and love. In essence, choosing to implement a makeup organization system is a commitment to practicality, beauty, and personal well-being, making it a transformative choice for any home.
Key Elements & Design Components
Essential Decor Items for Ultimate Guide to Vanity Organization: How to Organize Your Makeup for a Clutter-Free Vanity
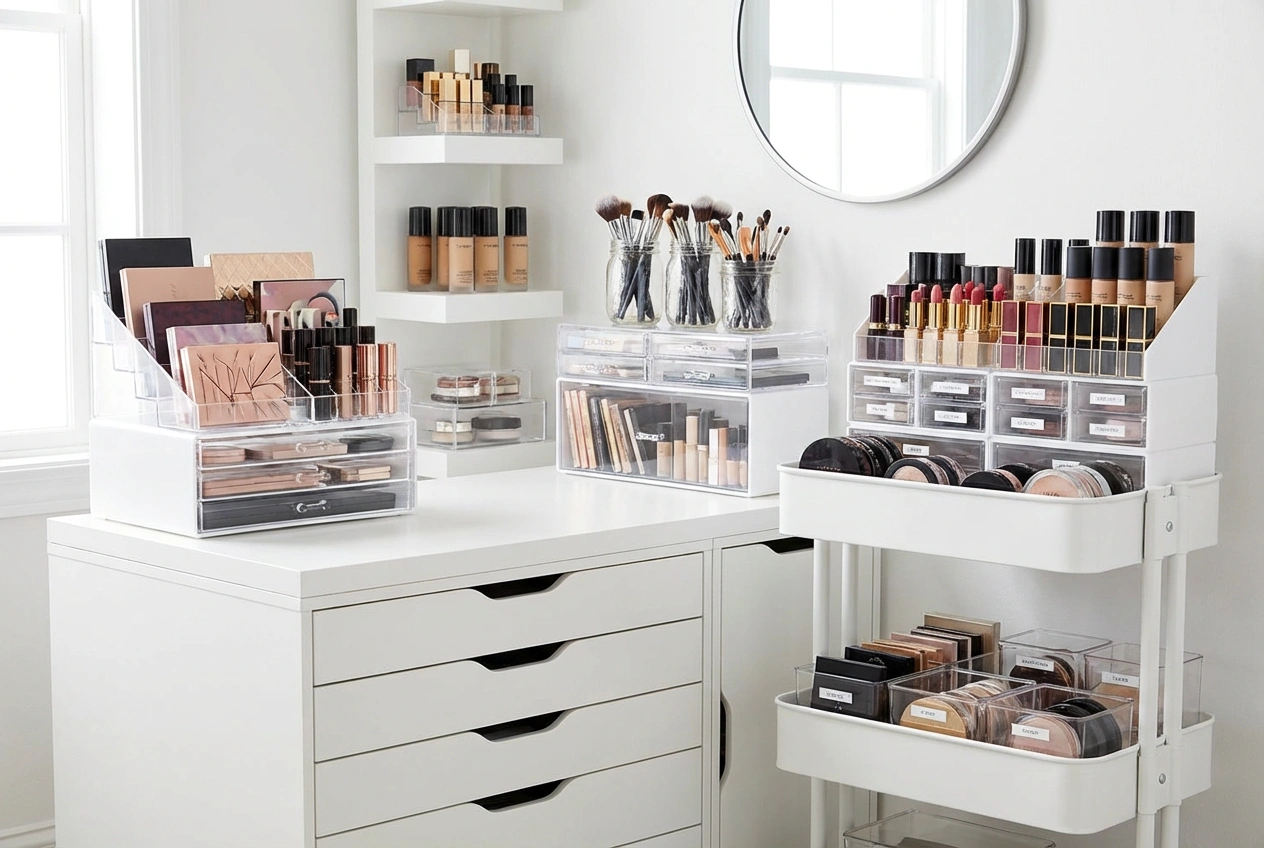
Creating a flawless vanity setup requires a blend of storage solutions and decorative touches. Here are the essential components:
- The Vanity Table: This is your foundation. Choose a table with drawers, like a classic dressing table or a sleek desk. For smaller spaces, consider a wall-mounted floating shelf or a narrow console table.
- A Quality Mirror: Good lighting is non-negotiable. Opt for a lighted mirror with adjustable brightness and color temperature (daylight vs. warm light). Alternatively, place your table near a window and supplement with a beautiful tabletop mirror.
- Strategic Storage Containers: This is the heart of cosmetic organization. Acrylic drawer dividers, clear stacking trays, and lipstick organizers keep items visible and accessible. Use decorative cups or mason jars for brushes and pencils.
- Comfortable Seating: A plush upholstered stool or a chic accent chair makes the experience comfortable and completes the look.
- Aesthetic Lighting: Beyond the mirror, add ambient lighting with a small table lamp or a pair of wall sconces to create a soft, flattering glow.
- Decorative Accents: A small tray for daily-use perfumes, a piece of art above the vanity, a pretty rug underneath, or a fresh plant adds personality and makes the space feel curated, not just utilitarian.
Style Variations & Budget-Friendly Alternatives
Your vanity organization should reflect your personal style and budget.
- Minimalist & Modern: Use a monochromatic color scheme with white, black, or grey organizers. Choose a floating vanity shelf, a simple round mirror, and store everything out of sight in matching closed containers. A budget-friendly tip? Use sleek office supply organizers from stores like IKEA.
- Glam & Hollywood: Embrace clear acrylic organizers in tiered stands, a large ornate mirror, and a velvet-upholstered stool. Add a crystal lamp for drama. For a cheaper alternative, find a vintage frame and attach it to a plain mirror, or use a faux marble contact paper to upgrade a basic tabletop.
- Boho & Vintage: Mix and match storage! Use woven baskets for bulkier items, ceramic cups for brushes, and open wooden crates. Look for a unique vintage table at a thrift store and repaint it. This style is perfect for renters, as many elements are non-permanent.
- Small-Space Solutions: If you lack a full table, create a battle station on a windowsill or inside a cabinet. Use a hanging organizer on the back of a door, a multi-tiered rolling cart that tucks away, or a wall-mounted pegboard with small shelves and cups for ultimate customization.
How to Achieve the Look: Step-by-Step Styling Guide
Follow this actionable plan to build your perfect, clutter-free vanity area.
Step 1: Declutter & Categorize Your Products
Begin by taking everything off your vanity. Sort all makeup, skincare, haircare, and tools into categories: foundations, eye products, lip products, brushes, etc. Then, ruthlessly edit. Discard expired items (check for smell and texture changes), and donate or recycle products you haven’t used in over a year. This purge is the most critical step for effective makeup storage.
Step 2: Assess Your Space & Choose Your Vanity Surface
Evaluate the space you have available. Do you have room for a dedicated table, or do you need a dual-purpose solution? Measure the area. Your surface should be deep enough to hold your mirror and a few daily essentials comfortably. Remember, the goal is a clutter-free vanity, so choose a size that won’t tempt you to overcrowd it.
Step 3: Select Your Core Storage Solutions
Based on your categorized products, select organizers. For instance, use shallow acrylic trays for daily face products in drawers. Subsequently, employ tall acrylic organizers for palettes and eyeliners on the desktop. Moreover, assign specific cups or jars for brushes. The key is to assign a “home” for every type of item. Clear organizers are highly recommended because they allow for instant visual inventory.
Step 4: Establish a Functional Layout
Think about your daily routine. Place your most frequently used items (like foundation, daily lip color, and favorite brushes) within easiest reach—typically in the center or front. Conversely, seasonal or occasional-use items can go in drawers or towards the back. Your mirror should be centered, with task lighting positioned to eliminate shadows on your face.
Step 5: Incorporate Personal Style & Finishing Touches
This is where your vanity area becomes a reflection of you. Add a small decorative tray to corral perfume bottles and jewelry. Hang a piece of art or a inspirational quote on the wall above. Drape a cozy, stylish blanket over your stool. Introduce a small plant or a fresh bouquet for a touch of life. These elements transform a functional station into a beautiful nook.
Step 6: Implement a “One-In, One-Out” Rule
To maintain your new system, adopt a simple rule: for every new product you bring in, try to let one go. This habit prevents the slow creep of clutter and ensures your cosmetic organization system remains sustainable and effective long-term.
Elevating the Look: Advanced Styling Tips
Once your basic system is in place, these pro tips will take your vanity organization to the next level.
- Lighting Layering: Combine your primary task lighting (the mirror light) with ambient lighting. A small, dimmable lamp with a warm bulb on the table creates a luxurious, spa-like atmosphere for evening routines.
- Create a “Favorites” Display: Use a beautiful, shallow dish or a specific section of your desktop to artfully display your current favorite products. This not only looks editorial but also simplifies your daily grab-and-go.
- Incorporate Art & Reflection: Treat the wall behind your vanity as a focal point. A gallery wall of small prints, a statement circular mirror behind your functional mirror, or a piece of textile art can add immense depth and character.
- Conceal the Clutter: For a supremely clean look, use pretty boxes or baskets with lids to store less-attractive items like cotton pads, hair tools, or product backups. This allows you to keep necessities handy while maintaining a serene visual field.
- Seasonal Rotation: Just like your wardrobe, consider rotating a few decorative elements with the seasons. A lighter, airier scarf on the stool in summer or a small pumpkin decor in fall can keep your battle station feeling fresh and connected to the rest of your home’s decor.
Maintenance & Care: Keeping Your Space Fresh
Maintaining your clutter-free vanity requires minimal but consistent effort. Firstly, get into the habit of doing a quick 2-minute tidy at the end of each day: wipe down the surface with a gentle cloth, return any stray items to their designated homes, and clean your brushes regularly to prevent product buildup and bacteria. Every month, do a quick scan for any expired products to discard. Furthermore, dust your organizers and mirror weekly to keep everything sparkling. To deep clean acrylic organizers, wash them with mild soap and water. This simple upkeep ensures your makeup organization system remains hygienic, beautiful, and functional, protecting your investment in both your products and your peaceful space.
FAQs: Frequently Asked Questions About Ultimate Guide to Vanity Organization: How to Organize Your Makeup for a Clutter-Free Vanity
Q: How do I organize a vanity in a very small space or a shared bathroom?
A: Focus on vertical space and dual-purpose items. Use a wall-mounted shelf above the toilet or sink as your surface. Implement magnetic strips on the wall for metal tools like tweezers and scissors. A multi-tiered over-the-door organizer can hold a surprising amount. For shared spaces, use a portable caddy or a rolling cart that you can bring in and out, keeping your vanity organization mobile and personal.
Q: What are the best affordable organizers for makeup?
A: Many dollar stores, Target, and IKEA have excellent options. Look for clear kitchen utensil holders, office drawer dividers, ice cube trays for small items like earrings or lip balms, and spice jar racks for nail polishes. Repurposing items you already own, like pretty mugs or teacups for brushes, is the most budget-friendly approach of all.
Q: How can I organize my vanity if I have a LOT of makeup?
A: Categorization is your best friend. Break down large categories further (e.g., separate red lipsticks from nudes). Use deep drawers with adjustable dividers for bulk storage. Consider dedicating one drawer to each category (e.g., an entire drawer for eyeshadow palettes). The principle remains the same: a designated home for everything. If your collection is vast, you might need to prioritize and display only your most-used items, storing the rest accessibly but out of sight.
Q: How do I prevent my vanity from getting dusty?
A: The best defense is regular use and quick wipes. For products you don’t use daily, consider storing them in drawers or containers with lids. A small desktop dust cover for your brush cups or a decorative cloche for a perfume display can also help. Consistent, light cleaning is more effective than occasional heavy cleans.
Q: What’s the one thing I shouldn’t skimp on for vanity organization?
A: Good lighting. You can have the most organized products in the world, but if you can’t see your face clearly in accurate light, the entire setup is less functional. Invest in a quality lighted mirror or ensure your space has excellent natural or artificial daylight-balanced lighting for applying makeup.