Mobile Home Remodel Ideas: Stylish Trailer Kitchen Remodels for Single Wide Spaces
Introduction to Mobile Home Remodel Ideas: Stylish Trailer Kitchen Remodels for Single Wide Spaces
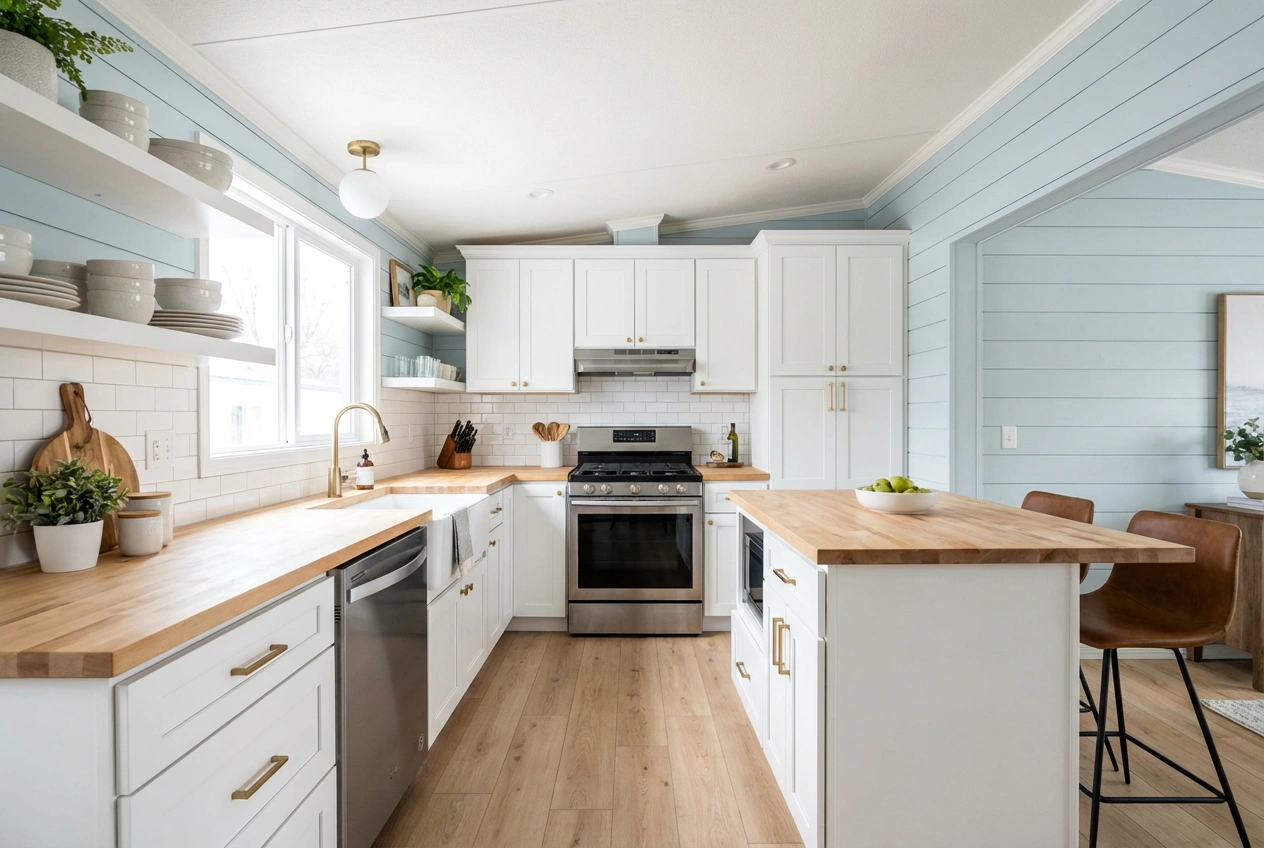
Imagine stepping into a kitchen that feels both expansive and intimately yours—a space where every inch is thoughtfully designed to inspire your inner chef and soothe your soul. This is the transformative power of a well-executed trailer kitchen remodel single wide. For far too long, mobile home kitchens have been saddled with a reputation for being cramped, dated, and purely utilitarian. However, a new wave of design thinking is proving that these compact spaces hold incredible potential for style, efficiency, and personal expression. A single-wide kitchen makeover isn’t just about new cabinets and countertops; it’s a reimagining of how you live, cook, and gather. By embracing smart space planning, light-enhancing color palettes, and multi-functional elements, you can create a kitchen that rivals any site-built home in both beauty and utility. This journey is about crafting a heart for your home that reflects your taste, supports your lifestyle, and maximizes every square foot. Whether you dream of a sleek, modern galley or a cozy, rustic nook, the following guide will illuminate the path to a stunning and highly functional trailer kitchen transformation.
Why Choose a Trailer Kitchen Remodel for Your Single Wide Space
Opting for a kitchen renovation in your mobile home is one of the most impactful decisions you can make for your daily life and your home’s value. Firstly, the kitchen serves as the central hub of activity; consequently, a remodel directly enhances your quality of life by creating a more enjoyable and efficient environment for meal prep, dining, and socializing. Single-wide spaces, in particular, benefit immensely from strategic design. A focused single wide kitchen renovation allows you to tackle common pain points like poor storage, inadequate lighting, and awkward layouts head-on, transforming constraints into clever design features.
Moreover, a stylish mobile home kitchen update is a powerful tool for visual and spatial illusion. Through the use of light colors, reflective surfaces, and strategic lighting, you can make the room feel significantly larger and brighter. Additionally, integrating smart storage solutions like vertical pull-out pantries, toe-kick drawers, and multi-tiered organizers can actually increase your usable space beyond what the original layout offered. This approach doesn’t just add aesthetics; it injects unparalleled functionality into a compact footprint. Ultimately, investing in your manufactured home kitchen is a declaration that your space deserves beauty and intentionality. It proves that limited square footage is no barrier to having a kitchen that is both profoundly personal and exceptionally practical.
Key Elements & Design Components
Essential Decor Items for a Single Wide Kitchen Makeover
Achieving a magazine-worthy look in your manufactured home kitchen hinges on selecting the right components. Here’s a breakdown of the essential elements:
- Cabinetry: This is the foundation. Opt for clean, shaker-style doors in light colors (white, cream, light gray) to reflect light and create airiness. For a budget-friendly update, consider painting existing cabinets and replacing hardware with modern pulls or knobs.
- Countertops: Durable, light-colored surfaces are key. Butcher block adds warmth and is DIY-friendly, while quartz or solid-surface materials offer a sleek, low-maintenance look. A light-colored countertop visually expands the space.
- Backsplash: This is your opportunity to inject personality. Subway tile is a timeless, space-enhancing choice. Alternatively, a sheet of high-gloss acrylic or a peel-and-stick tile in a fun pattern can add pop without overwhelming the room.
- Flooring: Luxury Vinyl Plank (LVP) is the champion for mobile home remodels. It’s durable, waterproof, and can mimic wood or stone, creating a cohesive flow. Light to medium tones work best to keep the space feeling open.
- Lighting: Layer your lighting. Replace a central fluorescent box with a stylish flush-mount or semi-flush fixture. Then, under-cabinet LED strips are non-negotiable for task lighting, making food prep safer and brighter.
- Hardware & Fixtures: Consistent finishes (e.g., brushed nickel, matte black) on faucets, cabinet pulls, and lighting fixtures create a polished, intentional look. A stylish, high-arc faucet can become a focal point.
- Open Shelving: Replacing one upper cabinet with open shelving creates visual depth, provides easy access to everyday items, and makes the room feel less enclosed.
Style Variations & Budget-Friendly Alternatives
Your trailer kitchen redesign should reflect your personal style. Fortunately, the core principles adapt beautifully to different aesthetics:
- Modern Farmhouse: Combine white shaker cabinets with butcher block counters, a black faucet, and open shelving displaying rustic ceramics. Use woven baskets for storage.
- Coastal Minimalist: Opt for light blue or seafoam green lower cabinets with white uppers, quartz counters, and a glass tile backsplash in aqua tones. Keep decor sparse and natural.
- Industrial Chic: Use slate gray cabinets, concrete-look laminate counters, exposed Edison bulb lighting, and stainless steel open shelving.
For those on a tight budget, creativity is your best tool:
* Paint is Power: A fresh coat on cabinets, walls, and even old laminate counters (with specialty paint) can work miracles.
* Contact Paper Magic: Use marble or wood-grain contact paper for a temporary countertop or backsplash refresh.
* DIY Open Shelving: Install simple wood shelves on brackets instead of costly new cabinets.
* Reface, Don’t Replace: If cabinet boxes are sound, consider refacing doors or just replacing doors and drawer fronts.
* Second-Hand & Habitat Restores: Source unique light fixtures, sinks, and hardware for a fraction of the cost.
How to Achieve the Look: Step-by-Step Styling Guide
Step 1: Plan Your Layout & Functionality
Before choosing a single paint color, analyze how you use your kitchen. Map out the classic “work triangle” (sink, stove, refrigerator) and aim for an efficient flow. In a single wide, this often means a galley or L-shaped layout. Identify dead zones (corners, ends of runs) where specialized storage like lazy Susans or pull-out cabinets can be added. This planning phase is the most critical step in your manufactured home kitchen overhaul.
Step 2: Establish a Cohesive Color Palette
Select a light, neutral base color (white, light gray, pale blue) for walls and major cabinets to maximize the sense of space. Then, choose one or two accent colors for a backsplash, lower cabinets, or decor. Stick to a maximum of three colors to maintain a calm, uncluttered feel. Remember, a monochromatic scheme in varying shades can be incredibly sophisticated and spacious.
Step 3: Select Space-Saving Cabinets & Storage
Invest in custom or semi-custom cabinets designed for narrow spaces. Features like tall, pull-out pantry cabinets, drawer organizers, and appliance garages are worth their weight in gold. Utilize every inch: install shelves on the inside of cabinet doors, use the space above cabinets for decorative storage, and incorporate toe-kick drawers for flat items.
Step 4: Install Lighting in Layers
Good lighting is transformative. First, ensure you have ample ambient light from a central fixture. Second, install LED tape lights under all upper cabinets to illuminate countertops. Finally, add personality with a small pendant light over the sink or a couple of sconces on a blank wall. Dimmers add instant ambiance.
Step 5: Choose Materials for Durability & Visual Weight
Select materials that are both practical and visually light. For example, quartz countertops are durable and seamless. A glossy subway tile backsplash reflects light. For flooring, light-toned LVP provides durability and continuity. Avoid busy patterns or dark, heavy materials that can make the space feel smaller.
Step 6: Incorporate Reflective Surfaces & Glass
Strategically place mirrors, high-gloss cabinets, or a glass-front cabinet door to bounce light around the room. A mirrored backsplash behind open shelving can double the visual depth. Similarly, a sleek stainless steel hood or appliances can add reflective appeal.
Step 7: Style with Intention & Scale
Finalize your compact kitchen transformation with decor that fits the scale of the room. A single piece of bold art is better than several small ones. Use a trailing plant on open shelving to add softness. Keep countertops as clear as possible, storing small appliances in cabinets to maintain a clean, open feel.
Elevating the Look: Advanced Styling Tips
To take your single wide kitchen renovation from great to exceptional, focus on these nuanced details. Firstly, consider adding a signature element, such as a unique range hood, a statement light fixture made of natural materials, or a custom-cut piece of live-edge wood as a small shelf or countertop extension. Secondly, pay attention to sight lines. When you look into the kitchen from the living area, what do you see? Frame that view with attractive items on open shelves or a beautifully styled countertop corner.
Furthermore, integrate smart technology discreetly. A smart speaker can provide music and recipes hands-free, while smart under-cabinet lighting can be controlled for different moods. Lastly, don’t forget the ceiling. Painting it a slightly lighter shade than the walls or adding subtle, shallow beam detailing can draw the eye up, creating an illusion of height. These thoughtful touches personalize the space and demonstrate a high level of design consideration, proving that your trailer kitchen remodel is both stylish and smart.
Maintenance & Care: Keeping Your Space Fresh
Maintaining the pristine look of your new mobile home kitchen update is straightforward with the right habits. For cabinetry, use a mild detergent and soft cloth for regular cleaning, immediately wiping up spills and grease splatters. Protect your countertops by using cutting boards and trivets for hot pans. Clean your backsplash regularly to prevent grime buildup, especially behind the stove. For LVP flooring, sweep daily and use a manufacturer-approved cleaner for mopping.
To keep the decor feeling fresh, adopt a seasonal “edit.” Rotate a few key accessories—like a vase, tea towel set, or countertop fruit bowl—to reflect the time of year without a full redecorating project. Periodically declutter drawers and cabinets to prevent the accumulation of unused items, which is essential for preserving the efficient functionality of your compact kitchen transformation. A well-maintained kitchen not only looks beautiful but also continues to function seamlessly for years to come.
FAQs: Frequently Asked Questions About Trailer Kitchen Remodels
Q: What is the most important thing to consider in a single wide kitchen remodel?
A: The most critical factor is space planning and layout efficiency. Before any cosmetic changes, ensure the workflow between the sink, stove, and refrigerator is logical and unobstructed. Maximizing storage in every possible nook is a close second.
Q: Can I really make my mobile home kitchen look bigger?
A: Absolutely! Key strategies include using a light, monochromatic color palette, installing reflective surfaces (glossy cabinets, mirrors), incorporating ample layered lighting, and using large-format tiles or flooring to minimize visual breaks. Open shelving and a clutter-free countertop policy also create a sense of openness.
Q: What are some budget-friendly ways to update my trailer kitchen?
A: A budget-friendly trailer kitchen makeover can start with painting cabinets and walls, replacing hardware and light fixtures, and adding a peel-and-stick backsplash. Updating faucets and adding under-cabinet lighting also have a high impact for a relatively low cost. DIY projects like building open shelves can save significant money.
Q: Are there specific materials better suited for a mobile home kitchen?
A: Yes, due to potential for shifting and flexibility. Lightweight materials like luxury vinyl plank flooring, quartz or laminate countertops, and medium-density fiberboard (MDF) cabinets are excellent choices. Avoid very heavy natural stone or thick tile that could stress the subfloor.
Q: How do I handle the lack of a traditional backsplash in my old single wide?
A: Many older mobile homes have a continuous sheet of paneling or laminate behind the counter. You can successfully tile over clean, solid paneling with the right primer and mortar. Alternatively, use a sheet of tempered glass, acrylic, or even high-quality, moisture-resistant peel-and-stick panels designed for this purpose.