Discover Stunning Kitchen Remodel Ideas with Peninsula Designs for Your Dream Space
Introduction to Discover Stunning Kitchen Remodel Ideas with Peninsula Designs for Your Dream Space
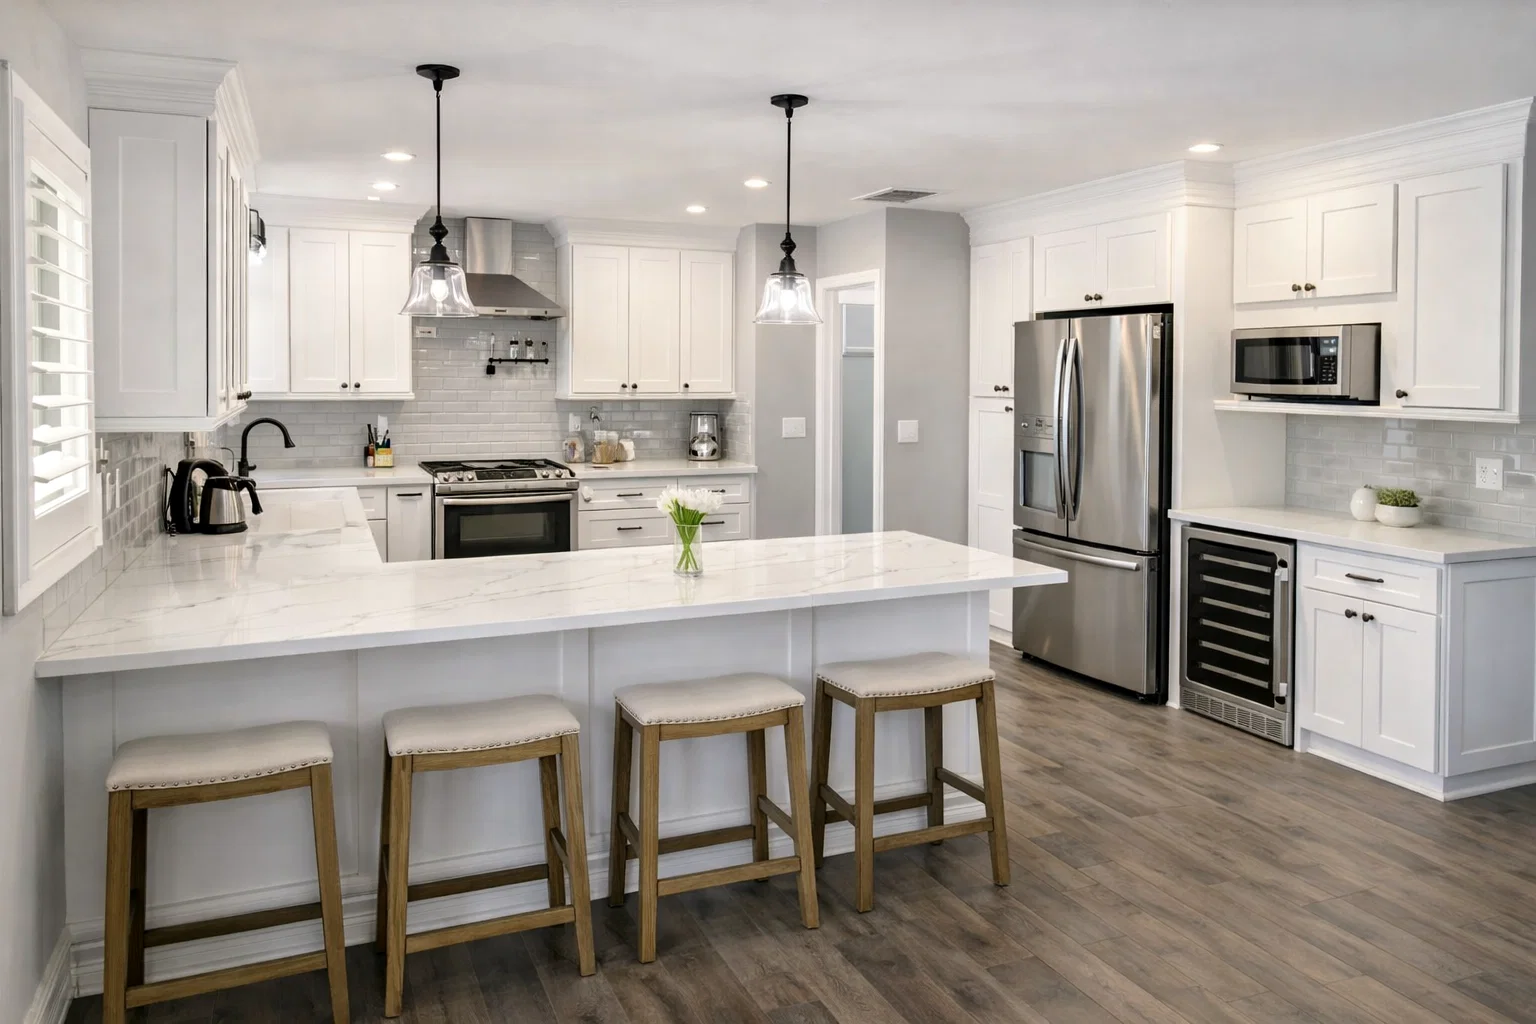
Imagine a kitchen that is not only the heart of your home but also its most stylish and functional hub. A kitchen remodel with a peninsula is one of the most transformative design decisions you can make, seamlessly blending the best of both worlds: the sociable openness of an island with the structured efficiency of a traditional layout. This versatile feature acts as a dynamic bridge, connecting cooking, dining, and living zones while providing invaluable extra storage, prep space, and seating. Whether you’re dreaming of a sleek modern aesthetic, a cozy farmhouse feel, or a timeless transitional look, incorporating a peninsula can be the cornerstone of your dream kitchen renovation.
The emotional impact is profound. A well-designed peninsula kitchen fosters connection, allowing the cook to engage with family and guests without feeling isolated. It introduces a natural flow that makes entertaining effortless and daily routines more enjoyable. From a design perspective, a peninsula can define an open-plan space without closing it off, creating a sense of order and intention. This guide will explore how a peninsula kitchen design can elevate your home, offering a perfect balance of aesthetic appeal, practical functionality, and that irreplaceable feeling of warmth and togetherness. Let’s dive into the inspiring possibilities that await.
Why Choose a Kitchen Remodel with a Peninsula for Your Space
Opting for a kitchen renovation featuring a peninsula is a strategic choice that delivers exceptional value on multiple fronts. Firstly, it’s a masterclass in space optimization. For homes where a full-size, freestanding island isn’t feasible due to square footage or traffic flow, a peninsula provides similar benefits. It utilizes existing walls or cabinetry as an anchor, freeing up floor space while still offering that crucial additional countertop real estate for meal prep, casual dining, or setting out a buffet.
Furthermore, a peninsula excels at enhancing functionality and workflow. It naturally creates a highly efficient “work triangle” or “work zone,” keeping key appliances and tasks within easy reach. You can house appliances like a microwave or wine cooler in the peninsula base, incorporate a sink for a secondary prep area, or simply use the expansive surface for baking projects. For families and entertainers, the addition of bar-style seating transforms the kitchen into a social epicenter. Kids can do homework, friends can chat over coffee, and everyone can gather without crowding the primary cooking zone.
From a visual standpoint, a kitinsula—a term blending kitchen and peninsula—acts as a stunning architectural element. It can serve as a beautiful room divider in an open-concept layout, subtly separating the kitchen from the living or dining area without the heaviness of a wall. This design feature allows for creative expression through contrasting countertop materials, statement lighting above, or unique cabinetry finishes, making it a focal point that elevates the entire room’s design narrative.
Key Elements & Design Components
Essential Decor Items for a Peninsula Kitchen Remodel
To bring your dream kitchen with a peninsula to life, several key components work in harmony. The peninsula itself is the star, and its construction and finish set the tone.
- The Peninsula Structure: This includes cabinetry (base and, optionally, upper cabinets on the backside), countertops, and an end panel. Choices here define the style: Shaker cabinets for a classic look, slab-front for modern, or open shelving for an airy feel.
- Countertop Selection: The peninsula countertop is a prime opportunity for a “wow” factor. Consider a durable, statement material like quartz, marble-look porcelain, or butcher block, especially if it will be used for dining. A waterfall edge design can add dramatic, high-end flair.
- Seating: Comfortable and stylish bar stools or counter-height chairs are non-negotiable. Allow 24-30 inches of width per seat. Choose backless stools for a sleek look and easy tucking, or upholstered seats with backs for prolonged comfort.
- Overhead Lighting: Pendant lights are the jewelry of the kitchen peninsula design. Hang two or three in a row to define the space. Choose shapes and materials that complement your overall aesthetic—glass globes for modern, woven rattan for boho, or black metal for industrial.
- Functional Backsplash: The backsplash on the peninsula wall or between upper cabinets is a canvas for texture and color. Subway tile is timeless, while zellige tile adds organic shimmer, and a slab of stone creates seamless luxury.
- Hardware & Fixtures: Cabinet pulls, faucet finishes, and even outlet covers contribute to the cohesive look. Mixing metals (e.g., matte black hardware with a brass faucet) can add depth if done intentionally.
Style Variations & Budget-Friendly Alternatives
A peninsula-style kitchen is incredibly adaptable. For a modern minimalist look, opt for a monolithic peninsula with a waterfall countertop in a solid color, handle-less cabinets, and sleek pendant lights. A rustic farmhouse version might feature a peninsula with a distressed wood countertop, beadboard end panels, and classic schoolhouse pendants.
For those mindful of budget, there are many savvy alternatives. Instead of a full custom-built peninsula, explore ready-to-assemble (RTA) cabinet lines configured in a “U” or “L” shape with an extended leg. Butcher block is a cost-effective and charming countertop option compared to high-end stone. You can also use a freestanding furniture piece, like a sturdy console table or a vintage dresser, to create a peninsula-like divider and prep space, which is a perfect solution for renters or quick DIY kitchen updates.
How to Achieve the Look: Step-by-Step Styling Guide
Crafting your perfect kitchen remodel with a peninsula is a rewarding process. Follow this step-by-step guide to ensure a cohesive and stunning result.
Step 1: Assess Your Space and Define Function
Begin by critically evaluating your kitchen’s layout, traffic patterns, and your primary needs. Use painter’s tape on the floor to map out the proposed peninsula’s footprint. Ask yourself: Is the main goal extra seating, more prep space, added storage, or better room division? This clarity will guide every subsequent decision, from size to features like appliance garages or a second sink.
Step 2: Establish Your Design Style and Color Palette
Determine the overall aesthetic you want to achieve. Gather inspiration from platforms like Pinterest or design magazines. Select a cohesive color palette of 3-5 colors, including cabinetry, countertops, walls, and accents. Remember, the peninsula can either blend in with the main cabinetry for a unified look or contrast with it to become a bold statement piece.
Step 3: Plan the Peninsula Layout and Specifications
Work with a designer or use kitchen planning software to finalize dimensions. Standard countertop height is 36 inches; for seating, ensure an overhang of at least 12-15 inches and a clearance of at least 36 inches between the peninsula and opposite cabinets. Decide on the configuration: will it be a continuation of your counter run, a T-shape, or an L-shape? This is the core of your kitchen layout with peninsula.
Step 4: Select Materials and Key Finishes
Now, choose your materials. Pair durable, easy-clean surfaces for countertops (like quartz) with your selected cabinetry finish. Coordinate backsplash tile, flooring, and hardware. This is where your style comes to life—whether through the warmth of wood, the coolness of marble, or the edge of concrete.
Step 5: Integrate Lighting and Electrical Plans
Lighting is crucial. Plan for layered lighting: ambient (ceiling lights), task (under-cabinet lighting), and accent (pendants over the peninsula). Consult an electrician early to place outlets conveniently on the peninsula’s side or end for small appliances. The right pendant lights will sculpt the space and enhance its functionality.
Step 6: Choose Seating and Final Decor Accents
Select stools that complement the peninsula’s thickness and style. Ensure they are the correct height (usually 24-30 inches for a 36-inch counter). Finally, add personality with decor: a vase of fresh flowers on the counter, a stack of beautiful cookbooks on the end, or art on the visible side of the peninsula. These touches make the space feel lived-in and loved.
Elevating the Look: Advanced Styling Tips
Once your peninsula kitchen renovation is installed, these advanced tips will polish the space to perfection.
- Create a Display Moment: Use the backside of the peninsula (if visible from another room) as a display area. Install open shelving for curated dishware, add a gallery wall of art, or use a bold paint color to make it a feature wall.
- Play with Texture: Introduce visual interest through texture. A woven pendant light, linen upholstery on bar stools, a rustic wood bowl, or metallic accessories can break up monotony and add depth.
- Incorporate Smart Storage: Maximize the peninsula’s utility with clever storage solutions. Include deep drawers for pots and pans, pull-out trash/recycling bins, vertical slots for cutting boards, or a pop-up electrical outlet in the countertop for a clean look.
- Style the Countertop Thoughtfully: Keep the peninsula surface functional but styled. Use a large tray to corral everyday items like a beautiful oil cruet, salt cellar, and fruit bowl. This contains clutter and creates an intentional vignette.
- Consider the View: Remember that the peninsula is often seen from multiple angles. Ensure its end panel is finished attractively, and that the sightlines from your living area are pleasing, avoiding visual clutter.
Maintenance & Care: Keeping Your Space Fresh
Maintaining your beautiful kitchen with a peninsula ensures it stays stunning for years. For daily care, wipe down countertops with manufacturer-recommended cleaners. Use a soft cloth for cabinetry and promptly clean up spills, especially on natural stone. Bar stools with removable cushion covers are ideal for easy washing.
To keep the look fresh, consider seasonal updates. Swap out stool cushions, change the decor on the countertop (e.g., citrus fruits in summer, gourds in fall), or update the pendant lights for a quick style shift. Periodically declutter the peninsula’s drawers and cabinets to maintain its efficient functionality. A well-maintained peninsula design not only looks great but also continues to serve as the joyful, functional center of your home.
FAQs: Frequently Asked Questions About Kitchen Remodel with Peninsula Designs
Q: Is a peninsula better than an island for a small kitchen?
A: Often, yes. A peninsula kitchen layout is typically more space-efficient because it attaches to a wall or existing cabinetry, requiring less floor clearance than a freestanding island. It provides similar benefits—extra counter space, seating, and storage—without dominating the room.
Q: How much does a typical kitchen remodel with a peninsula cost?
A: Costs vary widely based on size, materials, and labor. A peninsula remodel can range from a few thousand dollars for a simple update with RTA cabinets to $15,000+ for a full custom renovation with high-end finishes. It’s generally more affordable than constructing a full island with plumbing and electrical runs.
Q: What is the ideal distance between a peninsula and other counters?
A: For comfortable traffic flow and functionality, aim for a minimum of 36 to 48 inches of clearance between the peninsula edge and any opposite countertops or appliances. This allows cabinets and appliances to open easily and people to pass by comfortably, even when someone is seated.
Q: Can I add a sink or cooktop to my peninsula?
A: Absolutely. Incorporating a sink or a cooktop (especially an induction model with downdraft ventilation) is a fantastic way to boost functionality. However, it requires careful planning for plumbing, electrical, and ventilation, which increases complexity and cost. Ensure there is enough landing space on either side of these fixtures for safety and practicality.
Q: How do I choose the right height for peninsula seating?
A: Match the stool height to your counter overhang. For a standard 36-inch counter, choose counter-height stools (24-26 inches tall). If you have a raised bar section (typically 42 inches), you’ll need bar-height stools (28-30 inches tall). Always leave 9-12 inches of legroom between the seat and the underside of the counter.