Curb appeal is often the defining factor that sets a remarkable home apart from the rest of the neighborhood. While architectural details are critical, it is the living landscape that infuses a property with life, color, and texture. The image of this stunning, multi-layered front yard garden serves as a masterclass in modern landscape design. Every element, from the choice of colors to the deliberate arrangement of plant heights, contributes to a cohesive and inviting aesthetic. A truly effective garden doesn’t happen by accident; it’s the result of thoughtful planning and a keen understanding of how different species interact. For homeowners seeking to replicate this lush, impactful look, analyzing the core components of this design is the first step.
This post will dissect the elements that make this specific garden border so successful, providing you with actionable strategies to create your own show-stopping front yard landscape. We will explore the art of layering, the importance of contrast, and why choosing the right plants is pivotal for sustained beauty throughout the growing season.
The Essential Principle of Layers: Mastering Vertical Design
The first thing you notice about this landscape is its incredible depth and fullness. This is achieved not just by planting many flowers, but by arranging them in clear, descending layers. This technique, fundamental to professional garden design, creates a sense of abundant scale and ensures that every plant has its moment to shine.
Designing with Height in Mind
The foundation of this multi-tiered look is vertical organization. Look closely at the garden bed’s cross-section from the house outward.
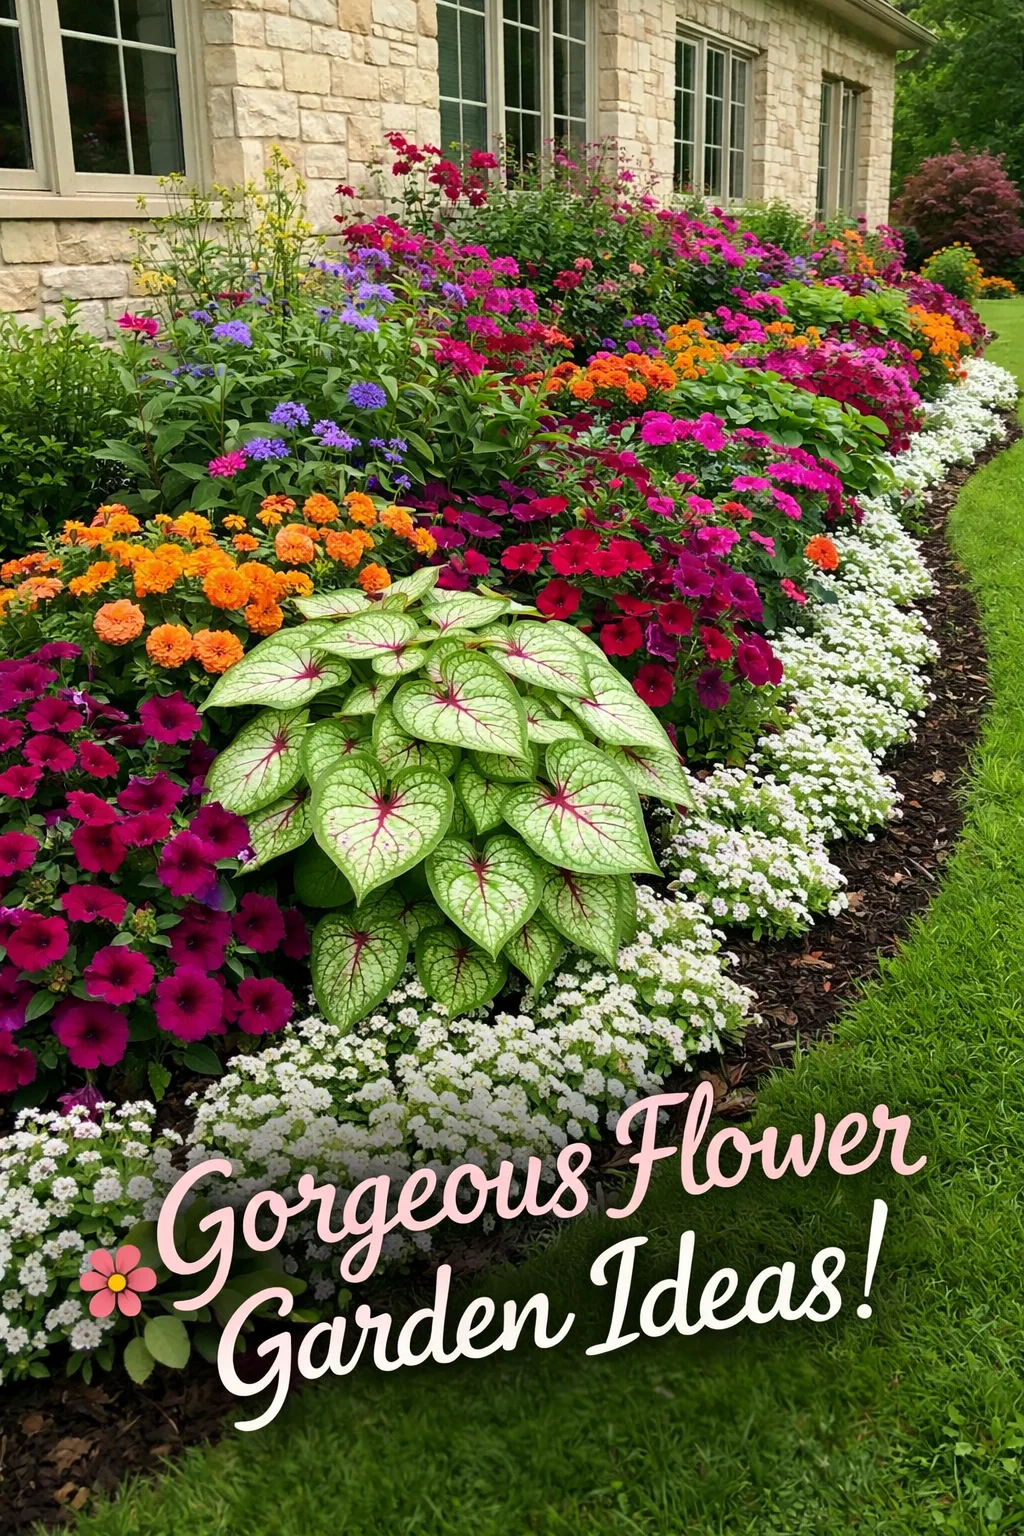
- The Background Layer (Tall Plants): Positioned right against the light stone foundation, you see the tallest specimens. Deep pink roses and what appear to be purple-spiked Verbena bonariensis (tall verbena) provide the essential backdrop. This layer grounds the entire bed and prevents the smaller plants from looking insignificant against the large house structure. They add vertical height and break up the expanse of the building.
- The Mid-Ground Layer (Intermediate Height): This is the workhorse section, providing bulk and continuity. Here, we see masses of vibrant orange marigolds and magenta-pink petunias and perhaps some Dianthus (pinks). This layer transitions the height from the tall background plants down toward the ground, filling the center of the bed with a dense carpet of texture and saturated color.
- The Foreground Layer (Groundcovers and Low-Growers): The border is neatly contained by a thick ribbon of low-growing white alyssum. This is crucial. It acts as a living frame, softening the edge where the garden meets the mulched path and, eventually, the lawn. It also helps with weed suppression and provides a unifying clean element. Intermixed at the edge are also some low-growing purple petunias, linking the foreground to the mid-ground color palette.
When planning your own garden, always select plants based on their mature height and place them accordingly. Without this deliberate stacking, the taller plants would obscure the shorter ones, and the garden would look chaotic rather than curated.
The Power of Contrasting Foliage: Making it Pop with Caladiums
While the abundant blooms are undeniable stars, the truly sophisticated element of this garden design is the strategic use of foliage for contrast. The large, heart-shaped leaves of the caladiums (likely ‘White Christmas’ or ‘Aaron’) positioned right at the center foreground are not merely fillers; they are dynamic focal points.
Creating Visual Impact and Texture
Contrast is what stops the eye. Without it, a massive block of a single color can become monotonous. The caladiums provide two types of critical contrast in this scene.
- Color Contrast: Their bright white and pale green leaves with distinctive deep magenta veins offer a startling break from the saturated oranges, pinks, and purples that surround them. They act like a spotlight, highlighting that specific area of the bed and making the entire garden appear brighter and more complex.
- Texture and Shape Contrast: The massive, smooth, structured leaves of the caladium are a complete textural opposite to the fine, feathery foliage of the alyssum and the dense, rounded shapes of the petunia and marigold blooms. This difference in form prevents the garden from looking visually “flat.” The leaves create an architectural anchor within the soft sea of flowers.
Incorporating bold foliage plants is often the difference between a nice garden and a great one. Consider adding ornamental grasses, hostas, or colorful coleus to provide structure and visual breaks in your own flowering borders.
A Saturated and Balanced Color Palette for Year-Round Appeal
This garden border is a celebration of color. Rather than sticking to a subdued, monochromatic scheme, it embraces a rich, multi-colored approach. Yet, it doesn’t look like a box of crayons exploded; there is balance and rhythm in how the colors are distributed.
Distributing and Echoing Colors
The color strategy is about density and echoing motifs.
- Density and Saturated Tones: The mid-ground layer uses large masses of contrasting saturated colors (orange marigolds next to magenta petunias). This creates high-impact zones that are visible even from a distance. The depth of color is maintained throughout the entire border.
- Echoing Colors for Unity: The color palette isn’t random. The deep magenta veins of the caladium leaves are perfectly echoed by the magenta-pink of the petunias. The tall purple verbena spikes in the background are mirrored by the low-growing purple petunias in the foreground edge. This deliberate repetition helps tie the whole composition together, creating a unified narrative rather than a disconnected series of plants.
- The Role of White: Never underestimate the power of white. The mass of white alyssum at the border is not just a frame; it acts as a neutral palate cleanser, separating and intensifying the colors of the other plants. It provides a clean, defining line that makes the colorful blooms look even richer.
For your own garden, select a primary palette of 3 to 4 colors and repeat them in different ways (flowers and foliage) at different layers. Ensure you include a clean white or light green as a neutral separator.
Maintaining the Edge: Definition and Tidiness
Even the most perfectly chosen plants will look sloppy without proper edging and maintenance. This garden’s beauty is greatly enhanced by its sharp, clean defining lines. The boundary where the living plants meet the ground is precise and tidy.
Strategies for a Clean Border
- Defined Edge with Mulch: Notice the dark, clean band of mulch that separates the white alyssum from the green grass. This isn’t just aesthetic; it’s functional. A crisp trench edge (often created with an edger or a spade) and a fresh layer of mulch provide a physical barrier that stops grass from encroaching into the garden bed and weeds from popping up at the edge. It makes the white alyssum border stand out dramatically.
- Plant Choice for Containment: Using a dense, mounding plant like alyssum that reliably creates a tidy border without growing wildly aggressive is key. It creates a neat living fence. When you combine this type of plant with a clean physical edge, the entire landscape looks manicured.
- Proper Spacing and Weeding: A dense garden like this relies on correct spacing to fill in completely and shade out weeds. However, initial spacing and regular maintenance are still required to keep the lines clean and prevent the plants from visually blurring into each other. Regular deadheading of flowers keeps them looking fresh.
Implementing These Concepts in Your Own Front Yard
This inspirational garden doesn’t require a master gardener’s license to emulate, but it does require careful planning. Here is how you can apply these principles.
- Analyze Your Site: Before you plant, observe your front yard. How much sun does it get? Is it wet or dry? This specific garden relies on full-sun, well-draining soil for its blooms. Choose plants that match your site conditions.
- Create a Map and a List: Draw a sketch of your garden space. Divide it into your three layers: tall, medium, and foreground/edge. Then, start listing plants for each layer based on your color palette and light requirements. Research mature heights carefully.
- Select “Bridge” Plants: Choose several plants in your list to serve as color and texture bridges, like the caladiums or a repeating color, to create that unified, professional look.
- Install a Solid Edge First: The most important practical tip: get your physical edge set before you plant. Dig a clean trench or install edging, and lay down your mulch. This sets the stage and ensures your garden will always have a tidy frame.
- Plant in Mass Drifts: Rather than buying one of this and one of that, buy plants in sets and plant them in “drifts” or large masses. This mimics how plants naturally grow and creates the impact you see in the example image. Think “three or five of a single species planted together.”
Conclusion: The Blueprint for Curb Appeal Mastery
A lush, professional-looking front yard flower bed like the one in this image is a source of pride and provides a daily sense of welcome. By analyzing this successful design, we have uncovered a clear blueprint: deliberate vertical layering, bold contrast provided by key foliage plants, a strategic use of color that includes unifying repetition, and an unwavering commitment to clean, defined edges. These elements are not secrets available only to professionals; they are fundamental principles of design that you can adopt. Your home’s exterior is the first chapter of its story. With these strategies in place, you are well on your way to writing a vibrant, beautiful chapter that will be the talk of the neighborhood.