Transforming a house into a home often comes down to the smallest details. While furniture and paint colors set the stage, it is the unique, handcrafted accents that truly breathe life into a living space. One of the most charming ways to achieve this is through functional woodworking projects that marry utility with personality. The cat-themed wooden key holder and shelf pictured here is a perfect example of how a simple piece of lumber can be reimagined into a whimsical and practical organizational tool for your entryway.
The Growing Appeal of Functional Wood Art
In recent years, there has been a significant shift toward artisanal home decor. People are moving away from mass produced plastic organizers and toward materials that feel grounded and natural. Wood is the ultimate medium for this movement because it is durable, versatile, and brings an organic warmth to any room. When you create something like a multi-tiered cat shelf, you are not just adding storage; you are adding a conversation piece that reflects your interests and your style.
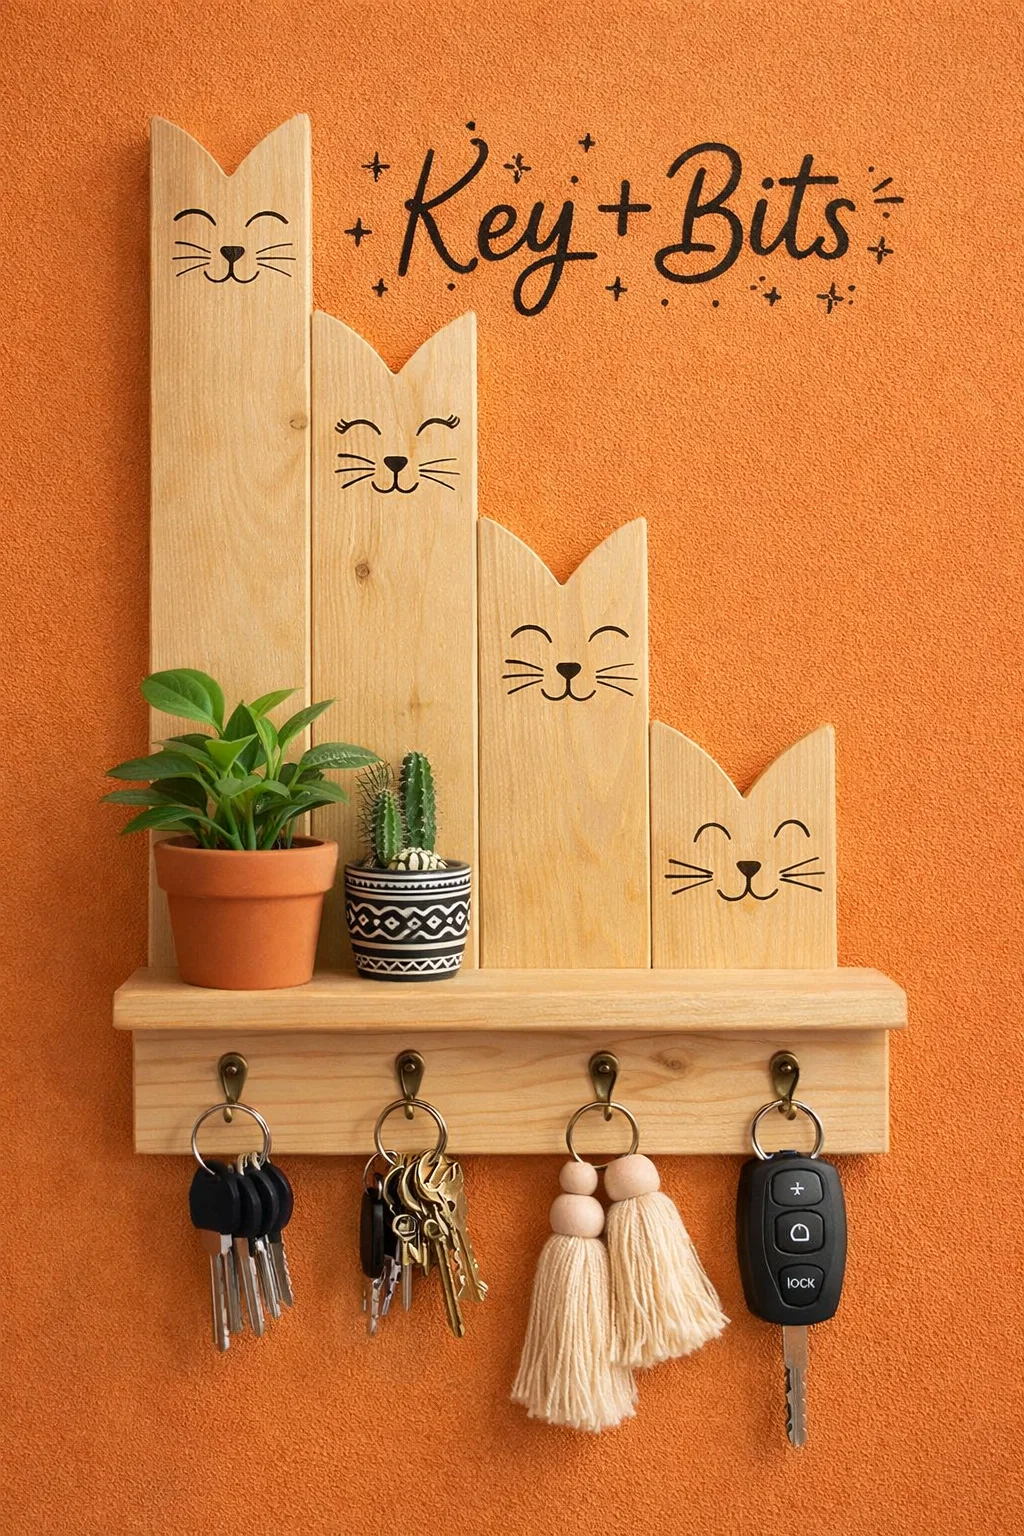
The beauty of woodcraft lies in its imperfections and the stories told through its grain. Whether you use pine, cedar, or oak, each piece of wood has a unique pattern that ensures no two projects are ever exactly alike. This project specifically uses vertical slats of varying heights to create a rhythmic, stepped silhouette that is visually striking even before you add the functional hooks and shelf.
Materials and Tools Needed for Your DIY Woodworking Journey
Starting a project like this does not require a massive workshop or years of experience. Most of the charm comes from the simplicity of the design. To recreate a similar cat-themed entryway organizer, you will need a few basic supplies that are easily found at any local hardware store. Using high quality materials will ensure that your piece stands the test of time and looks professional once mounted on your wall.
Selecting the Right Lumber
For a project that involves intricate shapes like cat ears, softwoods such as pine or poplar are excellent choices. They are easy to saw and sand, making the pointed ear details much simpler to achieve. If you prefer a more rugged or farmhouse look, reclaimed pallet wood is a fantastic alternative. Reclaimed wood often comes with a built in history, featuring knots and nail holes that add a rustic texture that new lumber simply cannot replicate.
Essential Tools for Crafting
- Jigsaw: This is the most important tool for cutting the ear shapes and the stepped heights of the backboards.
- Orbit Sander: To achieve that smooth, touchable finish, you will want to sand through various grits, starting from 80 and moving up to 220.
- Drill and Wood Screws: Necessary for attaching the horizontal shelf to the vertical backboards.
- Wood Glue: High strength wood glue adds an extra layer of durability to the joints.
- Measuring Tape and Square: Precision is key to ensuring your shelf sits perfectly level.
Step-by-Step Breakdown of the Cat Key Holder Project
The process of building this organizer is as rewarding as the final result. It begins with the back panel, which consists of four separate boards. Each board is cut to a different length, creating a staircase effect that draws the eye upward. The top of each board is then notched with a V-shape to mimic the ears of a cat. This simple geometric trick is what gives the piece its distinctive character without requiring complex carving skills.
Preparing the Backboards
Start by measuring your desired widths and heights. In the reference image, the boards appear to be roughly four inches wide. Once the heights are determined, use a pencil to mark the center of each board at the top. Draw diagonal lines from the center point to the corners to create the ear points. Using a jigsaw, carefully follow these lines. After cutting, it is crucial to sand the edges thoroughly to remove any splinters and round off the sharp points for a softer look.
Assembling the Shelf and Hook Rail
The horizontal shelf serves two purposes: it provides a surface for small items like succulents or cacti and acts as a structural bridge for the vertical slats. A second horizontal board is placed below the shelf to house the key hooks. This dual layer approach makes the unit much sturdier. When assembling, it is best to screw from the back of the vertical boards into the horizontal ones. This hides the hardware and keeps the front of the piece looking clean and professional.
Adding Personality with Minimalist Details
What truly sets this project apart is the minimalist cat faces. Using a fine tip permanent marker or a wood burning tool, simple lines are used to represent closed eyes, a nose, and whiskers. This “kawaii” or cute style is effective because it relies on the viewer’s imagination to fill in the rest. It keeps the project looking modern rather than cluttered.
Tips for Perfect Face Placement
Before committing with ink or a wood burner, practice your sketches on a scrap piece of wood. Positioning the faces at different heights on each board adds a sense of movement and playfulness. It makes it look as though the cats are peeking out from behind one another. If you are not confident in your freehand drawing skills, you can easily create a stencil or use a vinyl cutting machine to make decals that you can stick on and seal with a clear coat.
Choosing Hooks and Hardware
The hardware you choose can change the entire vibe of the piece. In the image, antique brass hooks are used, which complement the warm tones of the natural wood and the orange wall perfectly. For a more modern look, you might choose matte black hooks. For a boho feel, consider using mismatched vintage knobs. The four hooks provide ample space for car keys, lanyards, or even lightweight dog leashes, keeping your essentials right where you need them as you head out the door.
Styling Your Entryway Organizer
Once your project is built and mounted, the fun of styling begins. Because this piece has a built-in shelf, it offers a great opportunity to bring a bit of nature indoors. Small potted plants are a natural choice. As seen in the inspiration photo, a geometric patterned pot with a leafy green plant contrasts beautifully against the light wood grain. A small cactus in a terracotta pot adds a different texture and requires very little maintenance, making it ideal for a high traffic area like an entryway.
Coordinating with Wall Colors
The choice of wall color significantly impacts how the wood pops. Natural, light colored wood looks stunning against earthy tones like terracotta, sage green, or deep navy blue. If your walls are white or beige, the wood provides a subtle, minimalist elegance. The goal is to create a focal point that feels intentional. Mounting the shelf at eye level ensures that the cat faces are easily seen and appreciated by guests entering your home.
Maintenance and Longevity of Handmade Wood Items
To keep your wooden creations looking their best, a little bit of care goes a long way. Since this is an indoor piece, it does not face the harsh elements that outdoor furniture does, but it can still benefit from a protective finish. A simple clear polyurethane spray or a natural beeswax polish will protect the wood from moisture and fingerprints. Over time, the wood may darken slightly as it is exposed to light, a process known as patina which only adds to the beauty and history of the item.
Cleaning is simple. A quick dust with a microfiber cloth is usually all that is needed. If the wood ever starts to look dull, a light application of mineral oil can restore its luster and keep the fibers hydrated. This ensures that the intricate ear details do not become brittle or prone to chipping over the years.
The Joy of Handmade Living
Building your own home decor is about more than just saving money; it is about the satisfaction of saying “I made that.” Every time you hang your keys on a hook you installed or water a plant sitting on a shelf you sanded, you feel a connection to your environment. This cat-themed project is an accessible entry point for beginners while offering enough customization to satisfy more experienced woodworkers.
It also makes for a deeply personal gift. For the cat lover in your life, a handmade piece like this is far more meaningful than anything bought from a big box retailer. You can customize the number of “cats” to match the number of pets in their household, making it a true tribute to their furry family members.
Bringing the Vision to Life
Whether you follow the design in the image exactly or use it as a springboard for your own ideas, the core lesson remains the same: functional items do not have to be boring. You can take a standard utility like a key rack and turn it into a piece of art that brings a smile to your face every single day. The combination of natural textures, cute character design, and practical storage is a winning formula for any home improvement enthusiast.
As you gather your tools and prepare your wood, remember that the goal is to enjoy the process. Don’t worry if your lines aren’t perfectly straight or if your cat ears are a little lopsided. Those small variations are what make handmade items special. They represent the human hand at work, creating something unique in a world of digital perfection.
Conclusion
Handcrafted wooden projects like this cat key holder remind us that organization can be both beautiful and playful. By blending simple woodworking techniques with a bit of creative flair, you can solve the age old problem of “where are my keys?” while simultaneously upgrading your interior design. This project is a testament to the versatility of wood and the endless possibilities that come with a little imagination and a few basic tools. It is time to clear off your workbench, grab some scrap lumber, and start creating a piece that brings both order and joy to your home. Happy building!