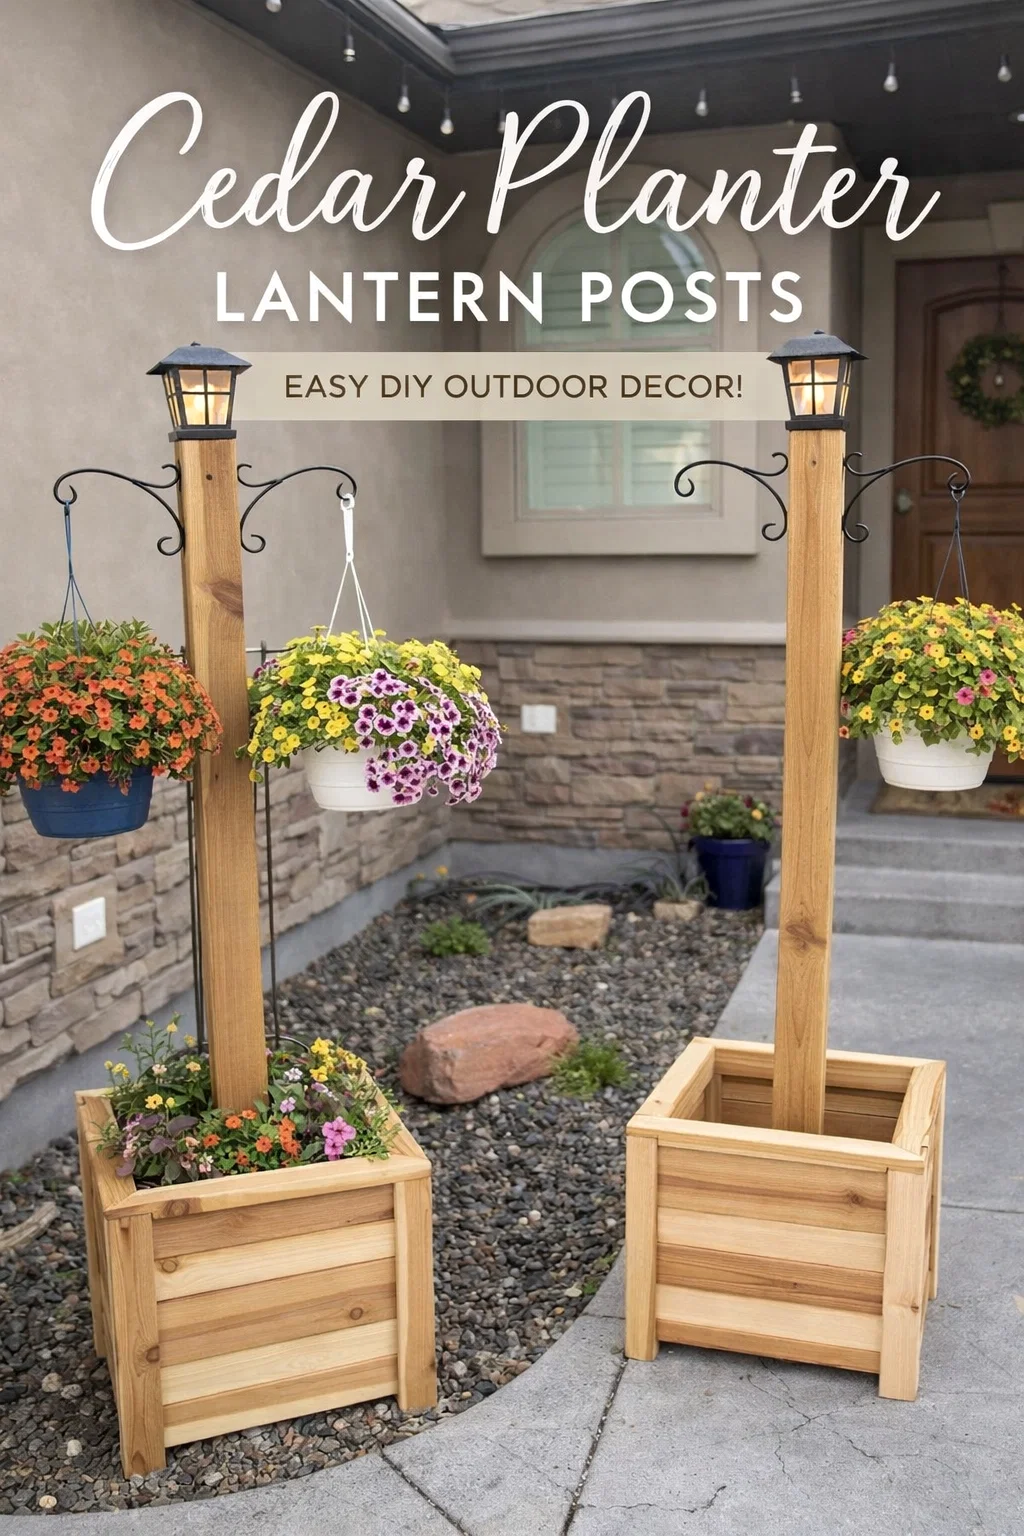
Welcome to a project that will completely transform the curb appeal of your home with a blend of natural beauty and modern functionality. If you have been looking for a way to make your front porch or entryway stand out, this DIY solar-powered planter and hanging basket post combo is the answer. It combines the warm texture of natural wood with the vibrant colors of seasonal flowers and the convenience of solar lighting. The best part is that this is a project you can build yourself in a single weekend. I was incredibly inspired when I first saw the image above, showing a perfectly balanced, symmetry-driven entrance feature. It is a stunning example of how functional design can be truly beautiful. We are going to break down exactly how you can replicate this look, customize it, and keep it looking great for years to come.
This post setup is a masterclass in modern rustic design. It solves multiple front yard decor challenges simultaneously. It gives you a place for ground-level flowers, a high-impact location for hanging baskets, and integrated pathway lighting without any complicated wiring. I particularly love how the two units frame the front door, creating a welcoming and intentional entrance. This isn’t just a container garden, it is a statement piece of outdoor furniture that you get to design yourself. Let us dive into everything you need to know to make your own set of these versatile wooden garden posts.
The Essential Supplies You Will Need for This Project
Before you start making cuts and making a trip to the home center, it is crucial to have a complete plan. This project requires a mix of materials from the lumber aisle, the garden center, and the hardware section. Getting organized now will save you time later.
Recommended Tools
- A miter saw is ideal for making clean, precise 90 and 45-degree cuts, but a circular saw or even a simple hand saw will work with care.
- An electric drill/driver is necessary for pre-drilling holes and driving the screws. A counter-sink bit is highly recommended.
- A tape measure and a speed square are essential for accurate measurements and checking for square corners.
- Safety glasses are a non-negotiable must-have for any woodworking.
- A carpenter’s level is crucial to ensure your final posts sit perfectly straight and the hangers are even.
- A clean paintbrush if you plan on applying any stains or sealers.
Material List
The core of this project is the lumber. Let’s talk about choosing the right species.
Cedar or Redwood: These are the gold standards for outdoor projects. They have natural, inherent resistance to insects and rot, meaning your planters will last for many years without chemical treatments. Cedar also has a beautiful, rich color. This will be for your main posts (e.g., 4×4 or 6×6) and the wood for the planter boxes (e.g., 1×6 or 1×8 fence pickets for a rustic look, or standard dimensional lumber).
Pressure-Treated Pine: If budget is a concern, pressure-treated lumber is a durable option. However, it often has a greenish hue and can be prone to shrinking and warping as it dries. You will need to let it dry completely before you can apply a stain. Avoid this for food-safe planters, but for purely ornamental flowers like these, it is perfectly fine.
Besides your primary lumber, you will also need the following hardware and accessories:
- Decorative Shepherd’s Hooks or Hanging Brackets: In the inspiration photo, a graceful, scrolling wrought-iron bracket is used. You can find these at most garden or craft stores. Ensure they are robust enough to handle the weight of a heavy, watered hanging basket.
- Solar Post Cap Lights: These are the star of the show for functionality. They replace the standard flat post cap and provide ambient light. Choose a style and color (e.g., black, white, copper) that complements your home’s existing architecture. Be sure to check that the light’s base fits the specific size of your post.
- Exterior-Grade Screws: Do not use regular indoor screws. They will rust and can cause the wood to fail. Choose decking screws or polymer-coated screws specifically designed for outdoor use. Counter-sink them slightly for a professional finish.
- Landscaping Fabric: Line the bottom and sides of your planter boxes with this fabric before adding soil. It helps keep the soil in place while still allowing water to drain, which is critical for plant health.
- Potting Mix, Drainage Gravel, and Selected Plants: Choose a high-quality potting mix that is formulated for containers. A layer of pea gravel at the bottom of the box before the soil helps with drainage.
- Your Choice of Finishes: An exterior stain, wood sealer, or paint will protect the wood and allow you to customize the final look to match your home.
Step-by-Step Build Guide: How to Construct Your Planter and Post
Now that your materials are ready, it is time for the fun part: building the units. This approach focuses on creating a stable, secure, and beautiful structure.
Step 1: Build the Planter Boxes
The planter box serves as the stable base for your entire unit. You have a couple of options for how to construct it. You can build a standard cube or rectangle, or you can build a separate “insert” liner. I recommend building a complete box first. Start by cutting your wood for the four sides and the base to your desired dimensions. Check that your corners are square (at 90 degrees) as you go. For a more finished look, you can make 45-degree miter cuts at the corners. For a faster build, simple butt joints are very common. Assemble the sides using plenty of exterior screws. Then, attach the base, making sure to drill several small drainage holes in it first.
Step 2: Install and Secure the Main Post
This is the single most critical step for the safety and longevity of your project. The main vertical post (the 4×4 or 6×6) must be securely anchored inside the planter box. You absolutely cannot simply set the post on top of the soil. The best way to do this is to attach the post directly to the base of the planter box before you put any soil in. Place the post centrally, then use several long, robust carriage bolts with washers and nuts to bolt it securely to the center of the box’s base structure from the bottom up. For extra rigidity, you can also screw small support blocks or brackets around the base of the post where it meets the interior sides of the planter box. This forms a strong, unified structure that will not tip over.
Step 3: Attach the Hanging Brackets
With your main post secured to the box, you can now add the decorative brackets that will hold your hanging baskets. This is where symmetry becomes key, as seen in our inspiration photo. Lay your posts on their sides or have a helper hold them upright. Use your measuring tape and a level to mark the exact same height on each post for the brackets. This ensures your final product looks professional. Pre-drill your holes to prevent the wood from splitting, and then use the screws provided with your bracket (or other exterior-grade screws) to firmly attach them. The scrolling metal design shown above is a beautiful choice that adds a touch of classic elegance.
Step 4: Prepare and Plant the Bases
Before you add your soil, line the inside of the planter box with a layer of landscaping fabric. It should cover the entire interior. Trim it to be flush with the top edge. Then, place a 1-to-2-inch layer of drainage gravel or small rocks at the very bottom of the box. This ensures excess water can always flow away from your plant roots. Finally, fill the box with your high-quality potting mix. This is a great time to mix in a slow-release granular fertilizer to give your plants a head start. In the example photo, we see a beautiful variety of low-growing colorful flowers, including petunias, in the base, which perfectly complement the hanging baskets.
Step 5: Install the Solar Light Cap
The final, finishing touch is also the easiest. The solar post cap light is designed to be a direct replacement for the standard post cap. It simply slips over the top of the post. It is typically held in place by friction, but some include small screws for a more permanent mount. Make sure you install the included rechargeable battery and check the manufacturer’s instructions for any initial activation steps, such as pulling a tab. Ensure the solar panels receive adequate sunlight for the first few days to get a full charge.
Design Decisions: Sizing, Placement, and Styling for Maximum Impact
One of the best things about a DIY project is the ability to make it your own. You can adapt this concept to fit any space and any aesthetic. Here are some design choices to consider.
Post Sizing and Overall Height
The choice between a 4×4 or a 6×6 post determines both the visual weight and the structural stability of the final piece. A 6×6 post, as shown in the inspiration photo, provides a more substantial, high-end feel and is incredibly sturdy. For smaller porches or a more streamlined look, a 4×4 post is still a great, sturdy choice and may fit smaller solar caps more readily. For overall height, consider the space you are working with. Your main post will likely be between five and seven feet tall. The top of the post should be high enough so your hanging baskets can hang freely without creating an obstacle.
The Power of Symmetry
The use of two identical units on either side of an entrance, as seen above, is a powerful design principle. Symmetry is naturally pleasing to the eye and creates a strong, formal, and welcoming sense of order. It makes your entry feel intentional and curated. While a single unit is beautiful, a matched set has exponential visual impact. When building a set, make a master cut list and work systematically to ensure both are as identical as possible.
Customizing the Wood Finish
What color is your front door? What is your trim? These answers should guide your finishing choice.
- A Natural Clear Sealer: The classic choice for cedar or redwood. It protects the wood from graying while celebrating its natural color and grain.
- An Exterior Stain: You can choose from countless semi-transparent or solid colors, from deep walnuts to weathered grays, to create a look that perfectly matches your home’s exterior.
- A Solid Exterior Paint: For a more modern and clean look, painting the units black, white, or a pop of color can make them an incredible focal point.
Plants that Wow: Selecting Flowers for Beauty and Success
The plants are the living heart of this project. To replicate the gorgeous, full look of the inspiration photo, you will need a smart strategy.
The Thriller, Filler, Spiller Method
This is a foolproof container gardening formula that ensures a stunning result in both the planter box and the hanging basket.
- Thriller: This is your showpiece. For the planter box, a taller plant like a spike or a grass can be a great thriller. The hanging basket’s shape makes it a thriller on its own.
- Filler: These are mounding, busy plants that fill out the container. Petunias and calibrachoa are the perfect example, providing masses of color.
- Spiller: This is a key element. These are trailing plants that gracefully spill over the edge of the planter or basket. Sweet potato vine (available in chartreuse or deep purple) or ivy are excellent choices that create a waterfall of foliage. The inspiration photo uses fantastic trailing petunias for this effect, creating a beautiful draped appearance.
Sun vs. Shade
Be honest about the light your entryway receives. Your solar lights will require full sun to charge effectively. Most of the sun-loving flowers like petunias also require 6-8 hours of direct sun. If your porch is a shaded north-facing area, you will need to choose shade-tolerant plants like impatiens, begonias, or fuchsias. You may need to compromise slightly on the solar light’s performance, but this setup still creates an incredibly inviting atmosphere.
Maintenance and Care
A full, lush look requires consistent care. Plants in containers, especially hanging baskets, dry out faster than those in the ground. Plan on daily watering, especially during the peak of summer heat. Feed your plants with a water-soluble fertilizer every 7-14 days to support the constant production of new flowers. Deadheading, which is the removal of spent blooms, will encourage the plant to put its energy into creating new flowers instead of seeds, keeping your planters looking their absolute best.
Conclusion: Crafting a Home Entrance with Lasting Style
Building a pair of these solar-powered planter and hanging basket posts is a weekend investment that will repay you with beauty and function for years. The final result is a beautiful and unique architectural feature for your home. This project shows how a thoughtful combination of elements can transform a space. You create a natural garden anchor, a elevated vertical element, and integrated, wire-free pathway lighting, all while adding your own style. By choosing durable materials and ensuring your build is structurally sound, you create a piece of outdoor furniture that you can be truly proud of. When the sun goes down and those solar lights cast their gentle glow, illuminating the vibrant flowers, you will know every moment was worth it.