We have all been there. You walk into your bathroom, look at that heavy, dated oak vanity, and feel a sense of design fatigue. It is functional, sure, but it definitely belongs in a different decade. Replacing a vanity can be expensive and involves plumbing headaches that most of us want to avoid on a weekend. The good news is that you do not have to rip out the old to make way for the new. With a little bit of patience and some high-quality paint, you can take a builder grade cabinet and turn it into a custom piece that looks like it came straight out of a high-end showroom.
The Hidden Potential of Dated Oak Cabinets
Oak was the king of the 1980s and 90s for a reason. It is incredibly durable and features a prominent grain that adds texture. However, the honey-toned finish that was popular back then can make a small bathroom feel dark and cramped. When you look at your vanity, try to ignore the color and focus on the bones. If the frame is solid and the doors are in good shape, you are looking at the perfect canvas for a DIY transformation. Painting your vanity is the most cost effective way to bridge the gap between a tired space and a modern sanctuary.
Assessing Your Bathroom Layout
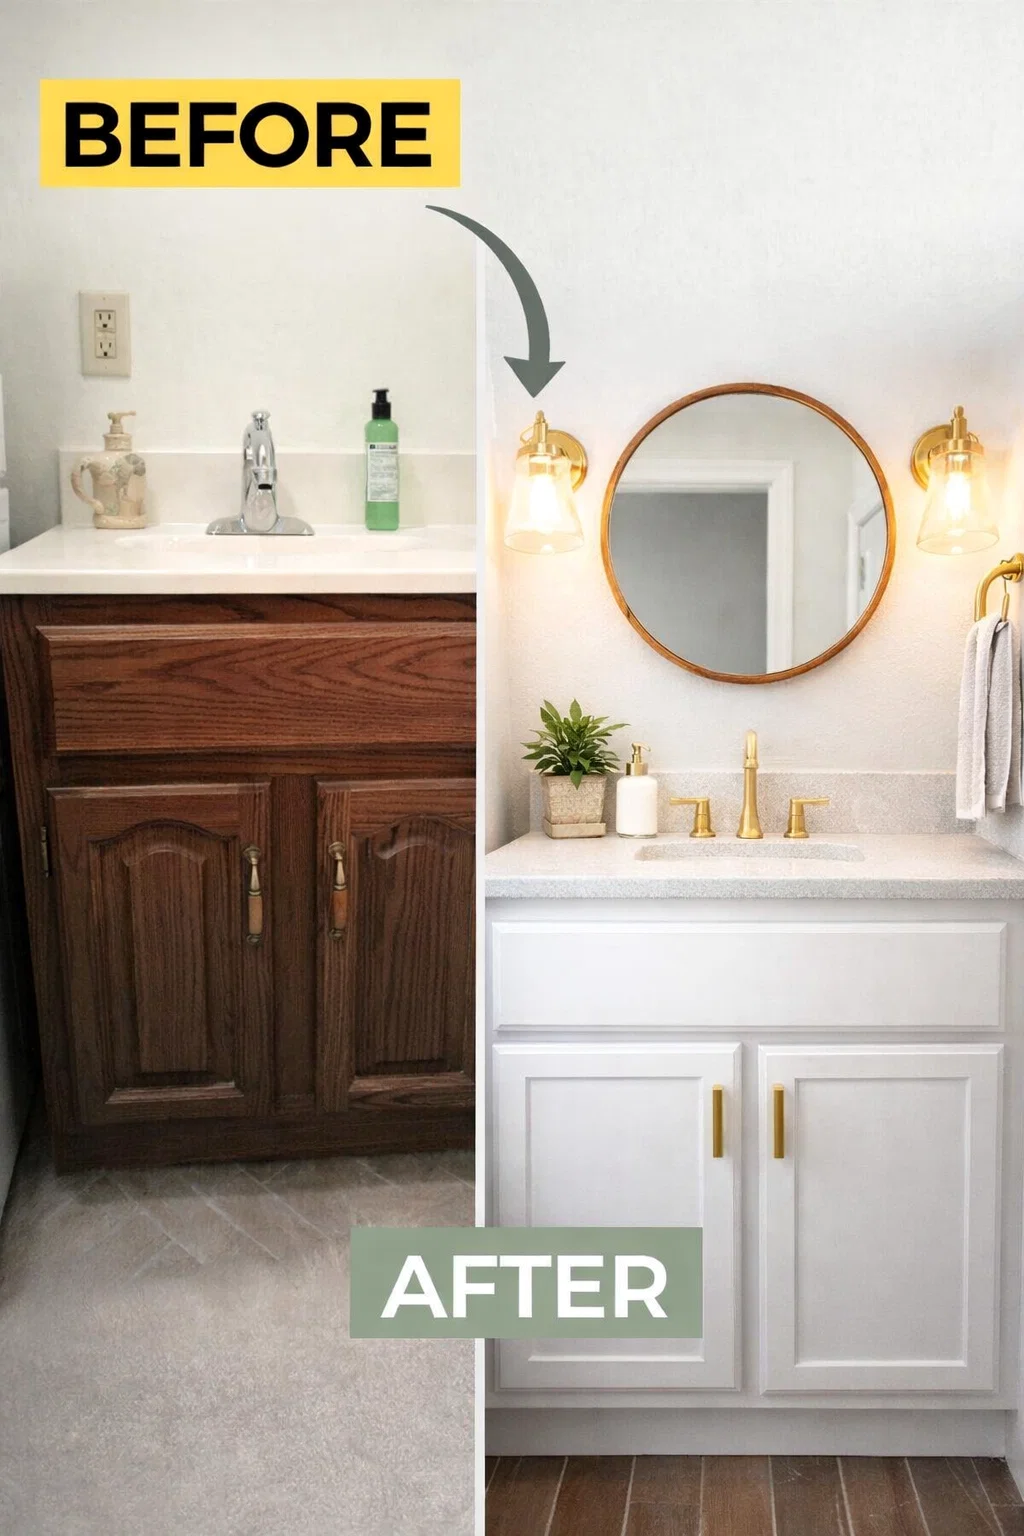
Before you pick up a brush, take a moment to look at the surrounding elements. The image shows a classic setup where the vanity is tucked into a tight space. In smaller bathrooms, every square inch matters. Changing the color of the largest furniture piece in the room will dramatically alter how light bounces off the walls. If your bathroom lacks natural light, moving toward a lighter palette or a sophisticated neutral can make the entire area feel twice as large as it actually is.
Gathering Your Transformation Toolkit
To get professional results, you need more than just a leftover can of wall paint. Wood cabinets require specific materials to ensure the finish does not peel or chip in a high moisture environment. You will want to invest in a high quality bonding primer, which is the secret to making paint stick to those slick, factory finished surfaces. For the topcoat, look for an enamel or a dedicated cabinet paint that cures to a hard, durable finish. You will also need fine grit sandpaper, a tack cloth to remove dust, and a set of high quality synthetic brushes or a small foam roller for a smooth application.
Why Sanding is Non-Negotiable
Many products claim that you can skip the sanding step, but for a bathroom vanity, you really should put in the manual labor. You do not need to strip the wood down to the bare grain. Instead, you are looking to scuff the surface. This creates a profile that the primer can grab onto. Since bathrooms deal with steam, humidity, and occasional splashes, skipping this step often leads to peeling around the edges of the doors within a few months. A quick pass with 220 grit sandpaper is all it takes to guarantee longevity.
Step by Step Guide to a Flawless Finish
The first step is always to remove the doors and hardware. Trying to paint around hinges or handles is a recipe for a messy look. Label your doors so you know exactly where they go back. Once the vanity is stripped down, clean it thoroughly with a degreaser. Years of soap residue and hairspray can create an invisible film that prevents paint from adhering correctly. After cleaning and a light sanding, wipe everything down with a tack cloth to ensure the surface is completely pristine.
The Magic of the First Primer Coat
Apply your primer in thin, even layers. If you are painting over a dark wood grain like the one in the photo, the first coat will look a bit splotchy. Do not worry. The goal of the primer is not full coverage but rather creating a bridge between the wood and the paint. Once the primer is dry, you can check for any imperfections or wood grain that might need a second coat. Oak is a porous wood, so using a grain filler before this step is an option if you want a perfectly smooth, glass like finish without the visible wood texture.
Choosing the Right Color for Your Style
Color choice is where your personality really shines. If you love a clean and airy look, a soft white or a warm cream can instantly modernize the space. For those who want something more dramatic, deep navy or charcoal grey provides a stunning contrast against a white countertop. If you lean toward a more earthy or boho aesthetic, consider a muted sage green or a dusty terracotta. These tones work beautifully with the natural textures often found in bathroom accessories like wicker baskets or linen towels.
Matching Hardware to Your New Look
The hardware is the jewelry of your vanity. The original pulls on these older cabinets are often small and dated. By simply swapping them out for something more contemporary, you can change the entire vibe of the room. Matte black hardware offers a modern, industrial touch, while brushed gold or brass adds a bit of warmth and luxury. If the new hardware has different hole spacing than the old ones, just fill the original holes with wood filler before you start the painting process and drill new ones once the paint has cured.
Small Decor Ideas to Complement Your New Vanity
Once the paint is dry and the hardware is installed, it is time to style the space. In a small bathroom, less is often more. Keep the countertop clear of clutter by using decorative trays to hold your daily essentials. A simple glass soap dispenser and a small potted plant can breathe life into the room. If you have extra wall space above the toilet or next to the vanity, consider adding some floating wooden shelves. This ties in a bit of that natural wood warmth while providing a place for folded towels or decorative jars.
Lighting and Mirrors
Never underestimate the power of a good mirror. If your vanity came with a basic frameless mirror glued to the wall, you can easily upgrade it by building a simple wooden frame around it or replacing it with a round or arched mirror. This adds a custom architectural element that makes the bathroom feel designed rather than just assembled. Update your light fixture to match your new hardware for a cohesive look that ties the whole renovation together.
Maintaining Your DIY Masterpiece
After all that hard work, you want your vanity to stay looking fresh. Give the paint at least a week to fully cure before you scrub it. When it comes to cleaning, avoid harsh chemicals or abrasive sponges. A soft microfiber cloth with a bit of mild soap and water is usually all you need. If you notice a small nick or scratch down the road, keep a tiny jar of your leftover paint handy for quick touch ups. Because you did the prep work of sanding and priming, your new finish should stand up to the rigors of daily use for years to come.
Creating a Wellness Sanctuary
Upgrading your bathroom is about more than just aesthetics. It is about creating a space where you can start and end your day with a sense of calm. A cluttered, dated environment can feel stressful, but a clean and intentional space promotes mindfulness. By taking the time to refresh your vanity, you are investing in your home and your personal well being. Every time you walk in to brush your teeth, you will feel a sense of pride in what you have created with your own hands.
Conclusion
Transforming a dated oak vanity is one of the most rewarding DIY projects you can tackle. It is a manageable task that yields incredible visual results without the need for a professional contractor. By following the right steps of cleaning, sanding, and using high quality materials, you can turn a relic of the past into a modern centerpiece. Your bathroom deserves to be a reflection of your style, and with a bit of paint and creativity, that dream is well within reach. It is time to grab your supplies and give that old cabinet the second life it deserves. Happy DIYing!