Curb appeal is often talked about but too many homeowners find themselves intimidated by the prospect of transforming their front yard. They envision weeks of grueling labor, thousands of dollars, and complex irrigation systems. But here is the secret: some of the most stunning transformations are rooted in simplicity. A few well-placed plants, defined lines, and thoughtful accents can elevate a home’s exterior from standard to stand-out. Looking at our inspiration image, we see a textbook example of this principle in action. A plain garage side is instantly upgraded into a charming focal point. This is not just landscaping; it is strategic design, and the best part is that you can achieve this exact look with a little weekend warrior spirit.
In this post, we are going to deconstruct the image to provide you with a step-by-step blueprint for a weekend curb appeal makeover. We will break down exactly why this design works, from the choice of stone to the specific plant placement, and show you how to adapt these principles to your own front yard, regardless of your skill level.
The Core Philosophy: Symmetry, Layering, and Edging
When you look at this completed project, your eye is immediately drawn to the cohesive and neat design. It does not feel chaotic or cluttered. That is because it follows three core principles: symmetry, layering, and robust edging.
1. Creating Clean Lines with Stone Edging
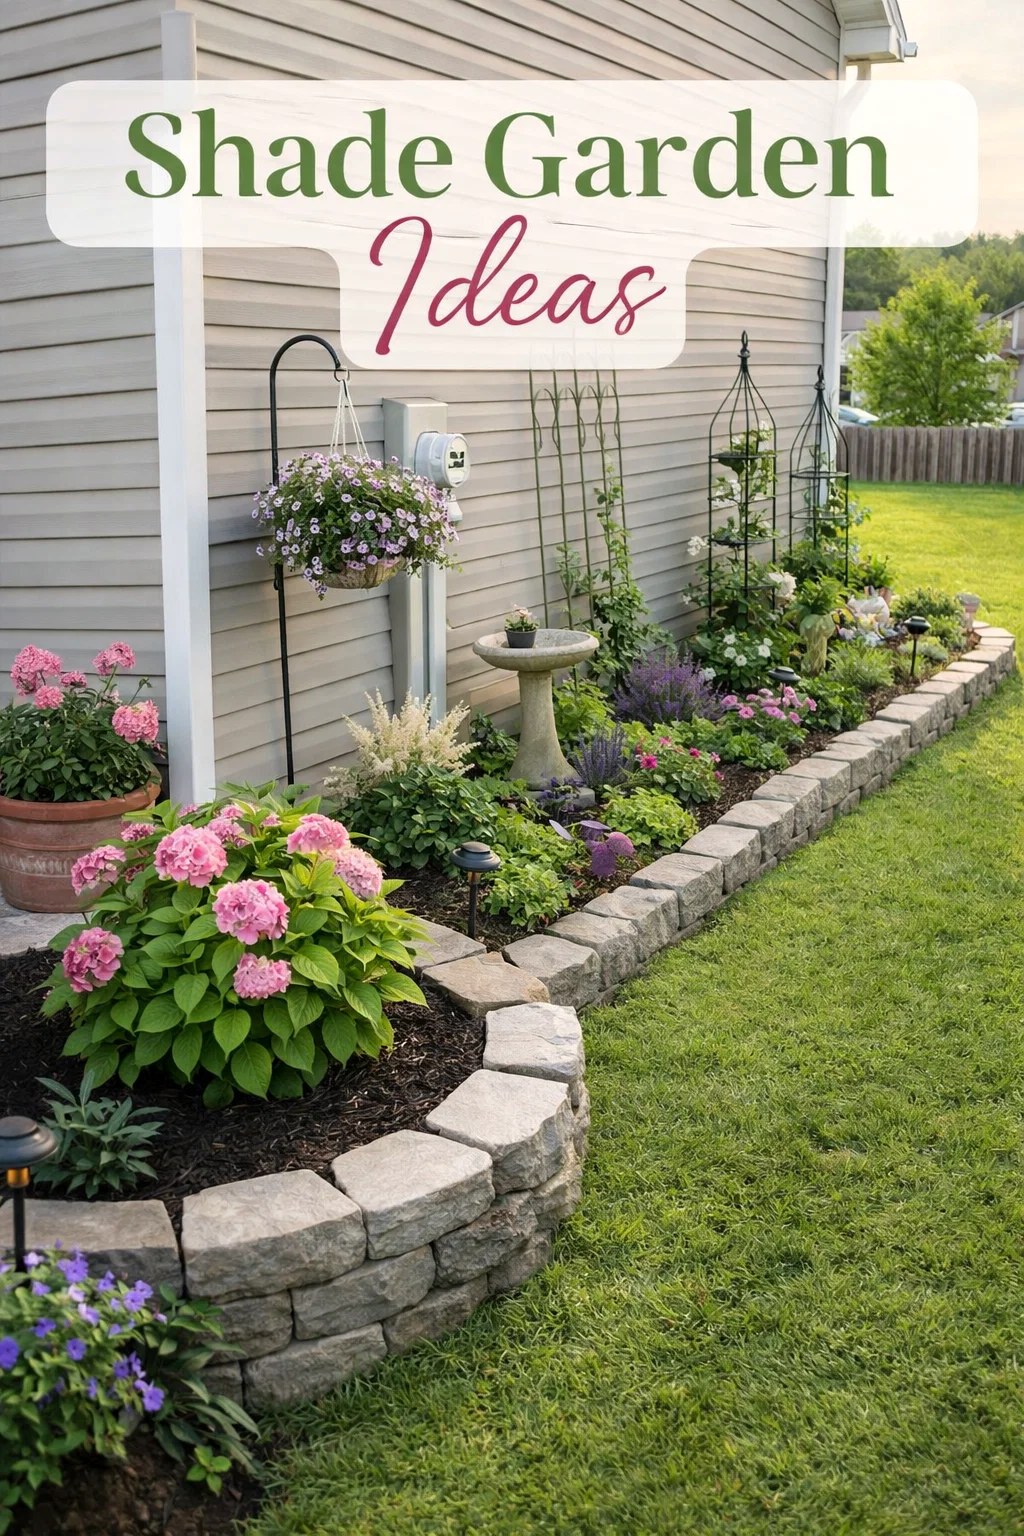
The first thing that defines this entire project is the edging. Instead of a messy plastic border or a simple cut edge in the soil, this design utilizes substantial, tumbled retaining wall blocks. This does a few things perfectly: first, it physically separates the manicured grass from the mulch bed, preventing weeds from creeping in and the mulch from washing onto the lawn. Second, it adds texture and architectural structure. The lighter gray-beige tone of the stone is a masterful touch, providing a sharp contrast to the black mulch. This strong, defined line immediately signals that the landscaping is intentional and professionally done.
2. Layering for Depth
Notice the plant placement. It is not just one long line of the same plant. Near the corner, there is a large, rounded shrub (looks to be a hardy species like an Aronia or a compact panicle hydrangea) providing initial impact. It anchors the whole corner. Behind it, in a large, rounded bed, sits a very large potted plant (with gorgeous bright pink Dahlias) next to another ground-level perennial. Further down the bed, we see layered perennials of varying heights, from the taller blue-spiked Salvia and pink Dianthus to the smaller, mounding lavender-colored flowers. Layering tallest plants in the back and smaller in the front creates visual depth, making the entire garden feel larger and more lush than it might actually be.
3. Symmetry without Rigidity
The design achieves a pleasing sense of balance without being a mirror image. The left side has a prominent potted plant and a large corner shrub. The right side features more dispersed, lower-profile plantings along the narrow bed. The placement of the decorative trellises also adds to this balance. While not perfectly symmetric, the entire composition feels anchored. It provides visual weight on both ends, creating a harmonious and stable appearance.
Deconstructing the Elements: A Closer Look
Now that we understand the philosophy, let us look at the specific components that make this scene work. Every piece plays a part in the overall aesthetic.
The Choice of Mulch: A Game Changer
Take a hard look at that mulch. It is dark, rich, and likely shredded black hardwood or a dyed black product. Why does this matter? Contrast. That dark mulch makes every green leaf and every color flower pop with incredible intensity. It makes the light gray-tan of the stone edging stand out. Contrast is key in front yard design. Too often, people choose a reddish or brown mulch that blends in with the soil or house color. By going for extreme contrast, you are guaranteed to make your plants the stars of the show.
Incorporating Vertical Elements
One of the brilliant and underutilized ideas in this image is the use of non-plant decorative elements to add height. Landscaping isn’t just about the ground; it is about filling the entire visual plane. On the wall, we see two different styles of black metal trellises. These serve three purposes: first, they add immediate height to the narrowest section of the garden bed. Second, they introduce a contrasting black iron texture against the horizontal lines of the beige vinyl siding. Third, they provide support for potential climbing plants, like a clematis or a climbing rose, which will add even more impact in the future. Without these trellises, that long stretch of wall would feel flat.
Combining Potted and In-Ground Plants
This image perfectly illustrates the power of mixing textures and methods. You do not have to put everything in the ground. The large terracotta pot on the left is a masterful touch. It instantly gives you high-impact color (the Dahlias) right where you need it, and it allows you to easily switch out plants by season. It also breaks up the single plane of the ground garden. Adding potted plants creates another ‘layer’ of height, and they are incredibly easy to manage.
Hanging Baskets for Immediate Color
The hanging basket of Calibrachoa (or ‘Million Bells’) is another essential move. It utilizes vertical space again, this time by hanging. Placing it on a shepherd’s hook or, as seen here, near the house’s utility meters, does two jobs: it draws the eye up with a splash of color, and it helps to visually soften and detract from functional-but-ugly utilities. It brings life to an often-overlooked area.
Your DIY Weekend Blueprint: How to Replicate This Look
You can achieve this level of curb appeal in a single weekend with a clear plan and the right materials. Here is your action guide, inspired by the success of our inspiration image.
Step 1: Planning and Prep
Before you ever touch a shovel, get your vision down.
- Map Your Bed: Lay out a garden hose to define the shape of your new garden bed. Do you want a clean, straight run along the house like the right side of the image, or a wide, rounded curve for impact like the corner? Following the example, a combination of both creates fantastic movement. Make sure your lines are clean and the curves are consistent.
- Clear the Area: Use a flat-head shovel to remove the top layer of sod or weeds within your defined boundary. For a large area, you can use a sod cutter, but a good shovel and some muscle is fine for this scale. Get down to bare soil. Make sure you clear it out completely; any grass or weeds left will fight their way back up.
- Determine Your Layout: Mark on the bare soil where your largest plants will go. Consider where you might add vertical elements like trellises or a shepherd’s hook. The plan in the image places large shrubs at the corners and smaller perennials filling the gaps. This is a very robust design choice.
Step 2: Installing the Edging
This is the most critical step for making your yard look professional. A poorly installed border will quickly ruin the entire look.
- Dig a Trench: Following your defined line (the hose), dig a trench that is wide enough for your stone blocks and about half their height. For standard tumbled stones like the ones pictured, you are looking at a trench about 4-6 inches deep. Keep the trench consistent.
- Create a Base (The Secret Step): Do not just put the stones directly onto the soil. Pour 1-2 inches of fine paving sand or crushed stone base into your trench and level it. This is your foundation. It will prevent your stones from sinking and shifting over time.
- Lay Your Stones: Place your stones into the trench one by one. Gently tap them into place with a rubber mallet, checking for level on each stone. Start at a definitive corner or edge and work your way out. If you are doing a curve, you may need to use smaller pieces or special ‘cap’ stones designed for radiuses. Take your time here; precision pays off.
Step 3: Planting and Mulching
This is where your vision comes to life.
- Amending your soil: Once your edging is in, loosen the soil in the entire bed. Mix in several bags of compost or high-quality garden soil. This provides essential nutrients for your new plants. Do not plant directly into hard, compact clay or pure sand. This will make your soil lighter and richer, helping the plants to thrive.
- Planting: Set your new plants in their nursery pots in the bed exactly where you plan to plant them. This lets you step back and view the entire composition before you commit. Once you are happy with the layout, dig each hole to the depth of the pot but 1.5 times as wide. Tease the root balls before planting, place the plant, and backfill with your soil mixture.
- Mulching: Spread your black mulch 2-3 inches deep across the entire garden bed. Be careful not to pile it directly against the plant stems; leave a small gap. This protects the plant roots and prevents pests. Once the mulch is in, water everything thoroughly to help them settle. Make sure to water near the base of the plant, not over the leaves. This will encourage deep root growth.
Step 4: Adding the Final Accents
The garden is planted, but it is the details that make the whole image.
- Decorative Trellises: Place your black iron trellises where you want to add height. Pictured, they add structure to the straight section of the bed. We can imagine a beautiful clematis vine climbing one of them in a couple of years. We love the way they contrast with the house color.
- Potted Plants and Hooks: Find a large, decorative pot for your Dahlias or another seasonal favorite. Put it right on the mulch, creating that extra layer of height. This also breaks up the ground-level plants. Set up your shepherd’s hook and hang your basket, carefully choosing a spot that softens utility boxes or adds color to a dull section of siding. This moves the color from the ground up to eye level, which is a key design trick.
Simple Landscaping, Maximum Impact
Look at what you can achieve in a weekend. By taking one inspired image and breaking it down into actionable steps, you can create a front yard that looks like a million bucks but only costs a few hundred. The key takeaway here is not that this exact composition is the only solution; it is the approach. Prioritize your borders, maximize your color contrast with mulch, and integrate vertical layers. It is this systematic design that will elevate your space. Do not be afraid to be inspired, to copy, and to create a yard that makes you smile every time you drive in. Take a little time this weekend, grab a shovel, and create your own perfect slice of curb appeal. The results are truly worth the effort.