Stepping into the woods and leaving the digital noise behind is more than just a weekend hobby. For many, it is a return to our roots. The image of this moss covered, earth integrated shelter speaks to the primal urge we all have to build something with our own two hands. It represents the pinnacle of bushcraft: the ability to create a functional, weather resistant home using nothing but the resources provided by the forest floor. Whether you are an experienced survivalist or a curious beginner looking to enhance your outdoor skills, understanding the mechanics of a natural hideout is the first step toward true self reliance.
The Philosophy of the Forest Hideout
Building a shelter like the one pictured is not just about stacking sticks. It is about harmony. Unlike a bright orange tent that stands out against the landscape, a debris hut or moss shelter is designed to disappear. This concept of camouflage is central to the bushcraft philosophy. By using organic materials found within a hundred yards of your site, you ensure that your structure belongs to the environment rather than intruding upon it. This approach minimizes your ecological footprint while maximizing your connection to the land.
There is a profound sense of peace that comes from sitting inside a structure you built yourself. The smell of damp earth, the insulating silence provided by thick moss walls, and the dappled light filtering through the trees create an atmosphere that no synthetic material can replicate. This is a space for reflection, for learning the language of the birds, and for testing your physical limits in a way that rewards patience and precision.
Choosing the Perfect Location for Your Shelter
Before you pick up a single branch, you must analyze your surroundings. The success of a survival shelter depends 90 percent on its location. If you build in a low lying area, you risk flooding during a sudden rainstorm. If you build on a ridge, you are exposed to high winds that can sap your body heat. You want to find the Goldilocks zone: a flat, well drained area that is naturally protected by the terrain.
Safety First: The Widowmaker Check
In the world of bushcraft, a widowmaker is a dead branch or tree that is caught in the canopy and could fall at any moment. Before committing to a site, look up. Ensure there are no hanging limbs above your intended sleeping area. Additionally, check for signs of animal dens or insect nests. You do not want to realize at midnight that you have built your home on top of an ant hill.
Proximity to Natural Resources
Building a shelter is labor intensive. You want to be close to your building materials to conserve energy. Look for areas with plenty of fallen timber, large rocks for a hearth, and a nearby source of insulation like moss, ferns, or dry leaves. Access to water is also vital, but you should aim to stay at least 200 feet away from lakes or streams to protect the water quality and avoid high mosquito populations.
The Structural Foundation: Building the Frame
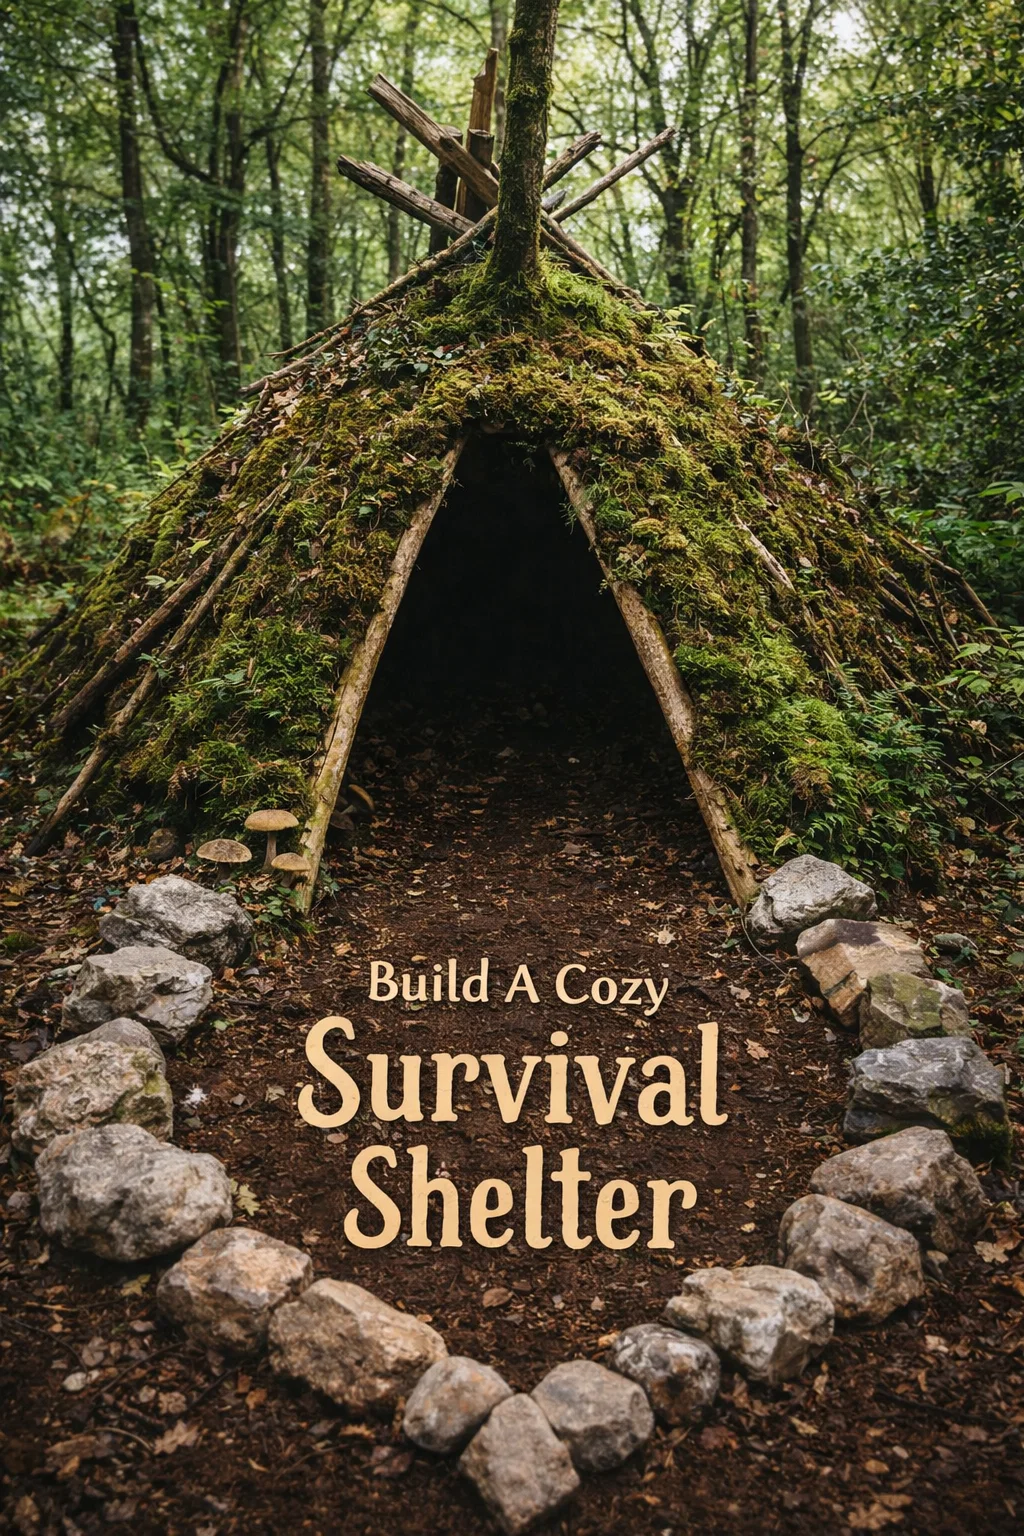
The shelter in the image utilizes a classic debris hut design with a wide, welcoming entrance. The frame is the skeleton of your home, and it must be sturdy enough to support the weight of wet soil and moss. Most traditional shelters start with a ridgepole: a long, thick branch that runs the length of the structure.
- The A-Frame Approach: Use two sturdy, forked branches to support one end of your ridgepole, creating an entrance. The other end of the pole rests on the ground or a low stump.
- Ribbing the Structure: Lean smaller branches against the ridgepole at a 45 degree angle. These act as the ribs. Ensure the gaps between the ribs are small enough that your insulation material won’t fall through.
- Reinforcing the Walls: Weave smaller flexible twigs through the ribs to create a lattice. This makes the entire structure rigid and provides a better surface for the moss to cling to.
The Magic of Moss and Earth Insulation
What makes the shelter in the photo truly remarkable is the living roof. Moss is one of nature’s most effective insulators. It is naturally fire resistant, holds moisture to keep the interior cool, and provides incredible thermal mass to trap heat in the winter. When you apply moss, you are essentially creating a living skin for your hut.
Applying the Layers
To achieve a waterproof and windproof finish, you need to think in layers. Start by packing the gaps in your wooden frame with dry leaves or pine needles. This acts as your loft. Next, add a layer of damp earth or clay. This mud layer acts as a glue. Finally, press large slabs of living moss into the mud. If done correctly, the moss will continue to grow, knitting the structure together over time and making it nearly invisible to the untrained eye.
Managing Moisture
While moss is great, you must ensure the pitch of your roof is steep enough to shed water. If the roof is too flat, water will pool and eventually seep through the layers. Notice how the shelter in the image has a distinct conical shape. This ensures that even during a heavy downpour, the water rolls off the sides and away from the entrance.
Creating a Comfortable Interior
A shelter is only as good as the sleep you get inside it. The ground is a heat sink that will pull warmth directly from your body, even in the summer. You must create a sleeping platform. In a survival situation, this usually means a thick bed of compressed pine boughs or dry grass at least six inches deep.
Designing the Entrance
The entrance should be just large enough for you to crawl through. The larger the opening, the more heat escapes. The shelter pictured features a stone lined path leading into the dark interior. This is a brilliant touch because the stones help keep mud out of your living space and can even be heated by a nearby fire to radiate warmth into the hut at night.
The Art of the Bushcraft Kitchen
No hideout is complete without a way to cook and stay warm. Safety is the primary concern here. You should never build a large fire inside a debris hut. Instead, create a small, stone lined fire pit just outside the entrance. The rocks will absorb the heat and reflect it back into the shelter. If you are building a more permanent structure with a smoke hole, ensure the hole is properly reinforced with green wood or stones to prevent the roof from catching fire.
Using Reflective Heat
A simple trick to double the efficiency of your fire is to build a heat reflector. This is a small wall made of logs or stones placed on the opposite side of the fire from your shelter. It bounces the radiant heat back toward you, ensuring that very little energy is wasted.
Maintenance and Longevity
A natural shelter is a living thing. It requires maintenance to stay functional. Every season, you should check the integrity of the frame and add a fresh layer of mulch or moss to the roof. Insects may try to make a home in your walls, so regular inspections are necessary. If you notice the moss browning, it may need a light misting of water during dry spells to keep it alive and effective as an insulator.
Why Building a Hideout Matters Today
In our modern world, we are often disconnected from the processes that keep us alive. We turn a dial for heat and go to a store for food. Building a forest hideout forces us to engage with the physics of survival. It teaches us about gravity, thermodynamics, and biology in a hands on way that no textbook can match. Beyond the technical skills, it builds mental resilience. Knowing that you can walk into the woods with nothing and create a comfortable home provides a level of confidence that stays with you in every aspect of life.
Conclusion
The moss covered shelter is a symbol of human ingenuity and our enduring bond with the natural world. It proves that we do not need complex technology to find comfort and safety. By using the ancient techniques of bushcraft, you can transform a pile of fallen branches into a sanctuary. So, the next time you find yourself wandering through a lush forest, look around at the sticks, the stones, and the moss. See them not as debris, but as the building blocks of your next great adventure. Whether you build a tiny crawl space or a grand woodland hut, the journey of creation is where the true magic happens. Get out there, start scavenging, and build your own piece of the wild.