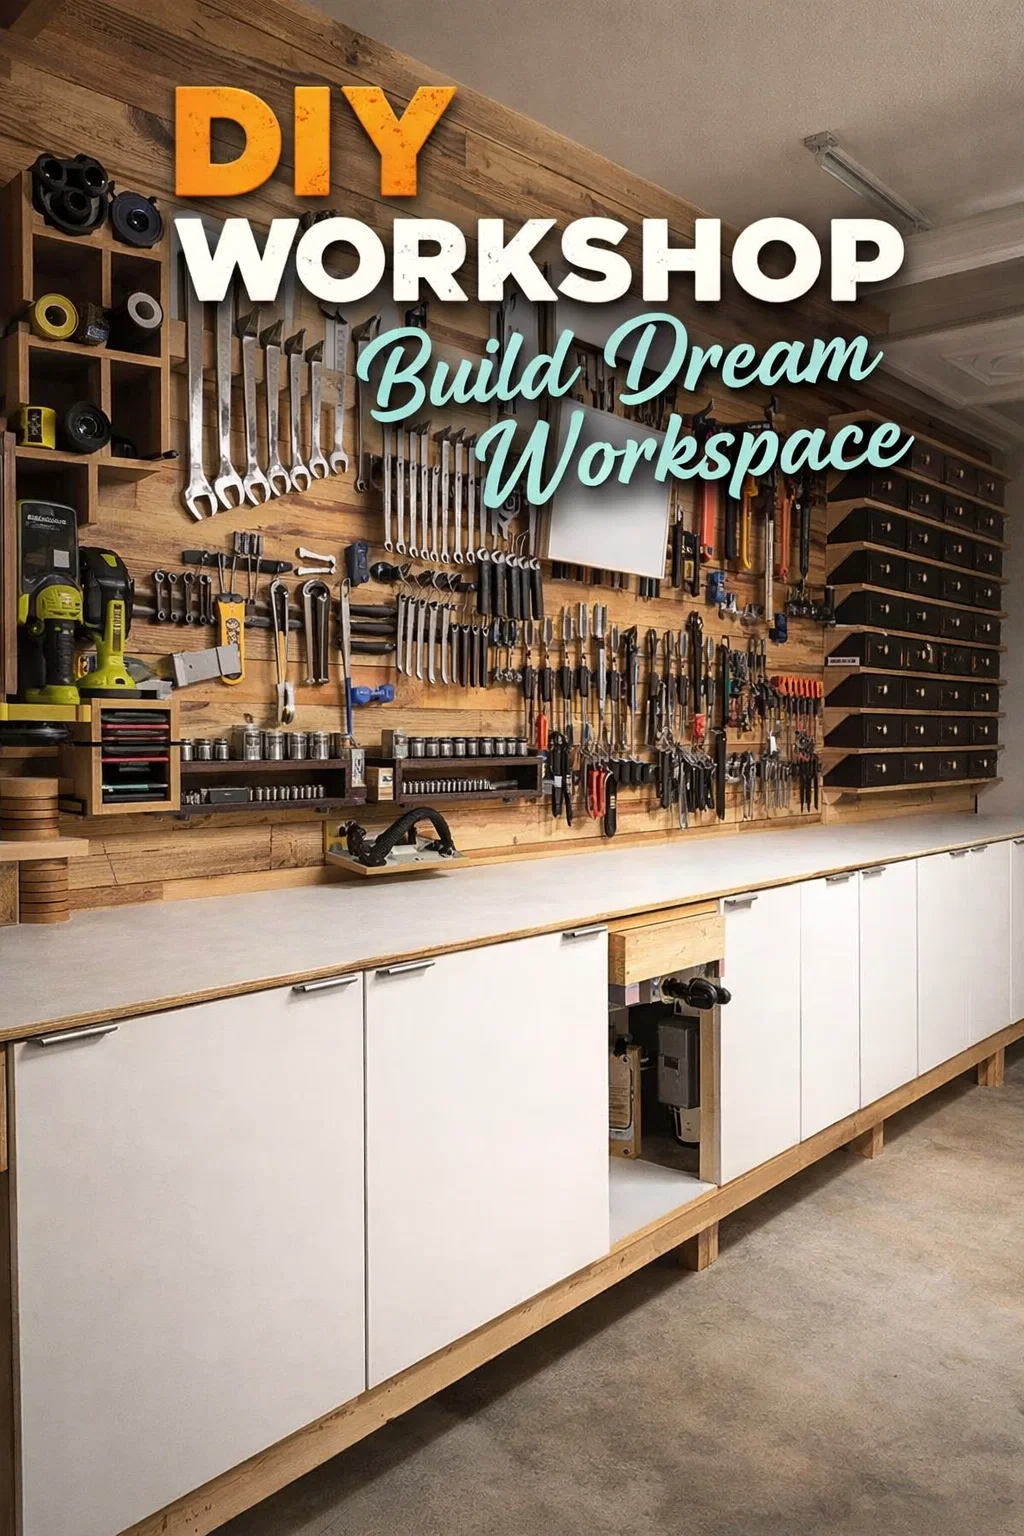
Stepping into a cluttered workspace can feel like a weight on your shoulders, but seeing a perfectly organized garage workshop is like taking a deep breath of fresh air. The image we are looking at showcases the pinnacle of functional design for the modern DIYer or professional woodworker. It features a seamless blend of expansive horizontal work surfaces, hidden lower storage, and a highly accessible vertical tool wall. This is not just a place where things get built; it is a environment designed to foster creativity and eliminate the frustration of hunting for misplaced tools.
The Foundation of Productivity: The Integrated Workbench
At the heart of any great shop is the workbench. In this setup, we see a continuous, clean white surface that stretches across the entire length of the room. This design choice is brilliant for several reasons. First, the light color reflects overhead lighting, making it much easier to see fine details on your workpieces. Second, the sheer length allows for multiple projects to happen simultaneously or provides enough support for long pieces of lumber when using a miter saw or track saw.
The integrated nature of the bench also means there are no gaps for sawdust or small screws to fall into. It creates a unified workspace that feels professional and intentional. Whether you are assembling furniture, repairing small electronics, or simply sorting through hardware, having a dedicated, flat, and sturdy surface is the most important investment you can make in your workshop.
Maximizing the Lower Footprint with Custom Cabinetry
While the top of the bench is for work, the area beneath it is where the magic of organization happens. The image highlights a series of large, white cabinets that provide a massive amount of storage volume. By using closed cabinetry instead of open shelving, the workshop maintains a minimalist and tidy appearance. This also protects your expensive power tools and materials from the inevitable dust that comes with woodworking.
Notice the small cutouts and specialized sections within the cabinetry line. There is a dedicated space for a woodworking vise, which is essential for holding pieces securely while sanding, sawing, or chiseling. This level of customization ensures that every square inch of the shop is serving a specific purpose. By tucking bulky items like air compressors, shop vacs, or heavy power tools behind these doors, you reclaim the floor space and make the room feel much larger than it actually is.
Vertical Storage and the Power of the French Cleat System
If the cabinets are the heavy lifters of storage, the wall above the workbench is the command center. This workshop utilizes a sophisticated vertical organization system that keeps every hand tool visible and ready for action. Looking at the wall, we see dozens of wrenches, pliers, screwdrivers, and hammers arranged with military precision. This is often achieved through a French cleat system or a custom slatwall, allowing the user to move tool holders around as their collection grows.
The beauty of this vertical approach is ergonomics. When you are in the middle of a project, you do not want to stop, open a drawer, and rummage through a pile of metal to find a 10mm wrench. Instead, you simply reach up and grab it. This flow state is what separates a frustrating hobby from a rewarding craft. The visual impact of seeing your tools displayed like this also serves as a constant inspiration to keep the space clean and respected.
Specialized Storage for Small Parts and Consumables
Beyond the large tools, every workshop struggles with the “small stuff.” This includes screws, nails, dowels, sandpaper, and adhesives. In the background of the image, we can see specialized racking systems designed to hold bins or sorted containers. Organizing by size and type is the only way to maintain efficiency. When you know exactly where your 2 inch wood screws are, you save minutes on every task, which adds up to hours over the course of a project.
The sandpaper station visible on the left side of the wall is another great example of niche organization. Sanding is often the most tedious part of woodworking, but having your grits labeled and stacked in order makes the transition from coarse to fine much more manageable. It is these small details that turn a basic garage into a high performance studio.
Creating a Lighting and Power Strategy
While we can see the physical storage, a workshop of this caliber also requires a smart electrical layout. A long workbench needs power outlets spaced every few feet so that you are never stretching cords across your walking path. In a professional setup like the one pictured, outlets are often mounted just below the lip of the workbench or integrated into the backsplash area of the tool wall. This keeps the workspace safe and prevents tripping hazards.
Lighting is equally critical. To complement a white workbench, high output LED shop lights should be positioned directly over the work zones to eliminate shadows. When your storage is this well organized, you want to be able to see the results of your labor clearly. Good lighting enhances the safety of the shop, as you can easily spot small obstructions or potential hazards on the floor or the benchtop.
The Importance of Flooring and Mobility
Although the cabinets in the image appear built in, many modern workshops choose to put their heavy equipment on mobile bases. However, for a stationary setup like this, the focus shifts to the comfort of the floor. Standing on concrete for hours can be hard on the back and knees. Adding anti fatigue mats in front of the primary work zones, such as the vise or the assembly area, can make a world of difference in how long you can comfortably work on your craft.
The cleanliness of the floor in the image suggests a robust dust collection system. Keeping the floor clear of scraps and sawdust is not just about aesthetics; it is about safety. A clean floor prevents slips and allows you to move freely around the expansive workbench to reach different tools on the wall.
Steps to Achieve This Level of Organization
If you are looking at this image and feeling inspired to overhaul your own space, the best way to start is by decluttering. You cannot organize what you do not need. Follow these steps to begin your workshop transformation:
- Purge the Excess: Go through every drawer and corner. Get rid of broken tools, dried up glues, and scrap wood that is too small to be useful.
- Categorize Your Tools: Group items by task. Keep all your measuring tools together, all your cutting tools together, and all your finishing supplies in one spot.
- Build Your Bench: Aim for the largest work surface your space can reasonably accommodate. If possible, use a light colored laminate or finished plywood for the top.
- Go Vertical: Clear the bench by moving everything possible onto the wall. Whether you use pegboard, slatwall, or French cleats, getting tools off the horizontal surface is a game changer.
- Label Everything: Especially for closed cabinets and small bins, labels prevent the “where did I put that” syndrome.
The Psychology of an Organized Workshop
There is a profound psychological benefit to working in a space that looks like the one in the photo. Chaos in your environment often leads to chaos in your process. When your tools are clean, sharpened, and in their proper places, you approach your work with more focus and intentionality. You are more likely to take the time to do a job right when you aren’t fighting your environment every step of the way.
Furthermore, an organized shop is a safer shop. Most workshop accidents happen when someone is rushing, frustrated, or working around a mess. By clearing the clutter, you create clear paths for your hands and body, reducing the risk of injury. It also makes the shop a more inviting place for friends or family to join you in a project, as the environment is welcoming and easy to navigate.
Conclusion: Your Dream Workshop is Within Reach
The stunning workshop pictured serves as a blueprint for what is possible when you prioritize organization and workflow. By combining a massive, clean workbench with smart cabinetry and an accessible tool wall, you create a space that works for you rather than against you. It is an investment in your craft and your peace of mind. While it takes time and effort to build out a system this sophisticated, the reward is a lifetime of productive, enjoyable, and safe making.
Remember that a workshop is a living entity. It will evolve as your skills grow and your interests shift. Start with the basics of a solid bench and clear walls, and gradually build out the storage solutions that fit your specific needs. Before you know it, you will have a space that is not only functional but is also a source of immense pride. It is time to clear off that old card table, sweep the floor, and start building the organized sanctuary you have always wanted.