Creating a backyard sanctuary is one of the most rewarding home improvement projects you can undertake. While a traditional wood-burning fire is classic, more homeowners are turning toward gas fire pits for their cleanliness, ease of use, and consistent heat. However, looking at a finished fire pit is one thing, but understanding the internal mechanics can feel a bit overwhelming if you are not familiar with the hardware. If you have been dreaming of a flickering flame at the flip of a switch, understanding the anatomy of a gas fire pit is the first step toward making that dream a reality.
The Foundation: Choosing Your Masonry and Layout
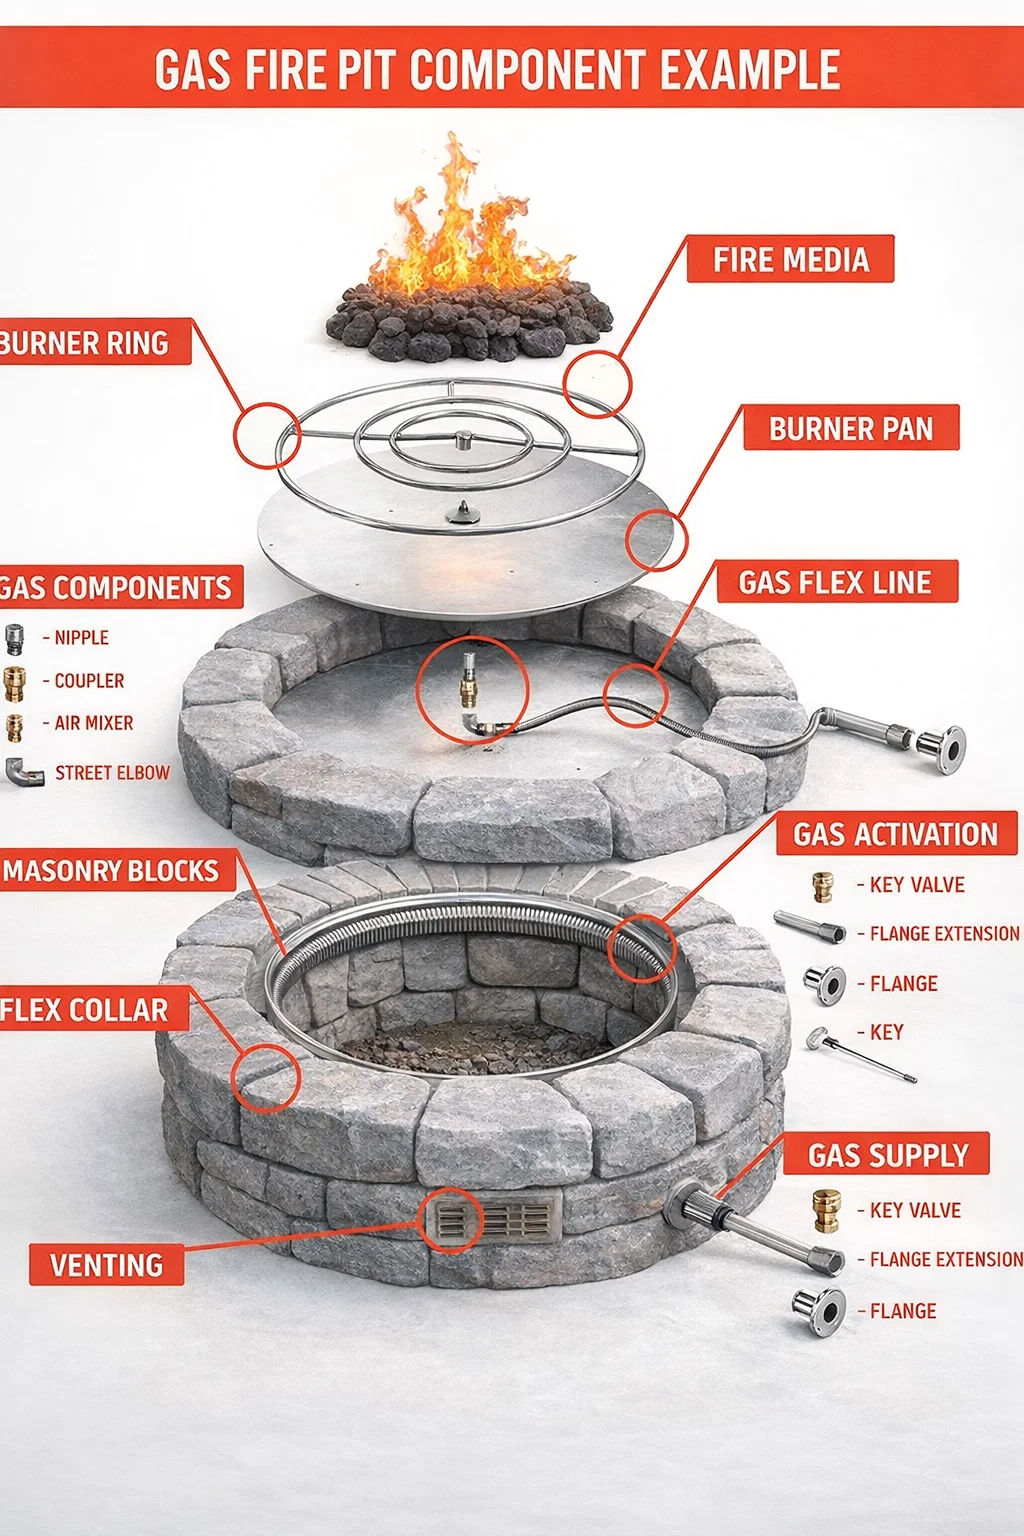
Before you even touch a gas line, you have to consider the structure that holds everything together. The base of a permanent outdoor fire pit is typically constructed from high-quality masonry blocks. These blocks provide the weight and stability needed to withstand the elements. When choosing your blocks, it is vital to select materials that are rated for high heat to prevent cracking or shifting over time.
One often overlooked aspect of the foundation is the venting system. Gas fire pits require proper airflow to prevent gas buildup inside the enclosure and to ensure the flame stays steady. Small vent inserts are placed near the bottom of the masonry structure to allow air to circulate freely. This is a critical safety feature that protects your investment and your home.
Understanding the Internal Gas Components
The heart of your fire pit lies in the series of small but mighty brass and stainless steel parts that manage the fuel. The gas supply line typically enters from the bottom or side, connecting to a series of specialized fittings. These include the nipple and coupler, which act as the primary joints for the internal piping. Each connection must be secure and airtight to ensure peak performance.
The Role of the Air Mixer
If you are using liquid propane instead of natural gas, the air mixer is perhaps the most important component in your assembly. Because propane is a heavy gas, it needs to be mixed with oxygen before it reaches the burner to ensure a clean, blue flame rather than a smoky, soot-heavy one. The air mixer is a small valve that draws in outside air, creating the perfect fuel to oxygen ratio for a beautiful fire.
Flexible Connections for Easy Installation
Trying to line up rigid pipes inside a stone circle can be a nightmare. This is where the gas flex line comes into play. These stainless steel hoses are designed to bend and curve, allowing you to connect the main gas supply to the burner pan without having to worry about perfect alignment. This flexibility also makes future maintenance much easier since you can lift the burner assembly out of the pit without disconnecting every single rigid pipe.
The Burner System: Where the Magic Happens
The visual centerpiece of the internal works is the burner pan and the burner ring. The burner pan is a flat or slightly recessed disc that sits inside the masonry. Its primary job is to support the fire media and protect the lower components from falling debris or rainwater. It also creates a clean shelf that gives your fire pit a professional, finished look.
Sitting atop the pan is the burner ring. These rings come in various sizes and shapes, though a double or triple concentric ring is the most common for circular pits. The small holes along the ring are where the gas escapes to be ignited. High-quality burner rings are made of 304 stainless steel, which resists rust and corrosion even when exposed to the moisture often found in outdoor environments.
Control and Activation: Safety at Your Fingertips
How you turn your fire on and off is just as important as the flame itself. A standard gas fire pit uses a manual key valve system for activation. This involves a valve installed into the side of the masonry, accessible via a small flange. You insert a long metal key into the flange and turn it to release the gas.
The Importance of the Key Valve
The key valve acts as your primary control point. It allows you to adjust the height of the flame by controlling the volume of gas flowing to the burner. When the party is over, simply turning the key to the off position completely shuts down the fuel source. This manual method is highly reliable and does not require complex electrical wiring, making it a favorite for DIY enthusiasts.
Integrating a Flex Collar
To give the installation a polished look, many builders use a flex collar. This component helps bridge the gap between the internal burner pan and the outer masonry blocks. It provides a snug fit that keeps the burner centered and prevents heat from escaping down into the base of the unit where the sensitive gas lines are located.
Selecting the Perfect Fire Media
Once the mechanical parts are installed, it is time to cover them up with fire media. This is the material that the flames dance through, and it serves both an aesthetic and functional purpose. Fire media helps to disperse the gas more evenly, creating a fuller and more natural-looking flame. Common choices include:
- Lava Rock: This is a classic choice that offers a rugged, earthy look. It is excellent at retaining heat and is generally the most affordable option.
- Fire Glass: For a more modern and vibrant feel, fire glass comes in dozens of colors and shapes. It reflects the light of the fire, creating a shimmering effect.
- Ceramic Logs: If you want the look of a wood fire without the ash, ceramic log sets can be placed over the burner ring to mimic a traditional campfire.
Maintenance Tips for a Long-Lasting Fire Pit
Even though gas fire pits are low maintenance compared to wood-burning versions, they still require a little love to stay in top shape. During the off-season, it is a great idea to use a weather-resistant cover to keep rain, snow, and leaves out of the burner pan. Moisture can lead to clogs in the burner ring holes, which results in an uneven flame.
Periodically check the venting areas to ensure that spiders or debris have not blocked the airflow. Additionally, if you notice your flame becoming orange or smoky, it might be time to clean the air mixer or check for any obstructions in the gas line. Keeping these small components clean ensures that your fire pit remains the highlight of your backyard for years to come.
Why a Gas Fire Pit is a Worthy Investment
Beyond the obvious aesthetic appeal, a gas fire pit adds significant value to your home. It extends the usability of your outdoor living space into the cooler months of autumn and even winter. Because there is no smoke, you do not have to worry about the wind blowing fumes into your house or onto your guests. It is the ultimate combination of luxury and convenience.
Building a fire pit using a standardized kit or specific components like those discussed today ensures that your project meets safety standards while allowing for total customization. You can choose the stone that matches your patio, the glass that matches your outdoor cushions, and the flame height that fits your mood.
Final Thoughts on Your Backyard Project
Taking the time to learn about burner rings, air mixers, and masonry venting might seem technical, but it is the key to a successful DIY build. When you understand how the gas flows from the supply line to the fire media, you can build with confidence and create a space that is as safe as it is beautiful. Whether you are hosting a summer barbecue or a quiet winter evening, your custom gas fire pit will be the place where memories are made. Start gathering your components today and get ready to light up the night.