Imagine a crisp autumn evening, the smell of toasted marshmallows in the air, and a gathering of your favorite people around a glowing fire. It sounds perfect until a shift in the breeze sends a thick cloud of stinging smoke directly into your face. Suddenly, everyone is playing musical chairs to avoid the fumes, and you wake up the next morning with your hair and clothes smelling like a chimney. This common frustration is exactly why the DIY smokeless fire pit has become the ultimate backyard upgrade. By combining simple masonry with a clever secondary combustion design, you can enjoy all the warmth and ambiance of a real wood fire without the irritating smoke. In this guide, we will break down exactly how this technology works and how you can build one over a single weekend.
The Science of Secondary Combustion
To understand why this specific DIY project is so effective, we have to look at what smoke actually is. Smoke is essentially unburned fuel. In a standard fire pit, the wood burns, but the combustion is incomplete because there isn’t enough oxygen at the right temperature to finish the job. A smokeless fire pit solves this through a process called secondary combustion.
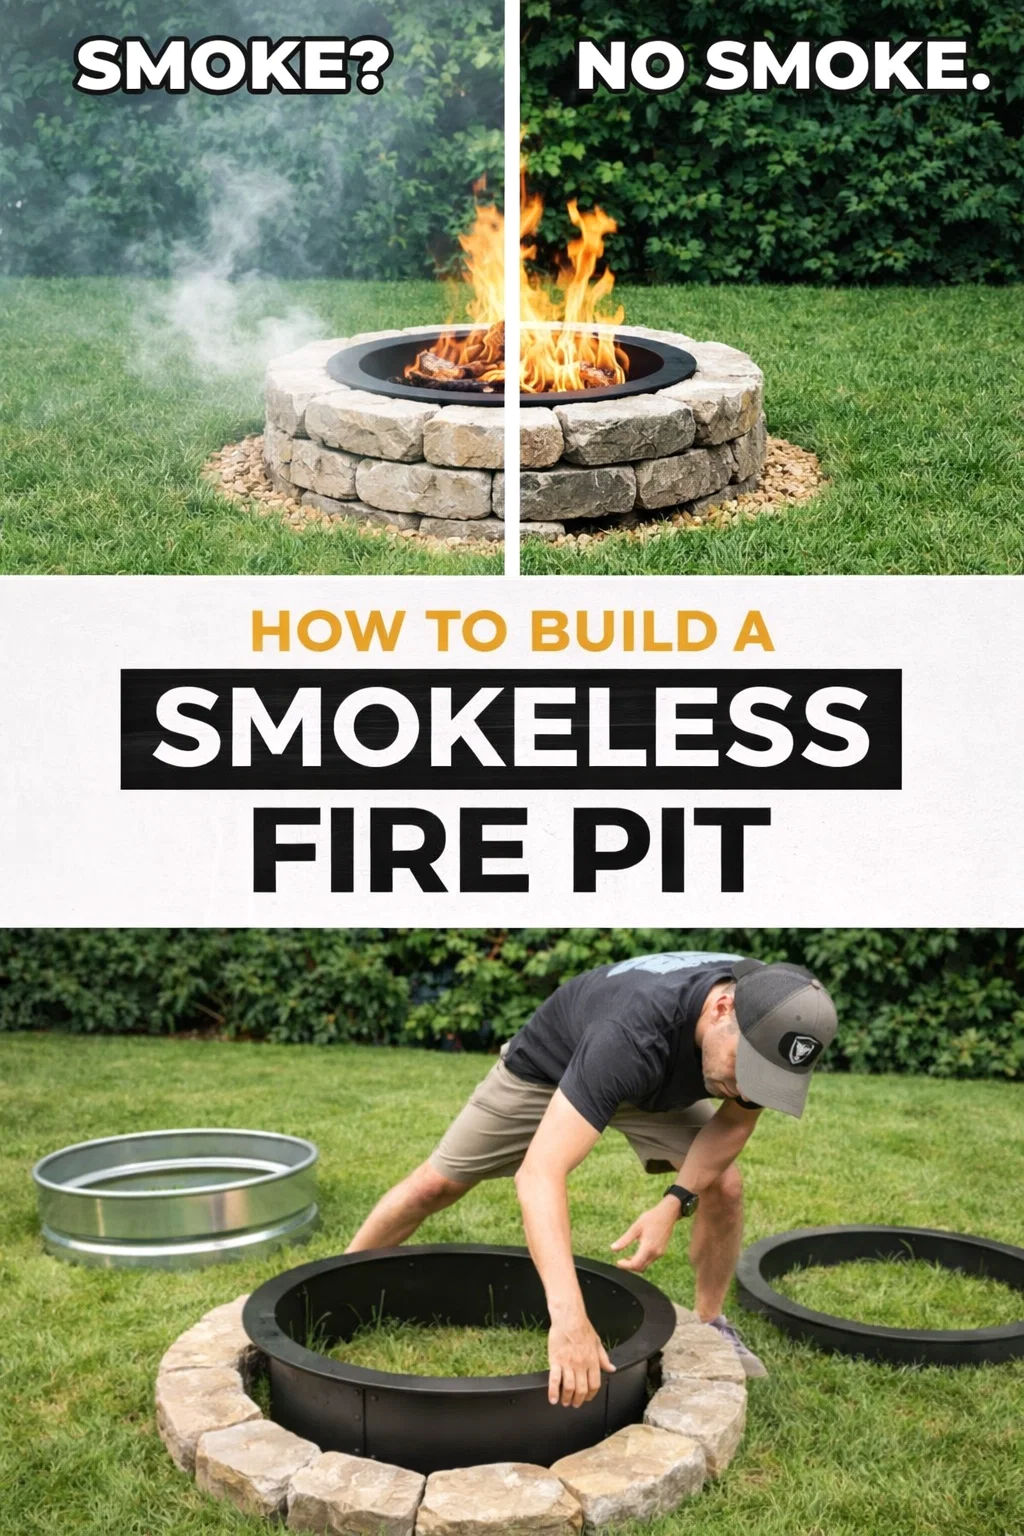
The design utilizes a double-wall system. Air is drawn in through vents at the bottom of the outer wall. As the fire heats up, this air rises between the two layers, becoming extremely hot. When this superheated air reaches the top of the inner ring, it exits through a series of small holes and meets the smoke rising from the logs. This injection of hot oxygen creates a secondary burn, effectively incinerating the smoke particles before they ever leave the pit. The result is a more efficient fire, more heat output, and a crystal-clear view of the flames.
Choosing the Right Materials for Your Build
The beauty of this project lies in its accessibility. You do not need to be a professional mason or a welder to get professional results. The core of the system is usually a galvanized steel stock tank ring or a heavy-duty steel fire ring insert. Surrounding this metal core with stone or pavers provides the thermal mass needed to keep the area warm long after the flames have died down.
The Metal Insert
You will want a high-quality steel ring that can withstand repeated heating and cooling cycles. Many DIY enthusiasts use a 30-inch or 36-inch fire ring. Some even repurpose stock tanks by cutting out the bottom, though a dedicated fire ring is often easier to work with. The key is ensuring the ring has a wide enough lip to rest securely on your stone border.
Retaining Wall Blocks
Standard concrete retaining wall blocks are the most popular choice for the exterior. They are affordable, heavy enough to stay in place without mortar, and come in various colors to match your patio or landscaping. Make sure to choose blocks that are rated for heat or ensure there is a sufficient air gap between the stone and the metal liner to prevent the blocks from cracking over time.
Base Materials
Safety starts at the bottom. You should never build a fire pit directly on top of grass. You will need a combination of crushed gravel, paver sand, or lava rocks. This provides a level foundation, allows for proper drainage, and creates a fire-safe barrier between the heat and the earth.
Step-by-Step Construction Guide
Before you dig your first hole, check your local municipal codes. Some areas have specific requirements regarding the distance a fire pit must be from structures or overhanging trees. Once you have the green light, follow these steps to assemble your smokeless masterpiece.
Phase 1: Foundation and Air Intake
Start by marking out a circle about 6 inches wider than your intended fire pit. Dig out the grass and soil to a depth of about 4 to 6 inches. Fill this area with crushed gravel and tamp it down until it is perfectly level. This level base is critical because any tilt in the bottom layer will become more pronounced as you stack your blocks.
As you lay your first ring of stones, leave two or three small gaps between the blocks. These gaps serve as the primary air intake. Without these, the secondary combustion cycle cannot start because there will be no vacuum effect to pull air upward through the walls.
Phase 2: Stacking the Walls
Continue stacking your blocks in a staggered pattern, similar to how bricks are laid in a house. Most backyard pits are about three to four layers high. This height is ideal for sitting in standard patio chairs. As you build, periodically check that your metal insert still fits snugly inside the opening. You want a small gap between the metal and the stone to allow for air movement and thermal expansion.
Phase 3: Installing the Smokeless Insert
Once your stone walls are at the desired height, drop in your metal liner. If your liner does not already have holes near the top rim, you will need to drill them yourself using a step bit and a high-powered drill. These holes should be about 1 inch apart and located roughly 2 inches below the top lip of the ring. This is where the magic happens and where the secondary burn is triggered.
Best Practices for a Cleaner Burn
Even the best-engineered smokeless fire pit will produce some smoke if you use the wrong fuel. To get that “invisible” flame look, you must use dry, seasoned hardwood. Oak, maple, and hickory are excellent choices because they burn hot and slow. Avoid “green” wood or wood that has been sitting in the rain, as the moisture will create steam and smoke that the secondary combustion system cannot fully overcome.
Another tip is to avoid overstuffing the pit. If the wood piles up above the level of the secondary air holes, it will block the airflow and disrupt the smokeless effect. Keep your logs tucked neatly below the rim for the best performance.
Maintenance and Long-Term Care
A DIY fire pit is an investment in your home’s outdoor living space, so a little maintenance goes a long way. After the ashes have completely cooled, make sure to scoop them out regularly. If ash builds up and covers the bottom air intake holes, the fire will starve for oxygen and start smoking again. You can use a simple metal shovel and a bucket for this task.
If you live in a climate with heavy snow or rain, consider purchasing a waterproof cover. While the steel and stone are durable, preventing water from pooling inside the pit will stop rust from forming on the metal liner and prevent the stones from shifting during freeze-thaw cycles in the winter.
The Benefits of Going Smokeless
Beyond the obvious comfort of not breathing in wood smoke, there are several hidden benefits to this design. Because the fire burns so hot and efficiently, you actually use less wood to get the same amount of heat. You also end up with significantly less ash to clean up at the end of the night because almost everything is consumed by the flames.
Furthermore, a smokeless fire pit is a safer option for those with close neighbors. Traditional fire pits can send large plumes of smoke into neighboring yards or open windows, which can be a nuisance. The smokeless design keeps the heat and the emissions contained, making you the favorite house on the block for summer hangouts.
Creating the Perfect Atmosphere
Once the construction is finished, the real fun begins. Enhance the area around your fire pit with comfortable seating, such as Adirondack chairs or a built-in stone bench. Add some string lights overhead to create a soft glow that complements the flickering fire. This space will quickly become the focal point of your backyard, perfect for everything from quiet solo evenings with a book to lively weekend parties with the whole family.
Conclusion
Building your own smokeless fire pit is one of the most rewarding DIY projects you can tackle. It bridges the gap between the primitive joy of an open flame and the modern desire for comfort and cleanliness. By following the principles of secondary combustion and using sturdy materials like steel and stone, you create a permanent fixture that adds value to your home and quality to your life. No more watering eyes, no more smoky clothes, just the pure, hypnotic warmth of a perfect backyard fire. So grab your shovel, pick out your pavers, and get ready to transform your outdoor experience for years to come.