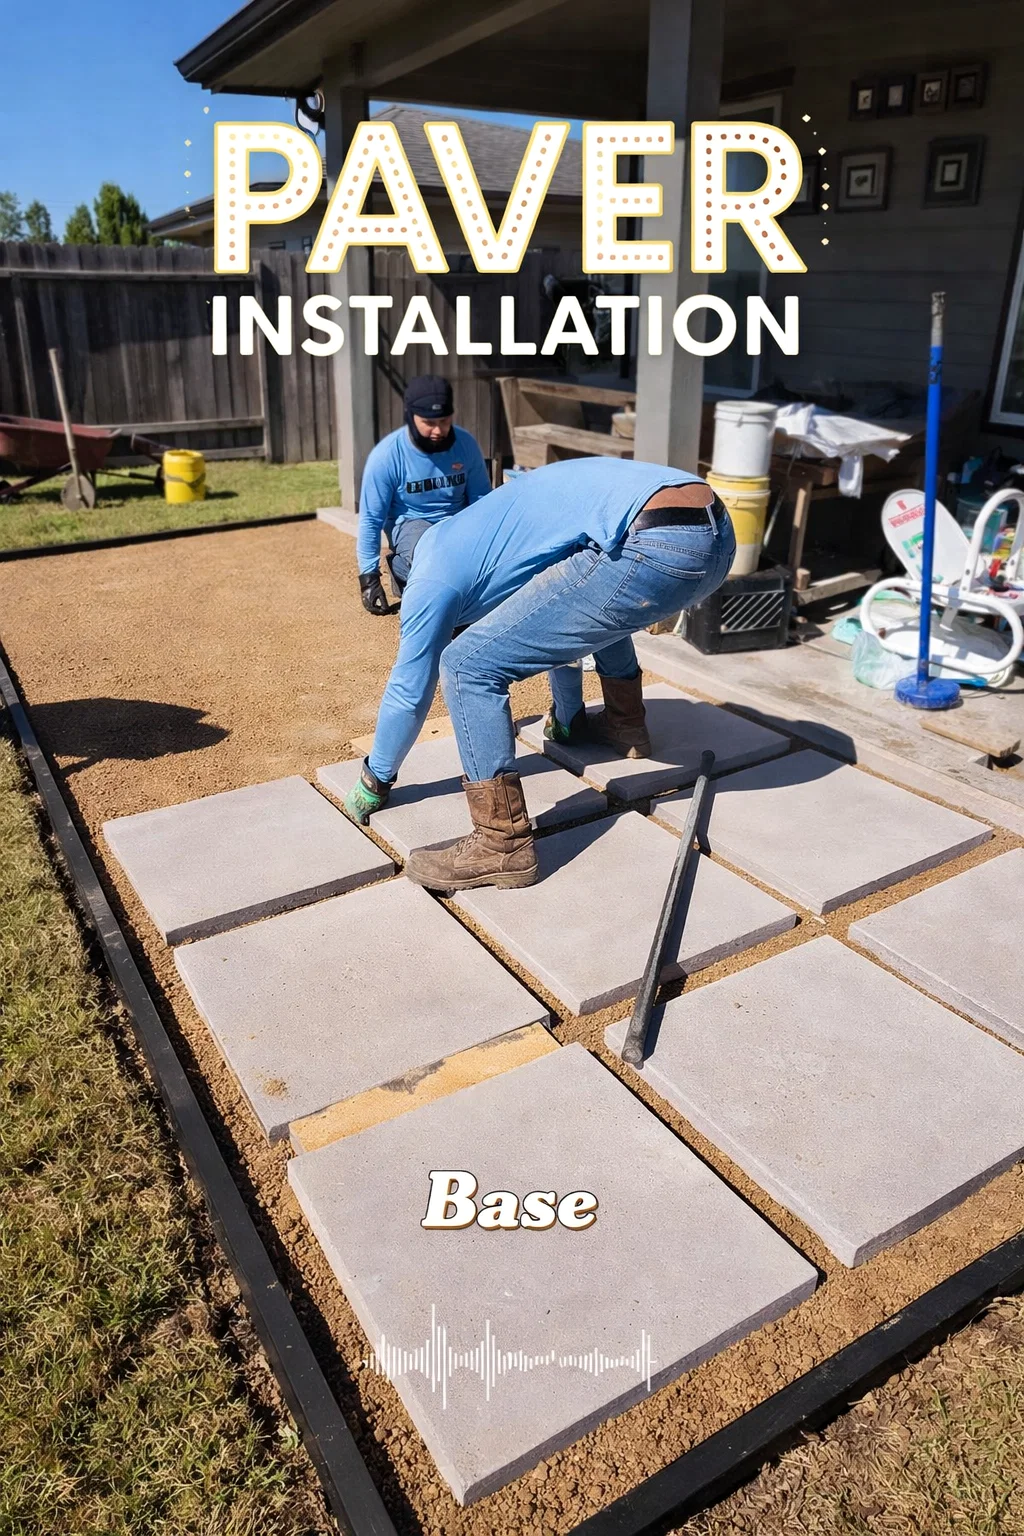
Creating a beautiful outdoor space often feels like a luxury reserved for those with massive renovation budgets, but as you can see from the leveling and laying process in the image, a stunning patio is entirely within reach for the dedicated DIY enthusiast. A backyard patio serves as the foundation for summer barbecues, quiet morning coffees, and evening stargazing. It is an extension of your home that invites you to breathe fresh air without sacrificing comfort. If you have been staring at a patchy lawn or a neglected corner of your yard, it is time to look at the ground beneath your feet and imagine the possibilities of a custom paver installation.
The Foundations of a Budget Friendly Patio
The secret to a patio that looks professional and lasts for decades lies almost entirely in what you cannot see once the project is finished. Many homeowners make the mistake of rushing to the pretty part, which is laying the stones, but the preparation phase is where the real magic happens. By taking the time to excavate properly and create a solid base, you prevent the shifting and sinking that often plagues amateur projects.
A budget friendly approach does not mean cutting corners on materials like crushed stone or sand. Instead, it means doing the labor yourself and choosing smart, oversized pavers that cover more surface area with less effort. When you work with large square pavers, you create a modern, clean aesthetic that feels expansive and high end. This minimalist look is incredibly popular because it complements almost any architectural style, from rustic farmhouses to contemporary suburban homes.
Choosing Your Materials Wisely
When selecting your pavers, consider the weight and the texture. Smooth concrete pavers offer a sleek finish that is easy to clean, while textured stones provide more grip and a natural feel. Buying in bulk from a local landscape supply yard rather than a big box retailer can often save you a significant amount of money. Additionally, choosing a standard size like 16 by 16 or 24 by 24 inches simplifies the math and the physical labor involved in the layout.
Step by Step Preparation and Excavation
Before the first stone is laid, you must clear the area of grass, roots, and debris. This is often the most physically demanding part of the job, but it is also the most rewarding once you see the blank canvas you have created. You should aim to excavate to a depth that accounts for your base layers and the thickness of the paver itself, ensuring the finished surface sits slightly above the surrounding soil to allow for proper drainage.
Proper drainage is the silent hero of any landscaping project. You always want to pitch your patio away from your home at a slight slope. A general rule of thumb is a one inch drop for every eight feet of distance. This ensures that heavy rain travels toward your lawn or garden beds instead of pooling against your foundation.
Creating a Solid Base Layer
Once the dirt is leveled, you will bring in your base material. Most professionals recommend a layer of compacted gravel or crushed stone. This layer provides the structural integrity needed to support the weight of furniture and foot traffic. Using a plate compactor is highly recommended here, as it settles the stone much more effectively than manual tamping. Over this, a thin layer of leveling sand is spread to create a perfectly smooth surface for the pavers to rest upon.
The Art of Laying the Pavers
Now comes the part of the project that truly transforms the yard. Laying the pavers requires a steady hand and a keen eye for detail. As seen in the process of building a modern patio, using spacers or a simple wooden guide can help keep your lines straight and your gaps consistent. It is a rhythmic process that feels incredibly satisfying as the dusty ground disappears beneath beautiful, solid stone.
When placing the pavers, you want to drop them straight down onto the sand rather than sliding them. Sliding the stones will disturb the perfectly leveled sand bed you just worked so hard to create. Once a row is in place, use a rubber mallet to gently tap each stone, ensuring it is firmly seated and level with its neighbors.
Checking for Level and Alignment
Consistency is key. Frequently using a long level across multiple stones will help you catch any high or low spots before they become a problem. If a stone is too high, remove a bit of sand. If it is too low, add a handful. This attention to detail in the middle of the project is what separates a DIY look from a professional grade installation.
Filling the Gaps and Finishing Touches
After all your pavers are laid, you will have small gaps between them. While some people choose to fill these with traditional sand, using polymeric sand is a game changer for long term maintenance. Polymeric sand contains special additives that, when activated with water, harden like glue. This prevents weeds from growing between your stones and keeps ants from making homes underneath your patio.
If you are going for a more “boho” or organic look, you might leave wider gaps and fill them with decorative pea gravel or even low growing groundcover like creeping thyme. This adds a soft, green element to the hardscape and can make a new patio feel like it has been part of the garden for years.
Enhancing the Space with Decor and Lighting
Once the hardscaping is complete, the focus shifts to making the space livable and cozy. A patio is just a floor until you add the elements that make it feel like a room. Think about how you want to use the space. If you love to host, a large outdoor dining table or a modular sectional is a great investment. If you prefer quiet nights, a couple of Adirondack chairs around a fire pit might be the better choice.
Lighting is the most affordable way to add atmosphere. String lights draped from the house to a nearby tree or fence create an instant “cafe” vibe that makes any evening feel special. Solar powered path lights or lanterns tucked into nearby planters add layers of light that make the space feel safe and inviting after the sun goes down.
Incorporating Greenery and Soft Elements
To soften the edges of your new stone patio, bring in plenty of plants. Large ceramic pots filled with ornamental grasses, colorful flowers, or even a small herb garden can define the boundaries of your outdoor room. Outdoor rugs are another excellent way to add color and a soft place for bare feet to land. These small additions bridge the gap between the indoors and the outdoors, creating a seamless transition for your family.
Maintenance Tips for a Lasting Patio
A well built patio is low maintenance but not “no” maintenance. Every year or two, it is a good idea to give the surface a thorough cleaning with a power washer to remove any built up dirt or moss. If you used polymeric sand, check the joints to see if any areas need a quick touch up. Sealing your pavers is another option that can protect the color from fading in the sun and make the surface more resistant to stains from food or oil.
By staying on top of these small tasks, you ensure that your backyard retreat remains a beautiful and functional part of your home for a long time. It is a rewarding cycle of work and play that begins with a few stones and a bit of sweat equity.
Conclusion and Inspiration
Building your own patio is a significant undertaking, but as the visual evidence shows, the results are deeply transformative. It is about more than just adding value to your property; it is about creating a place where memories are made. Whether you are flipping burgers on a Saturday afternoon or sitting in silence with a book, your new patio provides the perfect backdrop for the best parts of life.
Do not be intimidated by the scale of the project. Break it down into manageable steps, from excavation to the final sweep of the sand. Before you know it, you will be sitting on your own handiwork, enjoying the rewards of your labor. The dream backyard you have always wanted is just a few pavers away. So, grab a shovel, find your level, and start building your own slice of outdoor paradise today.