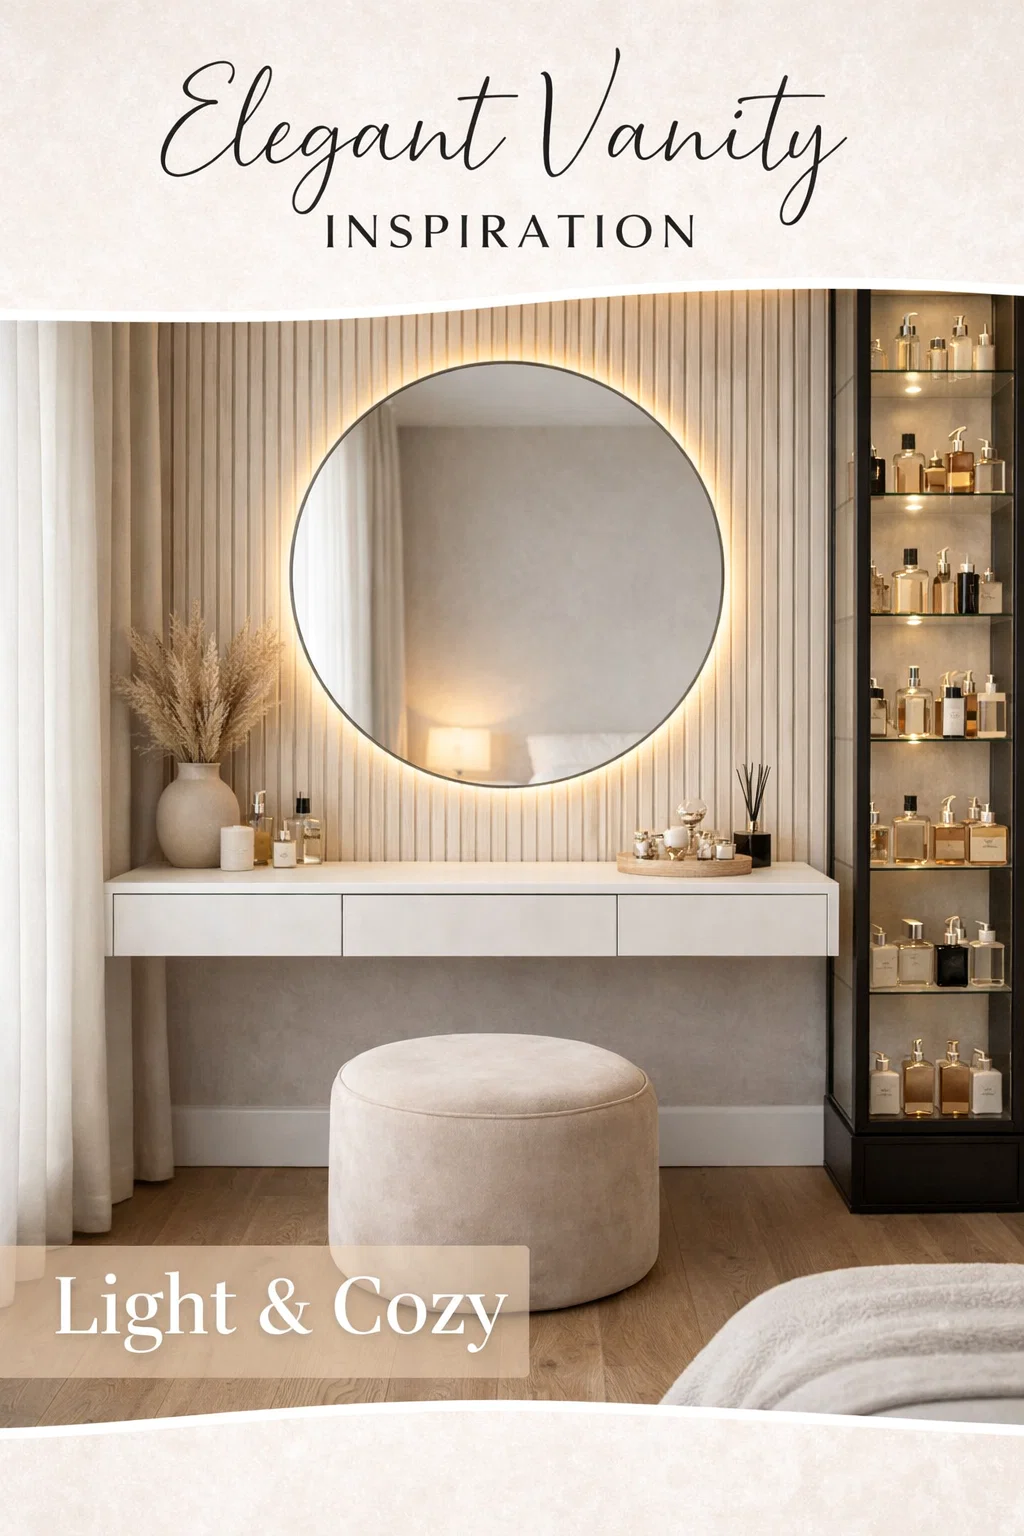
Creating a dedicated space for self-care and beauty is more than just a home improvement project. It is about crafting a sanctuary where you can start your day with confidence and end it with relaxation. The image of this stunning floating vanity setup represents the pinnacle of modern interior design, blending minimalism with high-end luxury. By lifting the furniture off the floor and utilizing vertical space, this design achieves a weightless aesthetic that makes even smaller rooms feel expansive and sophisticated. In this guide, we will explore how to recreate this exact look, focusing on the harmony between textures, lighting, and functional organization.
The Aesthetic Power of a Floating Vanity
The centerpiece of this design is the floating vanity desk. Unlike traditional dressing tables with bulky legs that can make a room feel cluttered, a wall-mounted unit creates an uninterrupted flow of flooring. This visual trick is essential for maintaining a clean, contemporary vibe. The crisp white finish of the desk provides a neutral base that allows other design elements, like the wood paneling and the plush seating, to stand out. Beyond the looks, a floating vanity is incredibly practical for cleanliness, as it eliminates those hard-to-reach dust bunnies that usually collect around furniture legs.
Choosing the Right Materials and Finish
To achieve the look in the image, you should opt for a matte or satin finish rather than high-gloss. Matte surfaces diffuse light beautifully and are much more forgiving when it comes to fingerprints and makeup smudges. The three-drawer configuration shown here is ideal for categorizing your essentials. You can keep your daily skincare in one drawer, color cosmetics in the second, and hair accessories in the third. This keeps the surface clear, which is the golden rule of minimalist design.
Transforming Walls with Wood Slat Paneling
One of the most striking features of this setup is the floor-to-ceiling wood slat wall. This architectural detail adds verticality to the room, drawing the eye upward and making the ceiling appear higher. The light oak or birch tones bring a much-needed warmth to the space, prevents the white furniture from looking too clinical. Wood slats also provide an excellent acoustic benefit, dampening echoes and creating a quieter, more peaceful environment for your morning routine.
Installing Slat Walls for a Professional Look
If you are planning a DIY version of this wall, look for pre-finished acoustic slat panels. These often come with a dark felt backing that provides a beautiful contrast behind the wood strips. Ensuring the panels are perfectly level is crucial, as any slight tilt will be magnified by the long vertical lines. When paired with the floating vanity, the slats act as a textured backdrop that frames the entire station like a piece of art.
Mastering the Glow with Backlit Mirrors
Lighting is the most critical element of any vanity, and the oversized circular mirror with integrated backlighting is a game changer. Traditional overhead lighting often casts harsh shadows on the face, making it difficult to apply makeup evenly. A backlit mirror, however, provides a soft, diffused halo of light that illuminates the face from all angles. The circular shape breaks up the rigid straight lines of the wall slats and the vanity, adding a sense of organic balance to the composition.
Smart Lighting Features to Consider
When selecting a mirror for your vanity, look for models that offer adjustable color temperatures. You want the ability to switch between cool white light, which mimics daylight for daytime makeup, and warm amber tones for a relaxing evening skincare routine. Many modern mirrors also come with touch-sensitive dimmers and anti-fog technology, which is a bonus if your vanity is located near a bathroom.
Luxury Storage Solutions: The Glass Display Case
While the vanity drawers hide the clutter, the tall glass display cabinet on the right serves as a “perfume bar” and a showcase for high-end products. This element adds a boutique feel to the room. Storing fragrances and luxury lotions in a glass-fronted case protects them from dust while turning your collection into a decorative feature. The internal LED spotlights within the cabinet ensure that every bottle sparkles, contributing to the overall high-end hotel atmosphere.
How to Style Your Display Case
- Group by Height: Place taller bottles at the back and smaller jars at the front to create depth.
- Color Coordination: Arrange products by bottle color or brand for a more cohesive and professional look.
- Less is More: Avoid overstuffing the shelves. Leaving a bit of “white space” between items makes the display feel curated rather than cluttered.
The Finishing Touches: Texture and Accessories
The difference between a nice room and a professionally designed space often lies in the textures. The velvet mushroom-style ottoman in the image provides a soft, tactile contrast to the hard surfaces of the wood and glass. Its neutral beige tone keeps the palette sophisticated. Additionally, the use of pampas grass in a ceramic vase adds an organic, “boho-chic” element that softens the modern edges of the vanity. These small details ground the design and make it feel lived-in and cozy.
Selecting Functional Decor
On the vanity surface itself, keep accessories to a minimum. A small gold tray can hold your most-used jewelry or a signature scent. Reed diffusers are a great addition, as they provide a constant, subtle fragrance that enhances the sensory experience of the space. Always choose containers that match the room’s color story, such as whites, creams, and brushed golds.
Ergonomics and Layout Planning
Before you start drilling holes in your wall, consider the ergonomics of the space. The height of a floating vanity should be tailored to your height and the height of your stool. Generally, a height of 28 to 30 inches from the floor to the top of the desk is standard. Ensure there is enough legroom underneath so you can sit comfortably without your knees hitting the drawers. Since there are no legs to navigate, you have more freedom to choose a wider stool or even a small armchair if space permits.
Managing Cables and Cords
A common mistake with floating furniture is leaving messy cables hanging down. To keep the look as clean as the one in the photo, you should plan for recessed outlets behind the vanity or use cord covers that can be painted to match the wall. If you are installing a backlit mirror, try to have the electrical connection hidden directly behind the mirror’s mounting point for a seamless, “cordless” appearance.
Why This Design Works for Every Home
The beauty of the minimalist floating vanity is its versatility. Whether you live in a compact city apartment or a sprawling suburban house, this layout can be adapted. In a small room, it keeps the floor visible, which prevents the furniture from “eating” the space. In a larger suite, it creates a designated zone for self-care that feels like a private retreat. It is a timeless look that prioritizes quality over quantity, focusing on a few high-quality pieces rather than a room full of mismatched furniture.
Creating a Ritual Around Your Vanity
Once your vanity is set up, it becomes more than just a place to put on mascara. It becomes a place for a ritual. Having a beautiful, organized environment encourages you to take those extra five minutes for a face massage or to sit quietly while your moisturizer sinks in. When your surroundings are orderly and aesthetically pleasing, your mind often follows suit. This design isn’t just about home decor; it is about investing in your daily well-being.
Conclusion: Bringing the Vision to Life
Transforming a corner of your bedroom into a high-end vanity station is one of the most rewarding interior design projects you can undertake. By combining a sleek floating desk, the warmth of wood slat panels, and the functional brilliance of a backlit mirror, you create a space that is both practical and breathtakingly beautiful. Remember to focus on the balance of light and texture, and don’t be afraid to display the items that bring you joy. With careful planning and an eye for detail, you can turn this inspiration into a reality that enhances your home and your daily routine for years to come. It is time to stop dreaming about that perfect getting-ready nook and start building it.