Transforming your backyard into a personal sanctuary for wildlife is one of the most rewarding hobbies you can undertake. It is a journey that connects you with nature right at your doorstep, offering a front row seat to the delicate beauty of local songbirds. While store bought bird accessories are functional, there is a special kind of magic that comes from creating something yourself. Today, we are exploring a project that perfectly blends vintage charm with ecological purpose: the DIY tea cup bird feeder. This project is a celebration of upcycling, proving that with a little imagination, even the most forgotten kitchenware can find a second life as a garden centerpiece.
The Aesthetic Appeal of Upcycled Garden Decor
There is a growing movement toward cottagecore and vintage inspired aesthetics in modern landscaping. People are moving away from mass produced plastic items and searching for pieces that tell a story. A tea cup bird feeder fits this niche perfectly. It brings a sense of nostalgia and whimsy to your outdoor space, reminiscent of a secret garden or a classic English tea party. The floral patterns, delicate porcelain, and elegant curves of a tea cup provide a stunning contrast to the raw, organic textures of bushes and trees.
Beyond the looks, upcycling is a powerful statement of sustainability. Every tea cup rescued from a thrift store or a dusty attic is one less item headed for a landfill. By repurposing these items, you are participating in a circular economy that values craftsmanship and longevity. This hobby is not just about making something pretty; it is about being a conscious creator who respects the environment while enhancing it.
Materials You Will Need for Your Project
One of the best things about this project is that it does not require a massive workshop or expensive power tools. Most of the items you need are likely already in your home or can be found for a few dollars at a local charity shop.
- A Tea Cup and Saucer: Look for matching sets or mix and match for a more eclectic look. Ensure they are free of deep cracks that could break under the weight of a bird or the pressure of freezing water in winter.
- High Strength Adhesive: You need a glue that is waterproof and can withstand temperature fluctuations. Clear silicone or E6000 are popular choices among crafters.
- Hanging Hardware: You can use a metal chain, a sturdy twine, or even a decorative ribbon. If you want to hang it exactly like the image, a small metal eye hook or a specialized saucer hanger will work best.
- Bird Seed: A high quality mix containing sunflower seeds, millet, and cracked corn will attract a wide variety of feathered friends.
Choosing the Perfect Tea Cup
When selecting your porcelain, think about the birds you want to attract. Smaller birds like chickadees, finches, and wrens will love the delicate proportions of a standard tea cup. Look for cups with wide handles, as these provide an extra place for birds to grip or for you to loop your hanging chain through. Floral motifs, particularly those featuring roses, lilies, or wildflowers, tend to blend beautifully with garden greenery.
Step by Step Guide to Crafting Your Feeder
Creating this feeder is a simple process, but patience is key, especially when it comes to the drying time for your adhesive. Follow these steps to ensure a long lasting and safe feeder for your backyard visitors.
Step 1: Clean and Prep
Before you even open your glue, ensure that both the cup and the saucer are bone dry and free of any oils or dust. Use a bit of rubbing alcohol on the areas where the two pieces will meet. This ensures the strongest possible bond. Any residue left on the porcelain can cause the glue to fail over time, especially when exposed to rain or humidity.
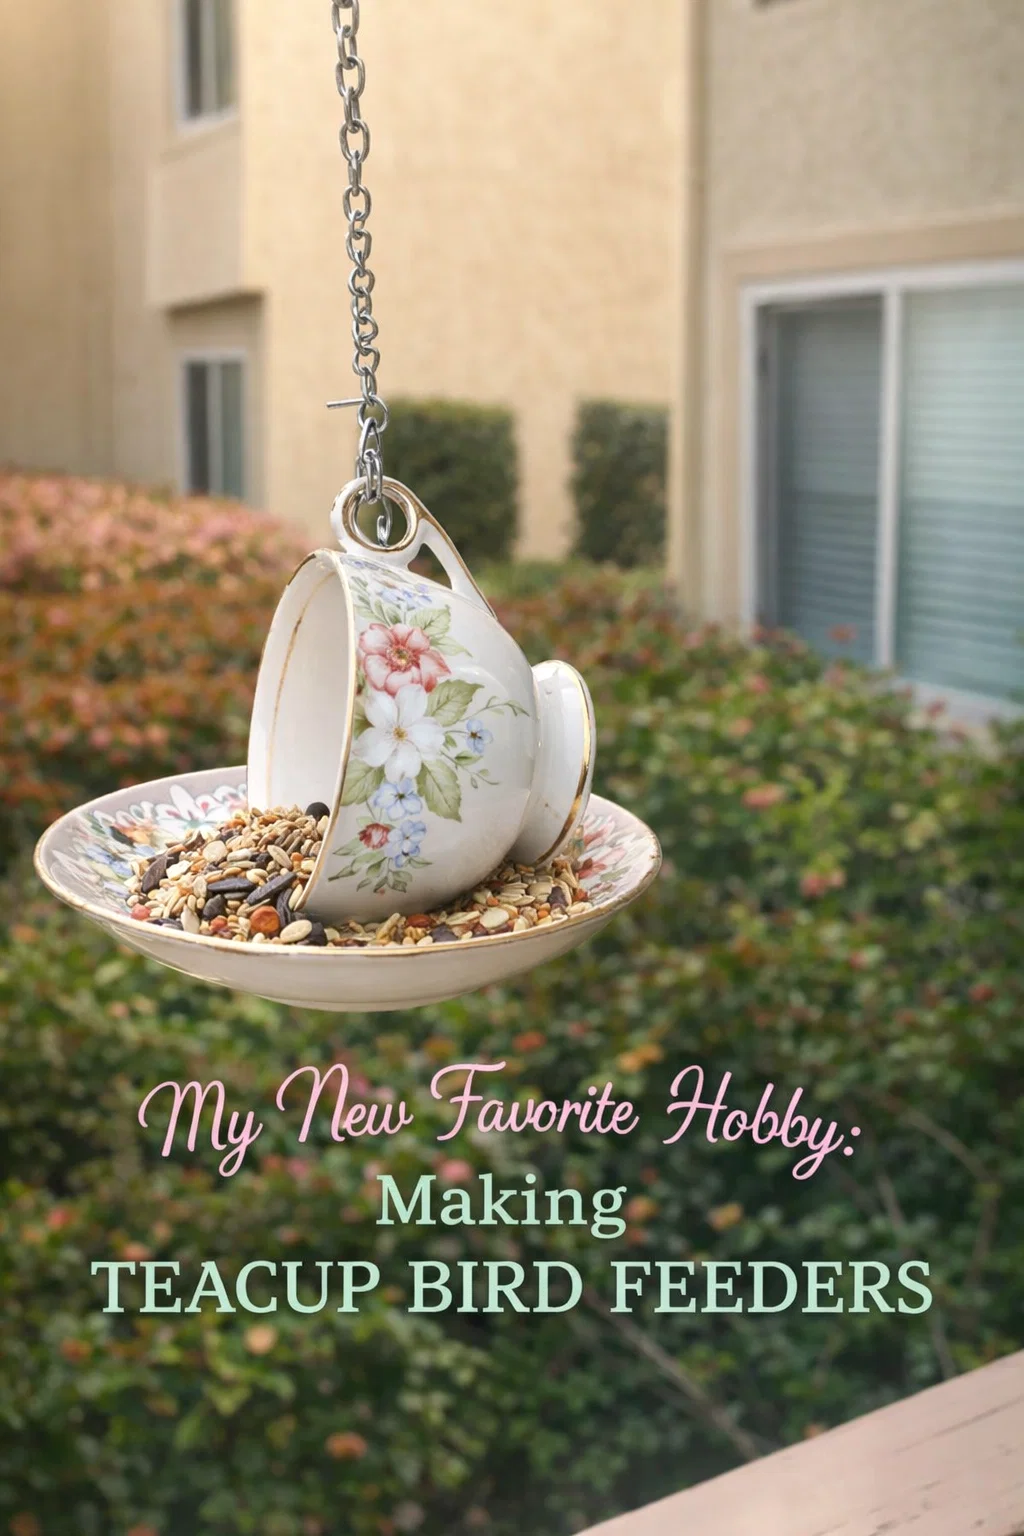
Step 2: Positioning for Gravity
In the image we analyzed, the tea cup is placed on its side. This is a brilliant design choice because it protects the bird seed from light rain and creates a natural “spill” effect onto the saucer. Position the cup so the handle is facing upward or slightly to the side. The handle will serve as the primary attachment point for your hanging chain. Apply a generous bead of adhesive to the side of the cup and press it firmly onto the center of the saucer.
Step 3: The Curing Process
This is the part many crafters skip, but it is the most important. Most industrial strength glues require at least 24 to 48 hours to fully cure. Do not attempt to hang the feeder or add seed until the glue is completely set. Place a small weight inside the cup if necessary to keep it from shifting while it dries.
Hanging and Placement Strategies
Where you put your feeder is just as important as how you make it. Birds need to feel safe from predators while they eat. If a feeder is too low, cats might be able to reach it. If it is too far in the open, hawks may have a clear line of sight.
Height and Visibility
Aim to hang your tea cup feeder at least five feet off the ground. This keeps it out of reach of most ground based predators. Placing it near a bush or a tree is a great idea, as it gives birds a place to hide quickly if they feel threatened. However, make sure it is far enough away from branches that a squirrel cannot simply leap onto it and knock it down.
Stability Matters
Since tea cups are relatively light, they can swing significantly in high winds. Using a sturdy metal chain, as seen in the inspiration photo, provides more stability than thin string. If you live in a particularly windy area, you might consider mounting the saucer to a wooden post instead of hanging it.
Maintaining Your Tea Cup Bird Feeder
To keep your local bird population healthy, maintenance is a must. Bird feeders can unfortunately become breeding grounds for bacteria if they are not cleaned regularly. Because these feeders are made of glazed ceramic or porcelain, they are actually much easier to clean than wooden feeders.
Regular Cleaning Routine
Every week or two, empty out any leftover seed and wash the cup and saucer with warm, soapy water. If you notice any mold or stubborn debris, a diluted bleach solution (one part bleach to nine parts water) can be used to disinfect the surface. Just make sure to rinse it thoroughly and let it dry completely before refilling it with seed.
Weather Protection
During extreme weather, such as heavy snowstorms or hail, it might be a good idea to bring your tea cup feeder inside. While ceramic is durable, the expansion and contraction of ice can sometimes stress the adhesive bond or even crack the porcelain if water gets trapped in small crevices.
The Joy of Bird Watching as a Hobby
Once your feeder is up and the birds start arriving, you will find that bird watching is an incredibly meditative and educational activity. It encourages you to slow down and observe the subtle changes in the seasons and the behavior of different species. You might start noticing that certain birds visit at the same time every morning, or that some species are much bolder than others.
Keeping a small journal near the window where you view your feeder can add another layer of enjoyment to the hobby. You can track which types of seeds attract which birds and watch as fledglings join their parents at the saucer in the late spring. It is a wonderful way to teach children about biology and the importance of caring for our environment.
Conclusion: A Small Project with a Big Impact
The DIY tea cup bird feeder is more than just a craft; it is a bridge between the human world and the natural world. It takes items that were once destined for a cupboard and puts them in the spotlight of the garden, providing essential nutrients to wildlife in the process. This project proves that you do not need a large budget or professional skills to make a meaningful difference in your local ecosystem.
Whether you are making one for your own porch or crafting a set to give as thoughtful, handmade gifts, these feeders are sure to bring a smile to anyone who sees them. So, the next time you pass by a stack of vintage dishes at a garage sale, look closer. You might just be looking at the next favorite hangout spot for the birds in your neighborhood. Grab your glue, find a beautiful chain, and start building your own whimsical bird sanctuary today.