Welcome to the ultimate solution for redefining your home without a sledgehammer. As open-plan living continues to dominate modern home design, homeowners face a persistent challenge. The expansive, airy layout that feels so liberating also creates vast, undefined spaces that can sometimes lack intimacy, structure, and character. We want the connection and light of an open floor plan, but we also secretly desire dedicated nooks for relaxation, work, and dining. The traditional answer—building permanent, light-blocking walls—is often an expensive, inflexible mistake.
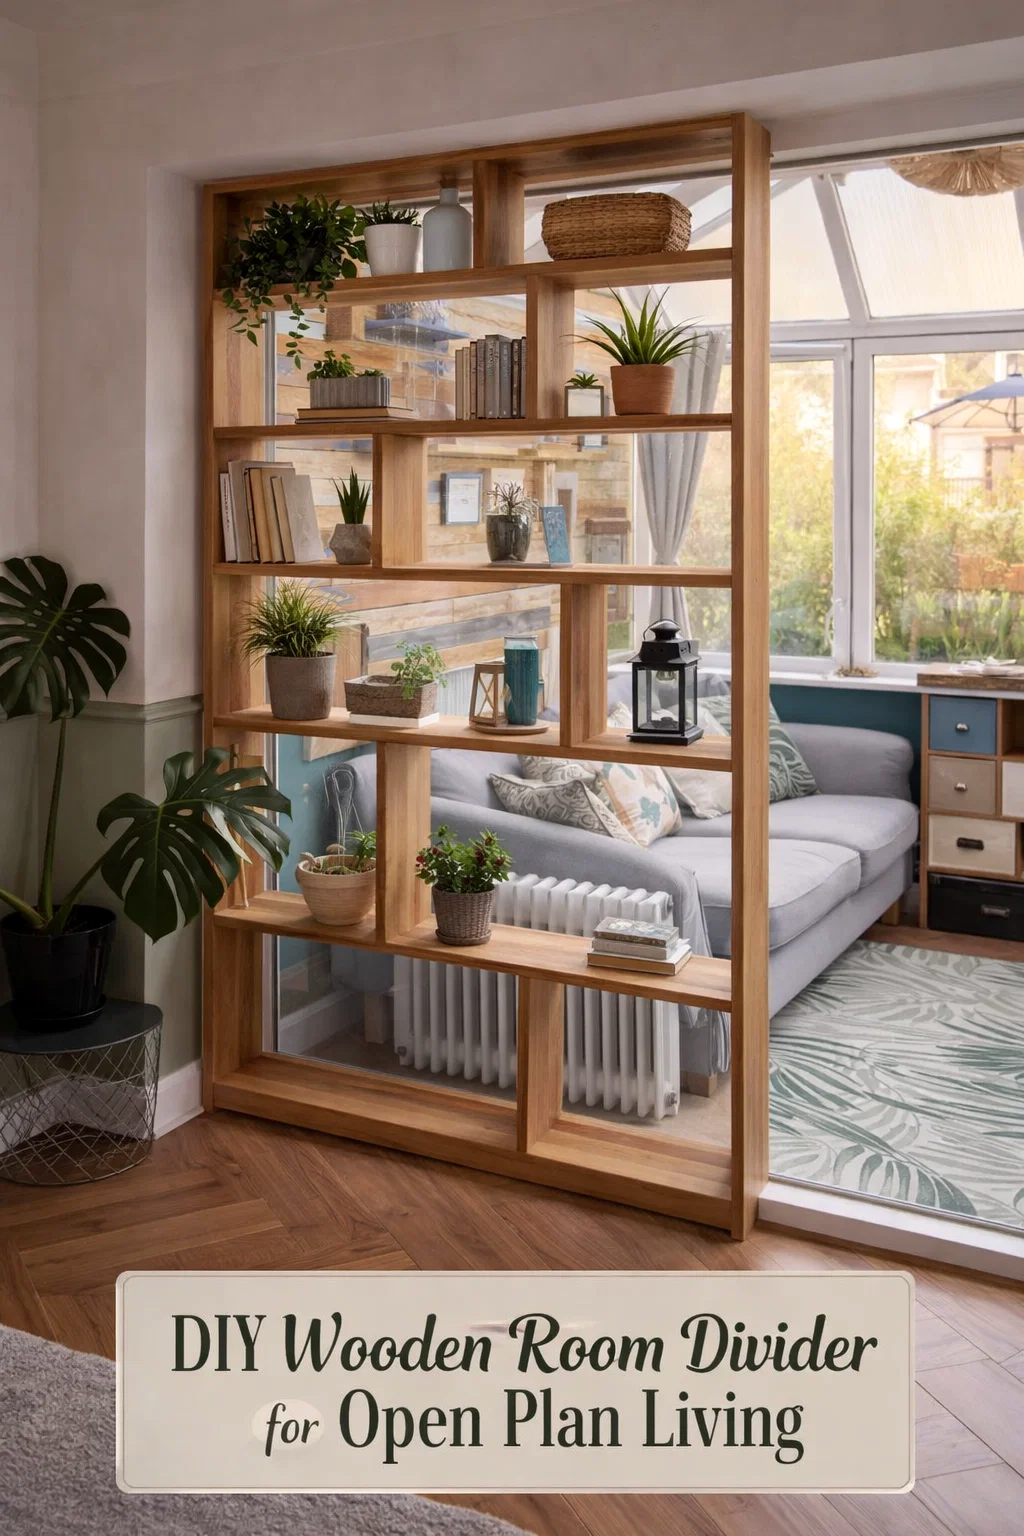
Enter the hero of the hour: the floor-to-ceiling wooden room divider and shelving unit, inspired by the beautiful piece shown in our image. This isn’t just a solution for separation; it’s an opportunity for integration, organization, and stunning aesthetic enhancement. By creating a DIY wooden room divider, you can achieve the best of both worlds—retaining the spacious feel of an open home while defining distinct zones with purposeful, personal design.
In this post, we’ll dive deep into why this specific type of divider works, how to plan your own DIY masterpiece, styling tips to make it a showstopper, and the fundamental principles of making an open-plan home feel both grand and cozy. Let’s unlock the potential of your living space.
The Magic of Transparent Division: Why This Setup Works So Well
When you look at the example image, the success isn’t an accident. This particular wooden room divider works because it embraces transparency. It isn’t a solid wall, nor is it a simple screen. It is an intricate lattice of open shelves that allows light to pass through and views to connect the spaces.
Traditional room dividers—like folding screens—offer immediate, temporary privacy but often act as visual dead ends, making a space feel smaller. A solid drywall partition would solve the zoning issue but at the cost of the entire room’s natural flow and light. This open-shelf design solves all these problems simultaneously:
- Preserves Light Flow: The entire wall of windows and the conservatory roof behind the divider continue to flood the main living area with natural light. The spaces are functionally separate but visually continuous.
- Retains the Open Feel: You can see through the shelves, which maintains the perspective of a large, unbroken room. The boundary is implied, not enforced by a barrier.
- Adds Three-Dimensional Depth: Rather than a flat surface, you get a textured, sculptural element that adds visual interest and a sophisticated sense of layering.
- Maximizes Functionality: Most significantly, it isn’t just a divider; it’s massive, invaluable, floor-to-ceiling storage and display space, turning what could be dead space into a central design feature.
Creating a Physical and Visual Anchor
An open-plan area often needs an anchor—a focal point that commands attention and provides a sense of gravity. In this image, the large-scale wooden structure does exactly that. It’s a statement piece. The warm wood tones contrast beautifully with the cool gray sofa and the painted walls, making the entire zone feel intentional rather than scattered.
Your DIY Game Plan: Structuring Your Wooden Room Divider Project
Are you feeling inspired to tackle this yourself? A project of this magnitude is ambitious but incredibly rewarding. Let’s break down the essential steps to turn this idea into reality. The key to a successful, professional-looking DIY room divider is meticulous planning, especially because you are effectively building furniture that will span a large vertical and horizontal plane.
Step 1: Detailed Measurement and Zoning
Before you even look at wood species, you need to measure your space three times. Start by defining exactly where the divider will go. Use masking tape on the floor and wall to map it out. This helps you visualize its impact and ensure it doesn’t block essential paths. Measure the precise floor-to-ceiling height in several spots, as floors are rarely perfectly level.
This is where your zoning strategy comes in. Are you dividing a kitchen from a living room? A living room from a workspace? In the example image, the divider separates a core seating area from a brighter, sunroom-like space. The large Monstera plant on the left further softens the transition, creating a multi-layered boundary.
Step 2: Customizing Your Design (The Layout)
This is the fun part. The design in the image uses a mix of long, continuous horizontal shelves interspersed with vertical dividers that are artfully misaligned. This asymmetry is crucial for a modern, artisan feel. A perfectly symmetrical grid would look more like industrial shelving.
Consider the items you want to display. If you have tall plants, create a few larger, open-height sections. If you need a lot of book storage, design some standard bookshelf-height zones. The layout should be bespoke to your needs.
This is also the moment to plan for integration. In the image, we can see a radiator. Notice how the lower shelves of the divider have been designed with open space around and below them to allow for the radiator, demonstrating clever customization. This level of thinking is what makes a DIY project successful.
Step 3: Material and Joinery Decisions
A structure this large needs to be sturdy. Materials matter. Solid wood (like oak, ash, or a sturdy pine) is best for the main frame. While more expensive, it provides the structural integrity required to span a high vertical space. For the intermediate shelves, you could consider high-quality plywood edge-banded with a matching veneer for a clean finish, but a consistent material like solid pine (as likely seen here) provides the most unified look.
Joinery is the difference between a divider that wobbles and one that feels like part of the house. While pocket screws (like with a Kreg Jig) are common in DIY, for something of this scale, you might want to consider stronger, more classic techniques. Dado or rebate joints (cutting a groove in the uprights for the shelves to slot into) are exceptionally strong. If you’re a beginner, a robust structure can be built using heavy-duty L-brackets that are hidden on the underside of the shelves, but for a high-end finish, traditional joinery wins.
Styling and Curating Your Divider for Maximum Impact
The build is only half the battle. Once you have your grand wooden structure, how do you make it look and feel curated, rather than just full of stuff? The art of styling or “vignette creation” on these shelves is critical. The example image provides an excellent blueprint for how to balance form and function.
A Lesson in Balance and Negative Space
The single most important rule is: don’t overfill the shelves. You must embrace negative space. The open spaces are just as important as the objects. It allows the wooden structure to breathe and prevents the divider from becoming a monolithic clutter trap.
In the image, we see a masterclass in variety. Every section of shelving is treated as its own small composition, yet they all work together.
- The Living Touch: Plants are used throughout the shelves at different levels, from small succulents in simple pots (middle shelves) to trailing ivies (top shelf). The presence of living greenery on almost every shelf level connects the interior space directly to the garden view beyond, enhancing the divider’s role as a connection point.
- The Human Touch: Books are placed both vertically and stacked horizontally. A stack of horizontal books provides a great base for another object, like a small pottery bowl. The personal items—photographs or small framed prints—are kept to a minimum and positioned deliberately. A unique lantern provides another touch of ambiance.
- The Functional Touch: Note the woven storage basket on the top right. Using attractive baskets allows you to store less-than-perfect everyday items (like remote controls, charging cables, or toys) while maintaining the visual aesthetic. This is practical zoning at its finest.
- Variety of Heights and Materials: The arrangement mixes a tall, narrow vase with low, wide bowls. The textures vary from pottery and terracotta to glass and woven wood. This constant shift in shape, height, and material keeps the eye moving and engaged.
The Importance of Color Matching
Observe the color palette used in the display. The tones are organic and earthy: natural wood, greens, simple whites, blacks, and neutral pottery. This complements the existing space (the cool gray sofa, the green-painted wall) without competing. By limiting the color palette on the shelves to a defined set of complementary neutrals and greens, the entire display feels cohesive rather than chaotic. The blue and colorful dresser behind the divider on the right provides a different pop of color, showing how multiple styles can coexist.
Bringing it All Together: Designing a Harmonious Open-Plan Home
Building and styling a grand wooden room divider like this is not an isolated task; it’s a critical part of a successful open-plan living strategy. Your goal is to create defined areas that feel like distinct “rooms” within a single volume of space, but which still retain their connection and flow. Here is how this divider contributes to that grand strategy.
Zoning Through Light and Air
Notice how the area behind the divider (with the radiator and sunroom view) feels like a quiet retreat, a secondary “study” or reading nook, while the area in front (with the sofa) is the more formal living space. By using a divider with open shelving, you’ve not just created two spaces—you’ve created two distinct atmospheres. One is a bit cozier and shaded, and the other is light-drenched and peaceful. This is a much more sophisticated approach to home design than just placing a solid furniture piece in the middle of a room.
A Foundation of Customization
A DIY project like this is the ultimate act of customization. It’s a statement of personal style. The home in the image feels layered and lived-in. We have the chevron wood floor (parquet style) which provides a rich pattern, the modern Monstera, the painted paneling, and the open-beam effect on the background wall. The custom-built divider acts as the central pillar that unites all these diverse textures and styles into a singular, cohesive vision.
Successful open-plan living is always a conversation between the grand architecture and personal detail. This floor-to-ceiling shelving unit is the perfect example of how to make that conversation happen, creating a home that is both expansive and intimate, functional and beautiful.