Walking into a cluttered workshop can feel like trying to solve a puzzle with half the pieces missing. The creative spark often gets smothered by the sheer frustration of not being able to find a specific screwdriver or a clean roll of tape. However, when you look at a beautifully organized vertical storage system, something clicks. It is more than just aesthetics; it is about reclaiming your mental space and your productivity. By utilizing vertical wall real estate, you transform a cramped corner into a high functioning hub of creativity. The warm tones of natural wood combined with the tactical placement of tools create an environment where you actually want to spend your time.
The Magic of Modular Slatwall Systems
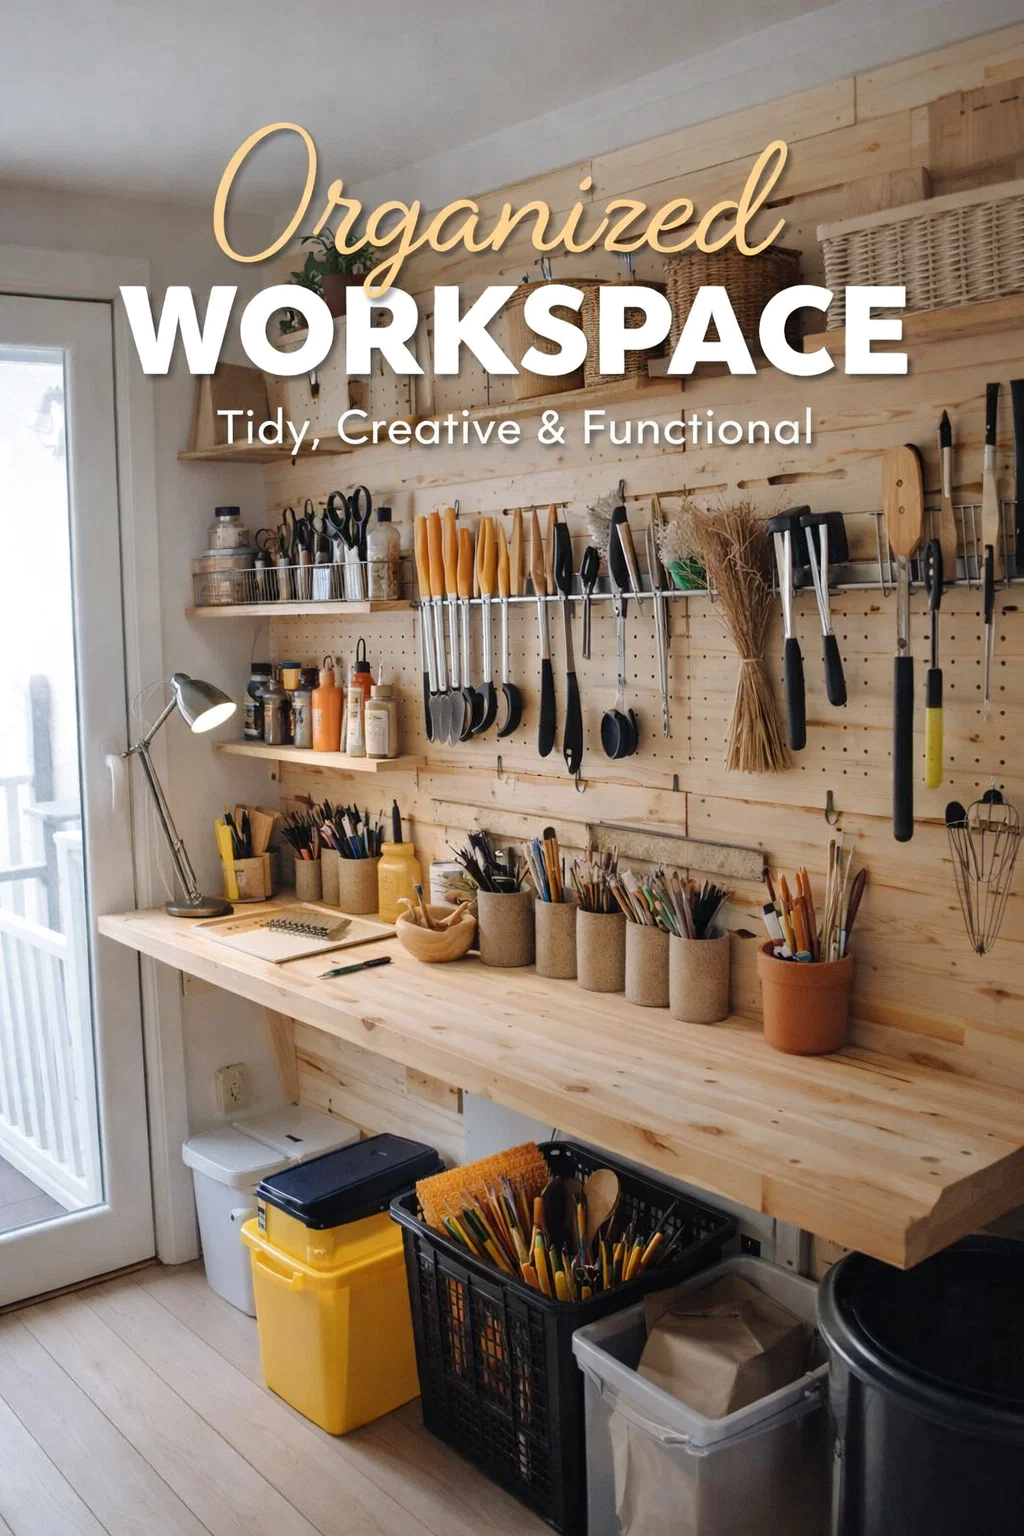
One of the most effective ways to manage a diverse collection of tools is through a modular slatwall system. Unlike a traditional pegboard, which can sometimes feel flimsy or limited in weight capacity, a wooden slatwall offers a robust and stylish alternative. Each horizontal slat acts as a mounting point, allowing you to slide in shelves, hooks, and specialized bins. This flexibility is vital because your workshop is a living thing. Your needs today will likely be different from your needs six months from now as you take on new hobbies or professional projects.
The beauty of the setup shown in the image lies in the repetition of the wood grain, which provides a cohesive backdrop. It prevents the space from looking chaotic, even when dozens of different tools are on display. By choosing a light, natural finish, you also help reflect light throughout the room, making the workspace feel larger and more inviting. This is a crucial design element for basement or garage workshops where natural light might be limited.
Maximizing Your Workbench Real Estate
The ultimate goal of any wall storage project is to keep the workbench clear. A workbench is for working, not for storing. When your surface is covered in jars, loose nails, and hand tools, you lose the physical space required to lay out materials or assemble projects. By lifting everything onto the wall, you create a clear zone for execution. Notice how the thick wooden tabletop in this setup remains completely unobstructed, save for the project currently at hand. This separation of storage and action is the secret to a professional grade workflow.
Categorization Strategies for Efficient Tool Retrieval
Organization is not just about putting things away; it is about being able to get them back out in an instant. A professional workshop should follow the three second rule: you should be able to locate and grab any frequently used tool within three seconds. To achieve this, you must categorize your gear logically.
- Hand Tools by Type: Group your pliers, wrenches, and cutters together. Seeing them all in a row allows you to quickly identify the exact size or jaw type you need for a specific task.
- Artistic and Craft Supplies: For those who dabble in mixed media, using jars or cylindrical containers for brushes, pens, and carving tools keeps them upright and prevents damage to the bristles or tips.
- Bulk Items in Baskets: Woven baskets or plastic bins are perfect for items that do not hang well, such as rolls of twine, rags, or large power tool batteries. Placing these on higher shelves keeps them out of the way but still visible.
The Role of Lighting in Organization
You cannot organize what you cannot see. Even the best storage system will fail if it sits in the shadows. When installing a wall system like this, consider the placement of your overhead lighting. Ideally, you want a mix of ambient room light and task lighting that shines directly onto the workbench. Shadows cast by deep shelves can hide smaller tools, so many modern makers are opting to install LED strip lights directly under the storage slats to illuminate the workspace below.
Ergonomics and the Golden Zone
In the world of workshop design, we often talk about the golden zone. This is the area between your waist and your eye level. This space is the most valuable real estate in your workshop because it requires the least amount of physical effort to reach. Your most frequently used items, such as your favorite pair of scissors, your primary hammer, or your measuring tape, should live exactly in this zone.
Items used less frequently can be moved to the higher shelves or tucked into bins under the workbench. For example, the bins at floor level are excellent for scrap wood, recycling, or heavy gardening equipment. By thinking about how often you reach for an object, you can map out your wall to minimize fatigue and maximize speed. This ergonomic approach turns the act of building into a fluid, almost dance-like experience.
Aesthetics Meet Functionality
There is a common misconception that a workshop has to look gritty or purely industrial. On the contrary, a workshop that looks good often performs better. The use of natural materials, like the wicker baskets and wooden slats seen here, softens the environment. It bridges the gap between a sterile laboratory and a messy garage. When you treat your tools with respect by giving them a beautiful home, you are more likely to maintain them and keep the space clean. A well designed room is a psychological cue to do high quality work.
Building Your Own Vertical Storage Wall
If you are inspired to create a similar setup, the process is more approachable than it looks. You can start by sourcing high quality plywood or dimensional lumber. The key is ensuring that the horizontal slats are perfectly level and securely anchored into the wall studs. A workshop wall carries a significant amount of weight, so safety and structural integrity are the top priorities.
Selecting the Right Containers
While the wall provides the structure, the containers provide the detail. Mixing and matching different storage vessels adds character to the space. Glass jars are excellent for seeing small hardware like screws and nails, while ceramic or concrete cylinders offer a modern, weighted base for taller tools. Do not be afraid to repurpose items from other parts of your home. A kitchen utensil holder or a simple office file tray can find a second life in the workshop as a highly functional organizer.
Consider using color as a secondary organizational tool. You might use orange bins for electrical work and black bins for woodworking. This visual shorthand allows your brain to skip the reading phase and go straight to the grabbing phase. It is these small, thoughtful details that separate a basic storage wall from a world class workspace.
Sustainable Workshop Habits
Building the wall is only the first half of the journey. The second half is maintaining it. A common pitfall is the end of day clutter. After a long project, it is tempting to leave everything on the workbench and walk away. However, the true mark of a master craftsman is the reset. Before leaving the room, every tool should return to its designated spot on the slatwall. Because each tool has a specific home, the cleanup process becomes fast and effortless. This ensures that the next time you enter the workshop, you are greeted by a blank canvas and a ready mind rather than a mess from yesterday.
The Benefits of an Open Storage Layout
While closed cabinets are great for hiding clutter, open storage like the one in the image has a distinct advantage: accountability. When everything is visible, you are forced to stay organized. It also acts as a visual inventory. You can tell at a glance if you are running low on a certain material or if a tool has been left elsewhere in the house. This transparency saves money by preventing the accidental purchase of duplicates and saves time by eliminating the need to rummage through drawers.
Conclusion: Your Workspace as a Reflection of Your Craft
At the end of the day, your workshop is a reflection of your inner world. A chaotic space often leads to a chaotic process, while an orderly environment fosters precision and pride in your work. Transitioning to a vertical, modular storage system is one of the best investments you can make in your creative journey. It honors your tools, protects your equipment, and most importantly, provides you with the freedom to focus entirely on the joy of making.
Whether you are working in a small apartment corner or a sprawling dedicated studio, the principles of verticality and modularity remain the same. Start small, focus on your most used tools, and watch as your productivity reaches new heights. An organized workshop is not just a place to store things; it is a launchpad for your next great idea. Take the time to build a space that inspires you, and the quality of your projects will surely follow.